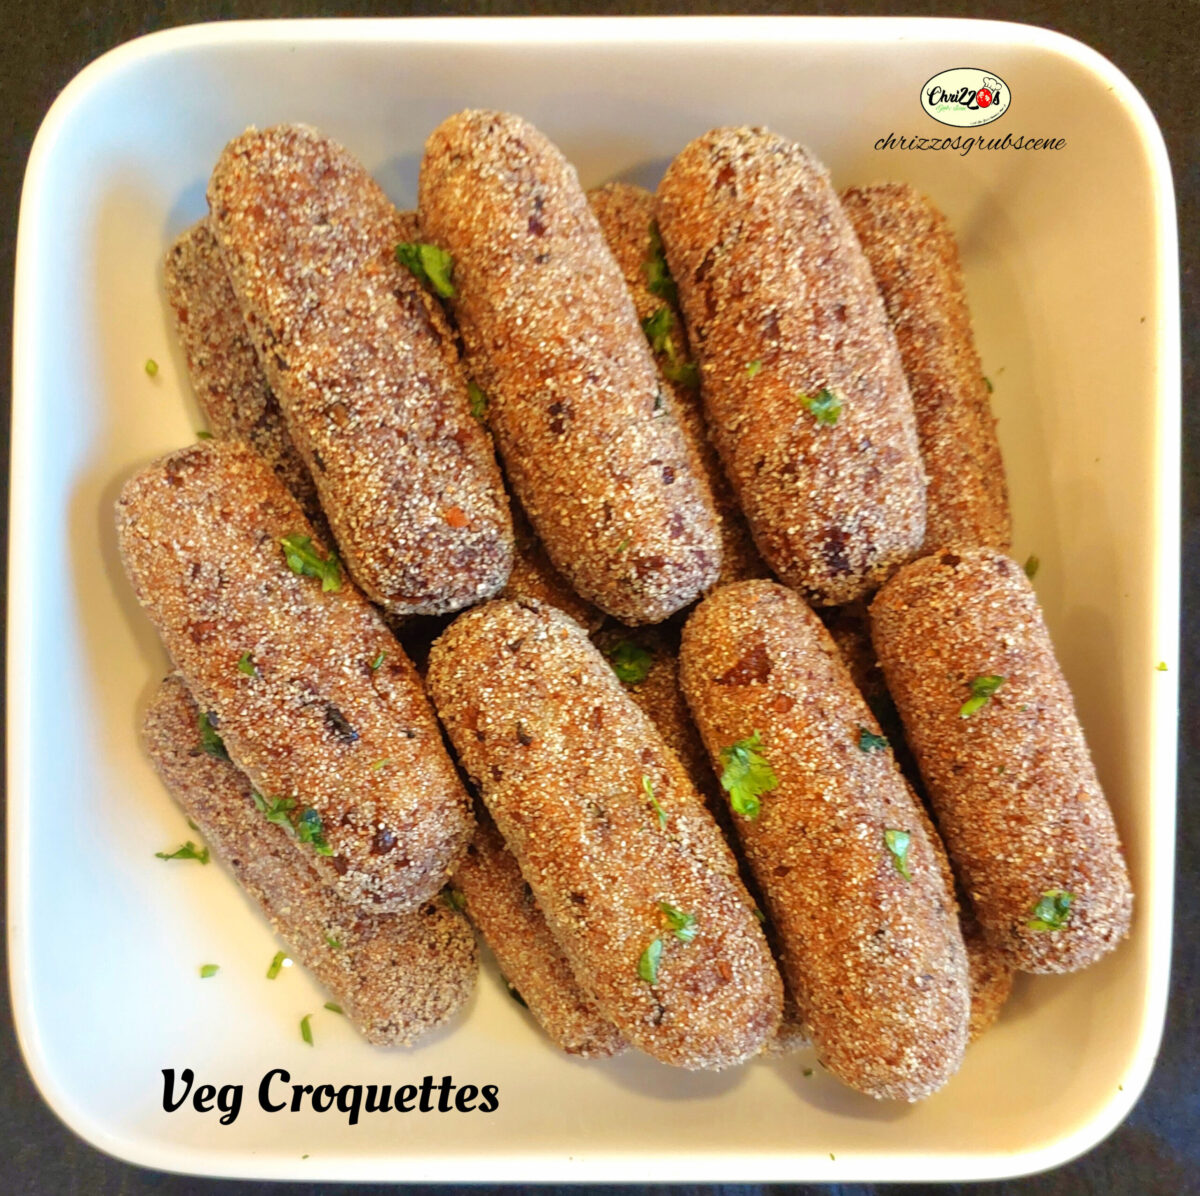
Recent Posts

Recipe for Saucy Pops

Recipe for Saucy Pops

  I was first introduced to these Saucy Chicken Lollipops at our College Canteen in St. Andrew’s, Bandra. I used to wait when that damn bell would ring and I’d run down to the canteen and grab myself two of these most delicious Saucy, Spicy…

Base Recipe for Veggies with Mild Spices

Base Recipe for Veggies with Mild Spices

When you think you've eaten too much of a feast especially after Christmas, New Year, Easter, Birthdays or Anniversaries, you can make this simple vegetable and enjoy it with Hot chapatis. It's light, simple, quick and super delish and requires no side dish.Now that Lent…

Recipe for Mushroom Chilly Dry

Recipe for Mushroom Chilly Dry

Recipe for Mushroom Chilly Dry

Being from a typical Goan Middle class family in Bombay, we never really saw Mushrooms being sold at the local ‘Bhajiwala’ nor did anyone in our neighborhood cook Mushrooms as they used to be super expensive and were always considered as one of the more exotic veggies back in the day. I remember eating Mushrooms lavishly only when my dad used to take us to his Hotel and give us a Burger which had a few pieces of mushrooms in it or a Stir Fry with some Mushrooms in it. We never really cooked Mushrooms at home then.
 
A little later during my teens, I was introduced to Mushroom Chilly Dry when I attended a family wedding and I absolutely loved it. I once randomly heard Sophie,my Sister in law saying that Mushrooms don’t take too long to cook but you have to wash it properly as they grow in the soil. I thought of trying this recipe using my Chicken Chilly Dry recipe and Bang On! It was Deeeeeeliiiiishhhaaasss!
Mushroom Chilly Dry is a superhit for parties and outings especially if you have Vegetarian guests coming over.
However, whenever I make it, I am always shocked to see how my Non Vegetarian guests enjoy this more than the Non-Veg starters. So, I always make a lot more extra or else my Vegetarian guests may have to Sin for a day and nibble on the Non-Veg leftovers 😊😊
 
This is how I make my version of it. Do give it a shot. This dish always earns me extra brownie points at each and every party.
Course Appetizer, Starters
Cuisine Indo-Chinese
Keyword Indo Chinese, Mushroom, Mushroom Chilly
Prep Time 30 minutes
Cook Time 15 minutes
Servings 8 people

Ingredients

  • 500gm Fresh White Button Mushrooms(wash and cut in halves)
  • 2 medium sized onions(cut in quarters)
  • 1 small capsicum(diced large)
  • 10-12spicy green chillies (slit in slants)
  • 20 medium sized garlic cloves
  • 1 Tbspn finely chopped Ginger
  • 2 Tbspn Soy Sauce
  • 2 Tea spoons Red Chilly Sauce
  • 2 Table Spoons Ketchup
  • 1 Tbspn Sugar(you can add more later if required)
  • 1 Tspn Vinegar
  • A pinch of salt
  • 1/4cup oil
  • 2 Tbspn Corn flour + 6 Tbspn Water(mix this in a bowl and make a slury)

Instructions

  • In a Wok, Heat the Oil on high heat and once the oil is Hot, add the Garlic and Ginger. Keep stirring for a minute
    Note: DO NOT wait until the garlic turns brown 
  • Now add the Chillies and keep tossing until the chillies start changing it's colour with a whiteish coating(this will take about 1 minute)
  • Now add the Capsicum and Onion and toss it for just another minute
    Note: Do not overcook the capsicum and onion. It tastes really nice when there's a slight crunch 
  • Add the Mushroom and the Salt and toss.
    (I use salt only to let the Mushroom release it's moisture as we do not use water in this recipe. The mushroom will cook in it's own juices. We do not use alot of salt all at once as the sauces contain a lot of salt already.You can add more salt later if required)
  • Add all the sauces, vinegar and sugar and toss. Ensure each piece of mushroom is coated with the sauces
    Note: Check if you require more Sugar, you can add it at this stage. Sugar will not make the dish sweet but will help to balance the saltiness and will enhance all the flavours. 
    Keep Tossing
  • After about 5-7minutes, pour the cornflour slury slowly and little by little
    Note: before pouring the slury, stir it and immediately pour, because when corn flour slury is kept to rest for a while, the cornflour separates itself from the water and sits at the bottom of the bowl(just like when you argue with your husband and wait for him to apologise, even when it's YOUR fault)
    Do not pour the slury all at once or too quickly or else it will clump up
     
    **Technique of Pouring the slury: Pour the slury with one hand and simultaneously stir the mushrooms with the other or else there will be lumps
    (No! you don't have to be a champion for this. But if you still think you're a 'One Hand Woman' then Ask for help, it won't make you look weak, it really won't 🙂 🙂
  • Mix and Toss everything well for about a minute or two more and turn off the heat. Your super delishaaaaassss Mushroom Chilly Dry is ready to be slurrrrrped!
    Enjoyyyyy this super yum Mushroom Chilly as a starter or pair it with some fried rice or hakka noodles! Your family/guests will love it.

If you like my recipe, don’t forget to “like” & “share”it with your friends and family. And once you’ve tried my recipe, request you to kindly share your valuable feedback with me. I'd Love to hear from You 🙂

    Notes

    Some Gyaan:
    **Note: if you're going to eat it immediately, you can also throw in some chopped spring onion leaves, it tastes really good. The only draw back about Spring Onion is that the dish doesn't remain fresh for too long, it tends to get spoilt as we do not fully cook the spring onion. So, if you're adding spring onion, you can add it towards the end, just before turning off the heat.But ensure you consume the dish immediately, within 4-5hours
    **Instead of Mushroom, You can also use Paneer or Chicken Franks
    **You can use different coloured Bell Peppers/Capsicum. It will give the Mushroom Chilly a nice colourful look
    **I prefer cutting the mushrooms in halves as it maintains its moisture and crunch. Mushrooms shrink when cooked. so if you cut it smaller, it will become even smaller after they are cooked. Also, the smaller/finer you cut mushrooms, the more moisture will it release. It was My Nephew Jaden who gave me this suggestion to cut the Mushroom in halves instead of quarters or slices
    **Add the salt only after the mushrooms go in as the salt helps the mushroom release it's juices
    **Let the heat/flame be High at all times. If the heat is low, the capsicum and onions and also the Mushroom will release it's moisture and when you cook it further in order to evaporate the the juices, everything will get overcooked and will change the whole taste and texture of the dish
    **Most Important Note: DO NOT forget to turn on your Exhaust or else your entire family will be Smoking on Mushrooms 🙂 🙂
    Recipe for Caldine Masala

    Recipe for Caldine Masala

    At home, We call Caldine “Sweet Curry” as this is a very mild curry with no spice nor spicy red Chillies like the other Goan curries. Whenever we are under the weather, my Mum makes this light and simple “Sweet Curry” for us. I remember…

    Recipe for Dubai’s Popular Avocado Milkshake

    Recipe for Dubai’s Popular Avocado Milkshake

    My absolute Favourite Drink at any café here in the UAE. Before I came to the UAE, I never thought I would even want to try an Avocado ever, because I had a horrible experience with Avocado during my college days!I was on a GM…

    Recipe for Rava Fried Beef(Goa’s Famous Cutlet Pao)

    Recipe for Rava Fried Beef(Goa’s Famous Cutlet Pao)


    Recipe for Rava Fried Beef(Goa's Famous Cutlet Pao)

    Some call them Steak Pao, some say Cutlet Pao but in Goa, it's CART-LACE Pao! Oh Yesss
    When my stomach screams *Goa* this is what i do in my kitchen. Beef cutlet pao With my favourite salad with a little watery ketchup
    My Goa trip can never be complete without the Famous Cart-lace Pao.
    This is the famous Street Food in Goa. You will find a Cutlet Pao cart at almost every corner of the village and the best part is that every cart is always filled with customers! However, the BEST Cutlet Pao I have eaten in Goa is the one made by Salu and his Wife at the cart at Candolim Tinto(The local market place). It is Fresh, filled with Authentic flavour and the filling is just AWESOME! It's usually 2 cutlets in one Pao or Poie, the local Goan Bread. You will find Salu's cart flocked with people coming from nearby villages and far off places too. He earned his fame through his dedication and hardwork and sincerity. Till date, the quality and taste of the cutlet pao remain the SAME(not even similar). If ever you're in Goa, please do visit his cart. It's called 'KING KANE' named after his son, Kane.
    Since Salu is in business, I thought it wouldn't be ethical for me to ask for the recipe of his famous Cutlet marinade. Hence, I'm sharing with you what we make at Home. Now, at Home, whenever we make Cutlet Pao, we no longer call it Cutlet Pao but "Salu's Steak Pao" 🙂 🙂
    Course Appetizer, Evening Snack
    Cuisine Goan
    Keyword Beef Rava Fry, Cutlet Pao, Goan Cutlet Pao, Goan Steak, Goan Steak Pao, Rava Fry Beef, Steak Pao

    Ingredients

    • 500gms Beef with no fat or skin (cut into palm size ¼ inch thin slices)
    • Unroasted Semolina (Rawa) for coating the Beef
    • Oil for Frying

    Ingredients for Type 1

    • 1 Tbspn Vinegar(If you have Palm vinegar even better)
    • 1/2 Tspn Kashmiri Chilly Powder
    • ½ Tspn Coriander Powder
    • ½ Tspn Turmeric Powder
    • 2 Tspn Jeerem Meerem Powder
    • 1.5 Tbpn Ginger Garlic Paste(This recipe requires a goodamount of Ginger Garlic paste)
    • 1 Tspn Salt

    Ingredients for Type 2

    • 1 Tspn Salt
    • 1 Tspn Ginger Garlic Paste
    • 1 Tspn Vinegar
    • Green Masala

    The Green Masala

    • 50gms Fresh Coriander with stem
    • 20gms peeled garlic cloves
    • 10gms ginger
    • 3 green chillies
    • 1 tbspn vinegar
    • 1 tspn peppercorrns
    • 1/2 tspn Cumin seeds
    • 1/2 tspn dried Coriander seeds
    • 1 inch Cinnamon stick
    • 8 cloves
    • 1/4 tspn Turmeric powder

    Ingredients for the Salad

    • 1 Cup grated Cabbage
    • 1 Tbspn grated Carrot
    • 1/2 Onion sliced
    • 4-5 sprigs fresh Coriander leaves chopped fine

    Ingredients for the Salad dressing

    • 2 tbspn vinegar(if you have Goan palm vinegar, even better)
    • 1 green Chilli chopped fine
    • 1 clove of Garlic chopped fine
    • 1/2 tspn sugar
    • 2 pinches of salt
    • 3-4 drops olive oil(optional)

    Instructions

    • Tenderise the Meat with a pounder.
      Note: Pounding the meat softens the slices and allows the marinade to seep into the meat. This process reduces the cooking time too. If you don't have a pounder, you can use a rolling pin or a pestle to pound the meat.
    • If you’re going with Type 1, then wash the Beef slices anddrain off all the water, transfer the slices into a bowl and add all the spicesto the Beef slices, mix well and keep it in the refrigerator for 1 day
      Note: Ensure to discard all the water or you can also patdry the beef slices. If there is any water, while frying the rawa will getseparated in the pan.
      I prefer marinating the Beef for a day as Beef takes alittle longer to cook. The vinegar and salt when added to meats reduces thecooking time. So more the marination time, sooner will the Beef cook
    • If you’re going with Type 2, then Wash the Beef slices anddrain off all the water, transfer the slices into a bowl and add salt, vinegarand ginger garlic paste and keep it aside for 30 minutes
    • After 30 minutes, add all the ingredients mentioned under the Green Masala section and grind the green masala to a smooth fine paste
    • Add the masala to the Beef
    • Mix the masala with the Beef slices and keep it in the refrigerator for 1 day
    • Next day, in a Pan heat Oil on Medium heat
    • Coat every marinated Beef slice with Rawa one by one
    • Once the Oil becomes hot, put about 4-5 rawa coated beefslice into the pan(depends how big or small your pan is. Do Not over crowd thePan or else the oil will lose it’s heat and the rawa may start separating itselffrom the beef
      Note: the oil should not be too hot or else the rawa coatingwill fry faster and in turn get burnt while the beef I not yet cooked
      Also, the heat should not be too low either or else the asthe beef is getting fried, the rawa will separate itself from the beef
      Fry the Beef on each side for about 7-10 minutes
    • Flip the beef slices to fry it on the other side. You can drizzlesome more oil into the pan incase you find that the oil has reduced
    • Once the Beef gets a nice golden crisp rawa coating, you cantransfer the fried beef into a plate or directly put it into a Pao(bread) andenjoy it gorom groom!

    For the salad

    • In a bowl, grate the Cabbage(I prefer using a potao peeler),Onion, Carrot and Fresh Coriander leaves
    • Pour the salad dressing over the veggies and mix it well. And the salad is ready
      Note: Mix all the salad dressing ingredients in a bowl and keep aside for 1 hour. If you wish you can make this dressing by increasing the quantity and storing it in a jar(refrigerate it) and use it as and when you make a salad
    • In a bowl, add the Tomato ketchup and add some Water.
      Note: Whenever I have used Tomato ketchup as it is, I feel it over powers the taste of the beef and salad. However, if the ketchup is missing, I feel there's a kick missing. When I saw Salu making the cutlet pao I noticed that he used a very runny ketchup. Hence I tried adding some water to the ketchup and that really worked for me. It felt like that hit the spot.
      This depends totally on you. I have some friends who do not like ketchup so you can feel free to skip this step.
      Or if you like ketchup as it is, you can use that too
      For me, the runny ketchup completes the Cutlet Pao 🙂
    • If you’re in a hurry or have forgotten to make the dressingyou can add vinegar, sugar and salt directly to the veggies and mix it well, ittastes equally good! But pleeeeeease add the salad to the Cutlet Pao, it takes itto the next level! Also, if you have some left over Beef Roast or CafrealMasala, Please add it to the Cutlet Pao…..OOOOOHHHH BOY!!! Yummmmzo!

    If you like my recipe, don’t forget to “like” & “share” it with your friends and family. And once you’ve tried my recipe, request you to kindly share your valuable feedback with me. I'd Love to hear from You 🙂

      Recipe for Goan Fried Masala Curry Paste

      Recipe for Goan Fried Masala Curry Paste

      Meat Curry with Coconut Milk or Fresh grated Coconut is one of my faves. But this recipe is extra Special not only because it is made by dry roasting the spices, but also because this is how my Maternal Grandpa who we used to call…

      Recipe for Goan Sorpotel/Vindaloo Masala

      Recipe for Goan Sorpotel/Vindaloo Masala

      Sorpotel…. Sorpotel…. We all Love Sorpotel!! So this is a dish which is prepared at most Goan homes for every occasion you can think of! I can eat Sorpotel for Breakfast, Lunch & Dinner & I'm sure many of us do too 🙂 🙂They say,…

      Recipe for Goan Green Masala with Coconut

      Recipe for Goan Green Masala with Coconut

      Recipe for Goan Green Masala with Coconut

      This Green Masala is a little different from the Cafrealand Guisado masala. It contains coconut which makes the Curry thick. All my cooking years, I have met people who like two different types of Green curry 1) Runny and 2) Thick. If you are a fan of coconut. like most of us Goans are and if you prefer a thick curry, you can use this recipe over the other two.
      This recipe can be used for 1/2 kg Chicken

      Ingredients

      • 30 gms Fresh Coriander with stem
      • 2 Tbsp Fresh Grated Coconut
      • 1/2 Tsp Peppercorns
      • 1/2 Tsp Cuminseeds
      • 1/2 Tsp Corianderseeds
      • 1 Green Cardamom
      • 2 Cloves
      • 1" Cinnamon
      • 2 Tsp Tamarind pulp or a marble size full tamarind
      • 2 Green Chillies
      • 4 Garlic cloves(roughly chopped)
      • 1/4 Tsp Turmeric Powder
      • 1/2 Small Onion(roughly chopped)
      • 1/2 Tsp Sugar
      • 1/2 Cup Water for Grinding the Masala

      Instructions

      • Transfer all the ingredients into a small(dry) mixer jar
      • Using water little by little, Grind all the ingredients into a smoothfine paste
        Note: If you addall the water at once, the spices won’t break down completely and the Masalawill remain coarse.
      • Once the Masala is ready, you can use it immediately or If you wish to store it, transfer the Masala into a dry Airtight container and wait until it completely cools and comes to room temperature and only then put the lid on
        Note: As soon as you grind masala in a mixer jar, it remains slightly hot/warm due the pressure and speed of the grinder. After transferring the Masala into the jar/container, If you close the jar/container when the masala is hot or even slightly warm, there is a high chance that the masala get spoilt faster due to the heat. Hence, let it come down to room temperature and only then close thelid tight. Since this masala contains coconut, I always prefer freshly grinding it. However. If you're a busy bee who likes to pre-grind the masalas and freeze it, you can either slightly dry roast the coconut and onion and then use it. Just on a pan very lightly for about 3-5 minutes dry roast it

      If you like my recipe, don’t forget to “like” & “share” it with your friends and family. And once you’ve tried my recipe, request you to kindly share your valuable feedback with me. I'd Love to hear from You 😊

        Recipe for Goan Fish Curry Masala

        Recipe for Goan Fish Curry Masala

        This curry is a traditional Goan Coconut based curry. "Orange" fish curry is a staple food in most Goan homes. This version of fish curry is one of my favorites out of the many fish curry preparations that we Goans make. It is best enjoyed…

        Recipe for Goan Meat Curry Masala with Coconut

        Recipe for Goan Meat Curry Masala with Coconut

        This curry paste can be used for Chicken, Beef, Mutton and Meat Ball, Chicken Ball or Mutton Ball Curry. The Aroma of this Masala will surely take you back home or to the time when your Grandma would make a curry like this on a…

        Recipe for Cafreal Masala

        Recipe for Cafreal Masala

        Recipe for Cafreal Masala

        Chicken Cafreal is a flavour packed Chicken dish that is cooked in a thick Coriander Gravy.The first time I ever ate Cafreal was when I was a little girl, at this very famous restaurant called 'Florentine' in Saligaon, Goa which till date earns it's fame because of it's Chicken Cafreal.Whenever I prepared Cafreal, I was never really content because it would taste like a normal Green Chicken Curry. As I started growing up and understanding flavours and after many experiments and trials and errors, I managed to come quite close to the Cafreals that I enjoy eating in Goa..
        This is a Masala Paste for 1 kg Chicken, Beef or Prawn
        Cuisine Goan
        Keyword Cafreal Masala, Chicken Cafreal, Curry Masala, masala

        Ingredients

        • 150 Gms Fresh Coriander leaves (with stem)
        • 1 Tspn Peppercorns
        • 1 Tspn Cumin seeds
        • 1/2 Tspn Corriander seeds
        • 4 Spicy Green chillies (alter the qty as per preference)
        • 2 Tbspn Vinegar
        • 1/2 Tspn Turmeric powder
        • 10-12 Garlic cloves

        Instructions

        • Transfer all the ingredients into a small(dry) mixer jar
          Grind all the ingredients into a smooth fine paste.
          Note: You may not need Water to grind this paste as there is enough liquid(Vinegar). Pour the vinagar little by little to grind the masala. If you pour all at once, the dry spices may not break down completely and it may remain coarse.
           
        • Once the Masala is ready, you can use it immediately or If you wish to store it, transfer the Masala into a dry Airtight container and wait until it completely cools and comes to room temperature and only then put the lid on
          Note: As soon as you grind masala in a mixer jar, it remains slightly hot/warm due the pressure and speed of the grinder. After transferring the Masala into the jar/container, If you close the jar/container when the masala is hot or even slightly warm, there is a high chance that the masala get spoilt faster due to the heat. Hence, let it come down to room temperature and only then close the lid tight
          Place the container/jar into the Deep Freezer and you can store it for Maximum 1month.

        If you like my recipe, don’t forget to “like” &“share” it with your friends and family. And once you’ve tried my recipe, request you to kindly share your valuable feedback with me. I'd Love to hear from You 🙂

          Recipe for Goan Red Curry Masala Paste without Coconut

          Recipe for Goan Red Curry Masala Paste without Coconut

          A Red Curry masala paste without Coconut can be used for Beef, Mutton, Chicken and Pork. If you are a Spice freak like me(and most Goans) you MUST try this Hot and Tangy Masala. This recipe quantity can be used for 1kg meat.

          Recipe for Goan Green Masala Paste without Coconut

          Recipe for Goan Green Masala Paste without Coconut

          This recipe is a simple, light recipe which can be used with fish for a flavorsome Fish Guisado(A light fish curry without coconut) or you can use his masala to make a Fresh Bombay Duck Xec Xec. My Mum uses this simple light masala to…

          Recipe for Mommy’s Homestyle Beef Biryani

          Recipe for Mommy’s Homestyle Beef Biryani

          Recipe for Mom's Homestyle Beef Biryani

          This is Not a regular or Authentic Biryani that you would find at a restaurant or at a Muslim Wedding but a very Simple Home style, makeshift, Sunday feast created by Mommy love.
          Her Beef Biryani used to be a hit at our eatery and even during her catering days. We used to serve it as specials on Weekends. It was loved by our customers. Even after we shut the eatery, our customers used toorder this in kgs with Mum for their picnics and parties. Ever since I started blogging, I have been requested for this recipe and due to it’s lengthy process, I always kept procrastinating but since I complete 5 years of blogging this year 2023, I thought it’s time to revive the Beautiful Memories of Mum’s Humble Home Style Beef Biryani and share the love with each of you.
          This recipe is specially dedicated to my friend Savio Zacharia who loved my Mum’s Beef Biryani a lot and has requested for this recipe many times. He now lives in another city, hence mum cannot cook this for him now. Ithought of him so much while writing this recipe 😊😊
          It is a lengthy process but trust me IT IS SO WORTH IT!
          Do give it a try and enjoy it with your family and friends
          Course Main Course
          Cuisine Indian
          Keyword beef, Beef Biryani, Beef Pulao, Biryani, Home Biryani
          Servings 4 people

          Ingredients

          Ingredients For boiling the Rice

          • 3 litres water
          • 375gms Long Grain Basmati Rice(2.5 cups)
          • ¼ Cup Oil
          • 2 Tbpsn Rock Salt or 1 Tbspn Fine Salt
          • 2 Green Cardamom
          • 4-5 Pepper Corns
          • 3-4 Cloves
          • 2-3 pieces Cinnamon sticks
          • 1 Star Annise
          • 2-3 Bayleaves
          • Lemon Skin(Squeeze the juice of the Lemon in a bowl and keep aside for the Gravy and use the skin in the Rice water)

          Ingredients for Boiling the Beef

          • 500 gms Boneless Beef – cut into medium sized cubes
          • ½ Cup water
          • 1 Tspn Ginger Garlic paste
          • 1 Tspn salt

          Ingredients For the Gravy

          • The Boiled Beef
          • 1 Tspn Shahi Jeera
          • 4 Medium sized Onions  - sliced thin and long
          • 3 Green Chillies - slit
          • 2 Medium sized Tomatoes - sliced thin and long
          • 3 Medium sized Potatoes – Cut into quarters(Peel, Cut intoquarters, wash and soak in water and 2tspn salt and keep aside)
          • 1 Tbspn Ginger Garlic Paste(Recipe link given below)
          • 1 Tspn Coriander Seed Powder
          • 1 Tspn Cumin seed Powder
          • 1 Tspn Turmeric Powder
          • 1 Tspn Red Chilly Powder
          • 3 Tspn Everest Garam Masala Powder
          • 1 small veg, beef or chicken stock cube(1 Tspn or 6gms)
          • 100 gms Unsweetened Yogurt
          • Juice of ½ a Medium sized lemon
          • 20 gms Mint Leaves(1 cup)
          • 50 gms Fresh Coriander with step(1.5 cup)
          • 1 Tbspn pure Cow’s Ghee
          • 1 Tbspn Oil

          Other Ingredients

          • 3 Tbspn Milk
          • 7-8 strands of saffron
          • 1 drop of orange food colour
          • 1 drop of green food colour
          • 1 large onion
          • 1 cup Oil

          Instructions

          Follow these steps to Boil the Beef

          • Wash the beef cubes and transfer it into a pressure cooker. Add ginger garlic paste, salt and water.
          • Allow the Beef to cook on medium heat until 2 whistles are released. Once the Beef is soft, keep the it aside.
            Note: DO NOT discard the water. We will use it for the gravy

          For the Colour (optional)

          • Take two small microwavable bowls and add 1.5 tbspn milk in each bowl. Heat the milk in the Microwave for 30 seconds
            In one, add a drop of Green food colour, mix it well and keep aside
            In the other, add the Saffron stands and orange food colour, mix it well and keep aside

          Follow these steps to Boil the Rice

          • In a bowl soak the rice for 20 minutes
            Note: Soaking the rice helps the rice grains to soak up some water making it softer and fluffier, thus reducing the cooking time
          • After 20 minutes Wash the rice very gently and drain out all the water till the last drop
            Note: You have to wash the rice till the water is clear and the rice can be seen
            Tip:- there should be absolutely no starch left in the rice as starch makes the rice sticky once cooked. You may have to wash the rice about 4-5 time
          • Now in a large vessel, add the Water, Oil, Whole Spices, Lemon Skin(Lemon skins soak up any starch in the rice water and takes away the stickiness from the rice) and Salt(all mentioned under the ingredients for the Rice section)
            Tip:-the vessel has to be Really wide whenever you make Rice or any Rice dish .Themore wider and bigger your vessel, the fluffier the Rice grains will be! This happens because each rice grain gets more space to cook and fluff up... I call it breathing space🙈🙈🙈
            Note: The whole spices add to the flavour to the rice
            DO NOT forget to add oil as Oil enables the rice to remain separated. This is one of the most essential element in a good textured Biryani – Fluffy Separated Grains
             
          • Once the water comes to a rolling boil, Add the soaked Rice into the vessel
            Note: DO NOT continuously stir the Rice it will cause the grains to break and we don’t want broken grain for Biryani. Stir the Rice ONLY once and very gently. I prefer using a silicone spatula to stir the rice as it is very gentle and keeps the rice intact
             
          • In exactly 5 minutes, I turn off the heat
            Note: This is for a small quantity. You may need to check if you’re using a bigger quantity. The whole point is to not cook the rice until it’s filly cooked
            Some things to keep in mind as to why we undercook the Rice:
            1)    The rice was soaked initially. Hence this step reduced the cooking time
            2)    When we take some time to remove the whole spices from the rice, the rice is getting cooked a little more in that hot water
            3)    After straining the rice, the rice will remain hot for some time. The heat that remains on the grains will further cook the rice
            4)    The Biryani will be given a Dum(further heat) later which will further cook the Rice
          • You will see all the whole spices and lemon skin floating in the vessel. It’s better to discard it as it’s not very pleasant when you bite into it when eating the Biryani….mood off types!
          • Strain the Rice in a colander
          • Once all the water is drained out, divide the rice into two trays or vessels so that the rice cools faster and doesn’t get further cooked for too long due to the heat. Let the Rice come down to room temperature
            Note: Please treat the Rice like a baby or better still like your Lover with utmost gentleness, unless you’re a tough lover then please calm down at this stage! Hahahah
            Use a silicone spatula or better still, directly pour the rice into the trays. This will keep the grains intact and long

          Follow these steps to cook the gravy

          • Peel the Potatoes, cut them to halves or quarters and soak it in a bowl of water and add 1tspn salt
            Note: Potatoes once peeled starts turning black. Ensure to immediately soak it in water. I prefer soaking it in Salt water so that by the time the Potatoes are ready to use, it is nicely coated with some salt. It enhances it’s taste
          • Soak the Mint leaves and Fresh Coriander in a bowl of room temperature water and keep it aside
            Note: Soaking any leaves and herbs, separates all the impurities and it becomes easier to wash the leaves
          • In a Vessel, heat the Oil and Ghee on medium heat
          • Once the Oil turns hot, add the Shahi Jeera
          • Then add the Onions and sauté until it starts getting translucent
          • Then drain out all the water from the Potatoes and add the Potatoes into the vessel. Mix this well and let the Potatoes get a light golden coating. Then cover the vessel and let the Potatoes cook a little
            Note: My Mum adds deep fried potatoes to the gravy at the end. However, to save time and make this like a One Pot gravy I add the Potatoes in the same vessel and cook it. But If you wish, you can always add fried potatoes in the end once the gravy is ready, it tastes superb
            **Also, if you wish to skip the Potatoes, you can do so
          • After about 5-7minutes, add the Tomatoes, all the dry Spices, Salt and Ginger Garlic paste and stir it well and cover the vessel and reduce the heat
            Note: The moisture from the Tomatoes helps the spices to not stick to the bottom of the vessel. Also as the Tomatoes begin to cook and soften, it turns mushy and this helps to thicken the gravy
          • As this is cooking, hand pick mint leaves and coriander and transfer it into another bowl. Wash the leaves with fresh water and drain out the water. Transfer the mint and coriander into a mixer grinder and make a thick smooth paste. DO NOT add any water
          • After about 5-7 minutes, once the Tomatoes have turned completely mushy, add the beef water, lemon juice, stock cube and the mint and coriander paste and stir it well and put the lid on
          • Allow this gravy to boil for about 10-15 minutes and then add the Beef cubes. Mix it well and let it cook
          • After about 10 minutes, add the yogurt and mix it well with the gravy
            Note: We add the yogurt towards the end as yogurt sometimes may split on high heat or if left unattended
          • After adding the yogurt, let the gravy boil until it’s nice and thick. Keep stirring it at intervals
          • Once the gravy turns thick, turn off the heat and keep it aside to cool at room temperature
            Note: Once the gravy comes to room temperature, it will further thicken
            We bring the gravy down to room temperature so that when we layer the biryani, the heat from the gravy does not further cook the rice as we also have to give it Dum which will cause more heat. Making Biryani is more like a Mission to Save the Long Rice Grains

          Follow these steps to Fry the Onions

          • Slice the Onion fine and long and separate it like how you would mix or squeeze something. So that while frying, every strand of onion is separated and all the strands fry evenly
          • In a skillet heat 1 cup oil on medium heat
            When the Oil turns hot, add the Onions and allow this to fry till it turns golden
          • Once the Onions turn brown, turn off the heat and transfer the fried onions into a bowl or vessel and keep it aside
            Note: Ensure the heat is not too high or else the Onions will get burnt and turn darker and bitter
            Onions have a high sugar content. Hence while frying the Onions, the sugar in the Onion reaches a point of caramelization and hence turns brown
          • Once the fried Onion turns cool, it will get crisp
            If you wish to use fried Potatoes in the gravy, you can fry the Potatoes in this Oil

          Follow these steps to Layer/Assemble the Biryani

          • Grease with oil a vessel that is deep and not very wide. It helps create more layers
            Add some rice in the vessel. This will be the first layer
            Note: Greasing the vessel with oil, avoids the rice to get stuck at the bottom while giving the Dum
          • The add some gravy and cover the rice
          • Then add another layer of rice
            In this way, keep alternating and layering the biryani and gravy. Ensure the last and final layer is of Rice
          • Now with the help of a spoon, pour the orange and food colour liquid over the rice
          • Sprinkle the fried onions over the rice
            Note: If you like lots of fried onions in your Biryani, you can fry more onions and sprinkle it over every layer of rice
            Put a lid on the vessel and place it on low heat for 30 minutes and turn off the heat
          • FINALLLLLLLLY The Biryani is Ready!! 5 full hours but sooooooo worth the entire process!
          • And DON'T forget the Raita! Oh Yummy yum yum! A Sorted Sunday Be like!!!!

          If you like my recipe, don’t forget to “like” & “share” it with your friends and family. And once you’ve tried my recipe, request you to kindly share your valuable feedback with me. I'd Love to hear from You 🙂

            Recipe for Mommy’s Special Raita

            Recipe for Mommy’s Special Raita

            A Biryani without Raita is like Chrisan without Floyd ……Absolutely BLAH!!! There are many types of Raita Boondi, Beetroot, Cucumber, Carrot and then there is Mixed Raita! Ooooooh so delish!This Raita that we make at home is not your regular Raita. You may or may…

            Recipe for Mr. Swanky Salmon

            Recipe for Mr. Swanky Salmon

              Salmon is a fish I was introduced to when I first came to Dubai. Ofcourse Yes! You guessed that right….at IKEA! I was so intrigued with the class that it brought to the table, that I wanted to learn more about it. More because…

            Recipe for Sitaphal(Custard Apple) Pudding

            Recipe for Sitaphal(Custard Apple) Pudding

            Recipe for Sitaphal(Custard Apple) Pudding

            As a kid, Sitaphal used to be my Most Favourite Fruit. I would claim Two (The Biggest ones) only for me). We used to get the medium sized ones as the Big ones were quite expensive. But, Mum ensured that we would have it often whenever it's in season. As we grew, we discovered Sitaphal Milkshake at "Bachelors" - An outlet at Girgaum Chowpatty, in South Bombay. And when we grew still further and began working, we discovered this Ice Cream parlour called Naturals(Now they have outlets all over Bombay) where they served(and still do) Sitaphal Ice cream and that till date is the First thing Floyd and I eat when we touch down Bombay. Yummmm
            As I moved to Dubai, Floyd took me to the popular Kulfilicious where you get a variety of fruit flavoured and other flavoured Kulfis and guess what I saw on the Menu???? Yep you guessed that right - Mr. SITAPHAL!!! it was so delish and till date we wait for the Sitaphal season to start to go enjoy the yummy Sitaphal Kulfi.
            As I love playing with Gelatin and Agar Agar and since Floyd is a Dessert freak and a Sitaphal freak too and since Mr. Sitaphal has been following me till Dubai in various forms, I thought Dedication toh banta hai boss!!!! Hence the Pudding!!
            Sitaphal in itself is a burst of flavour and happiness in every bite, the pudding had to turn out yum!!!
            Do give it a try if you love Sitaphal as much as we do 🙂
            Course Dessert
            Cuisine Indian
            Keyword Agar Pudding, Custard Apple, Desi Dessert, Dessert, pudding, Sitaphal Pudding, Sweet Tooth

            Ingredients

            • 2 Big Ripe Custard Apples
            • 4 Tbspn Sugar
            • 1/2 Tspn Vanilla Essence
            • 500 ml Milk
            • 10gms Unflavoured Gelatin Powder(approx 3 tspn)
            • A small bowl of Room temperature milk to bloom the gelatin

            Instructions

            • Wash and Break open the Custard Apples and with the help of a spoon separate the flesh along with the pulp and de-seed the flesh
            • In a bowl add a little room temperature milk and and sprinkle the gelatin over it and keep it aside for about 15-20minutes. Do Not stir
              Note: This process is called blooming. It simply means that gelatin first needs to moisten before adding it to a hot liquid to set
            • In a vessel add the milk, vanilla essence, custard apple and sugar and bring it to a boil
              Note: Let the Custard Apple pieces be as it is as it tastes nice to bite into them while eating the pudding
            • Turn off the heat and add the gelatin mix into the boiled milk and mix it well until all the gelatin gets dissolved. Pour this mixture into a bowl and cling wrap it and tuck it into the refrigeratore for about 6-8 hours to chill. Once it has chilled in the fridge and is set and firm, you can run a knife around the pudding and topple it into a serving tray or leave it as it is. Enjoy this pudding nice and cold! So Yummmmm!

            If you like my recipe, don’t forget to “like” & “share” it with your friends and family. And once you’ve tried my recipe, request you to kindly share your valuable feedback with me. I'd Love to hear from You 🙂

              Notes

              For more tips on how to use Gelatin and Agar Agar you can follow my Tender Tiranga Pudding and Tender Coconut Pudding
              Tender Tiranga
              https://chrizzosgrubscene.com/2023/08/14/recipe-for-the-tropical-tiranga/
               
              Tender Coconut Pudding
              https://chrizzosgrubscene.com/2021/07/14/recipe-for-tender-coconut-pudding/
               
              Mango Pudding
              https://chrizzosgrubscene.com/2020/08/18/recipe-for-mango-pudding/

              A Base Recipe for Goan Rava Fry Fish

              A Base Recipe for Goan Rava Fry Fish

                This is a basic Goan Fish Fry with Rava. Rava Fry Fish takes me to the Beaches of Goa where we used to enjoy these at the local shacks. Also, A good crisp rava fry fish, as easy as it may look, has so…

              Recipe for The Tender Tiranga Pudding

              Recipe for The Tender Tiranga Pudding

                This recipe is inspired by the Indian National Flag – The Tiranga, on the occasion of the Indian Independence Day which is celebrated on15th August.This Day also happens to be the Feast of the Assumption of Mother Mary into Heaven. This feast is celebrated…

              Recipe for Cheesy Corn Aloo Tikki

              Recipe for Cheesy Corn Aloo Tikki

              Recipe for Cheesy Corn Aloo Tikki

              I was first heard of Corn Cheese Aloo Tikki when my accountsProfessor in Management college Professor Natika asked me if I could make thesefor a college event. I was so lost and said I don’t know how to make these butI can always ask my helpers if they do. But none of my helpers were confidentof a good recipe. Ofcourse, I did not take up that order back then but I washell bent on learning how to make these. I mean izzat ka sawaal types hehe. Itried many recipes after watching youtube videos of Corn Cheese Aloo Tikki butfailed miserably and some I was just not convinced that it would work. Theywere either breaking or just turning blah and I ended up wasting a lot ofingredients. I eventually gave up.
              I’m not so well versed with Veg dishes, but afterunderstanding ingredients, taste and techniques of food over the years and afterlearning something or the other from each failed recipe, after 11 years Ifinally mastered the Corn Cheese Aloo Tikki. I wish I could go back to collegewith this dish and treat Natika Ma’m to these beauties 😊😊
              Here’s my take on Cheesy Corn Aloo Tikkis
              Course Appetizer, Evening Snack, Snack, Starter
              Cuisine Indian
              Keyword Aloo, Aloo Pattice, Aloo tikki, Cheese, Corn Cheese ALoo Tikki, Cutlets, Potato, Tikkis

              Ingredients

              • 2 Big Potatoes(Peeled, Boiled with a little salt till soft and Mashed)
              • 100gms sweet corn kernels(boiled with a little salt)
              • 2 slice bread(dry grind in a mixer grinder)
              • 1 Tspn Cumin seed Powder
              • 1/2 Tspn Kashmiri Chilly Powder
              • 1/2 Tspn Ginger Garlic paste
              • 1/2 Tspn Chaat masala(optional)
              • 1/Tspn Black pepper Powder
              • 2 Tspn Lemon Juice or 1 Tspn Amchur Powder
              • 2 spicy green chillies chopped fine
              • 1 small onion chopped fine
              • 7-8 sprigs of fresh coriander with stem chopped fine
              • 2 Tspn Corn Flour
              • 200gms Refrigerated Cheddar cheese Block(cut into 1inch cubes)

              Instructions

              • In a bowl, hand mix all these ingredients well to form a firm paste
              • Make balls of 30gms each of the Tikki paste
                Lightly grease your palms with some oil so that the potatoes don't stick to your palms and it becomes easy to work with it
                Note: Since this is a vegetarian recipe and thereis no egg, the bread powder acts as a binding agent and prevents the tikkisfrom breaking when fried
              • Take each ball and flatten it on your palm and place the cheese piece in the centre
              • Cover the tikki by bringing the potato paste together from the sides
                Shape all the tikkis in this manner and place it on a tray. Tuck the tray into the refrigerator for about 30 minutes
                Note: We use Blocks of cheese and not a slice or shredded cheese because when frying the tikkis, the shredded cheese or sliced cheese will melt faster and will start oozing out of the tikki. Block cheesewill take time to melt so by the the cheese melts the cutlet is also ready onboth sides otherwise the cutlet may remain undercooked if the cheese begins to melt quickly
                 
                Note: We chill the tikkis for a bit so that the cheese becomes cold. If the cheese is at room temperature, it tends to melt faster that when it is refrigerated. Hence, to be on the safer side, let the tikkis chill for a bit
                 
              • Then, in a Pan, heat oil on medium heat and once the oil turns Hot, transfer the tikkis into the pan and fry it or 3-4 minutes till it gets a crispy coat
                Note: ensure that the oil is not too hot or else the tikkis will get burnt
              • Flip the tikkis to the other side and fry it for another 3-4 minutes and transfer them on to a Kitchen paper towel or napkin to get rid of any excess oil
              • Enjoy these super delicious Cheesy Aloo Corn tikkis hot with a dash of Ketchup. Yummmmmmmmzo!!

              If you like my recipe, don’t forget to “like” & “share” it with your friends and family. And once you’ve tried my recipe, request you to kindly share your valuable feedback with me. I'd Love to hear from You 🙂 

                Recipe for CAB Cutlets(Corn Aloo Beetroot)

                Recipe for CAB Cutlets(Corn Aloo Beetroot)

                  So, very recently, some of our friends here in Dubai decided to catch up at my place since my Mum n Dad had come from India to be with us for a bit. Usually at my place, you’ll find a Non veg spread and…

                Recipe for “KAISA DIYA” (Quesadilla)

                Recipe for “KAISA DIYA” (Quesadilla)

                  After months of waiting, My sweet friend Linda and I finally decided to go out for Coffee.We did a recipe shoot for The Family Kitchen Season 2 on COLORS TV here in the UAE and after we finished, we decided to celebrate that joy.We…

                Recipe for Goan Egg Drop Curry

                Recipe for Goan Egg Drop Curry


                Recipe for Goan Egg Drop Curry

                Egg Curry is one of the easiest curries to make especially when I'm running late or my creative cells and thinking power go for a mighty toss and I just cannot understand what to cook. My fridge always has stock of eggs at any given point of time, like almost all households. So, it's either Egg Burji or Egg curry to the rescue.
                Some of the Best Egg curries I've eaten were made by my Sis-in-law Sophie and my Aunt Cecil(RIP)...yummmmmmiest!
                Although my Bitter Better is not very easily excited when he hears there's Egg Curry, he very kindly eats it without a fuss whenever I make it and after he finishes eating He'll say "I wonder why the sound of Egg curry doesn't excite me. It's so Yumm ya" hahaha so cute. He does the same for Shark Fish Ambot Tik and Black Pomfret 🙂 🙂
                Here's my recipe for the curry!
                Course Main Course
                Cuisine Goan, Indian
                Keyword Anda Curry, Egg, Egg Curry, Goan Egg Curry, Tanti Kodi

                Ingredients

                For the Masala

                • 1 Cup Fresh grated Coconut
                • 1 Tspn Cumin seeds
                • 1 Tspn Coriander Seeds
                • ½ Tspn Turmeric Powder
                • 4 Kashmiri Chillies(If the chillies are thin, use 6)
                • 6 Garlic cloves
                • 1 Onion roughly cut
                • 3 ripe plump Tomatoes roughly cut
                • A small ball of tamarind
                • ½ Cup Water for grinding the Masala

                Other ingredients

                • 2 Green Chillies - slit
                • 6 Eggs
                • 1 Tbspn Oil
                • 1 Stock Cube(approx 6 gms)
                • 2-3 Cups Water for the Curry
                • 1/4 Cup Coconut Milk(optional)

                Instructions

                • In a Mixer grinder, add all the ingredients mentioned under the 'Masala section'
                • Grind all the ingredients together using water little by little
                  Top Secret: While grinding the Masala, it’s always best to use a small mixer jar(the dry jar) so that all the ingredients break down well and the masala turns into a smooth and fine consistency. If you use the Big Jar, the ingredients may not break down as much and the Masala will remain coarse
                  Also, while grinding the masala, if you add all the water at once, the ingredients won’t break down and in turn, the Masala will remain coarse. 
                • In a vessel, heat the Oil on medium heat and add the Curry Paste into the hot oil. Put the lid on and let this cook for around 2-3 minutes or till you see the oil getting separated from the masala
                • Then, add 1 cup water into the Mixer Jar, give it a shake and add that water into the vessel
                  Add some more water into the vessel, add the stock cube, chillies and salt and stir the curry well and cover the vessel
                • Allow the curry to boil for about 10 minutes
                • When the curry comes to a rolling boil, reduce the heat and one by one, crack open each egg into the boiling curry
                  Sometimes, if I have Coconut Milk on hand add a little to the curry. It tastes really yum but it's optional. You can add it at this stage before adding the egg
                  Some Gyaan: Reduce the flame so that it doesn’t splash on your fingers while dropping the egg in
                  Ensure to drop the egg very gently and from  a close distance or else the egg will split and shred into the curry
                  If you wish, u can crack open each egg into a bowl first and then pour into the curry. This helps incase the egg is old or might be spoilt
                  Keep a distance/gap of atleast2-3 inches between each egg sothat all the eggs don’t get stuck to eachother
                  You could also used Boiled egg instead of dropping the eggs.In that case, boil the eggs, peel the shells off, Cut each egg into two halvesand add it to the boiling curry. Or if you wish to use the whole egg, thenafter you take off the shell, gently make 2-3 incisions on the egg so that whenyou add it to the curry, the curry seeps inside the egg and tastes better sinceegg by itself is bland
                • Now cover the Vessel, increase the heat and let the curry boil. Do not Stir the curry or else the egg will get fully shredded
                • When you see the egg turning white and the yolk getting covered, you can turn off the heat and let the vessel be covered for about 10 minutes and then Enjoyyyyy!!!
                • You can eat this delicious Egg curry with Hot white Rice and don’t forget the Beef Chilly or the Beef Roast or Bacon Chilly on the side. Yummmmm!

                If you like my recipe, don’t forget to “like” & “share” it with your friends and family. And once you’ve tried my recipe, request you to kindly share your valuable feedback with me. I'd Love to hear from You 🙂

                  Recipe for Hurry Burry Mushrooms

                  Recipe for Hurry Burry Mushrooms

                  This recipe was tried as a fluke since I had some leftovers!I paired it with Pan Grilled Garlic Pepper Chicken and Stir Fry! Oooooh Yummmm!And now this is my Go-to dish whenever I have sudden guestsat my door. It is so quick and hassle free…

                  Recipe for Seafood Pink Pasta

                  Recipe for Seafood Pink Pasta

                    Dinner is readyLeftovers really excited me because the end productturns out insane so many ideas running in the head all at the same timeI had eaten a Pink Sauce Pasta many years ago atthis restaurant in Vasai, Bombay called Farmhouse(I hope I got the…

                  Recipe for Red Pasta Sauce(Marinara Sauce)

                  Recipe for Red Pasta Sauce(Marinara Sauce)


                  Recipe for Red Pasta Sauce(Marinara Sauce)

                  So at home, there’s always a Pasta team. Some like Red Sauce Pasta, some like White and some like a mix of both. There are some days where the teams change too! So, in my opinion, I guess the preference of sauce depends on the kind of Mood or the kind of Day it probably is. But whenever there is Pasta made at home, there are always 3 types  - Red, White and Pink( A mix of Red and White)
                  So, here’s my recipe for the Red Sauce. Which Team do you belong to?
                  P.S. The Actual name for what we call Red Sauce is "Marinara Sauce" and White sauce is "Bèchamel sauce".
                  Cuisine Italian
                  Keyword Pasta, Pasta Sauce, Red Sauce, Sauce
                  Prep Time 1 hour

                  Ingredients

                  • 4 ripe plump Red Tomatoes
                  • ½ Cup of water for boiling
                  • ½ cup Cup of water for adding while cooking
                  • 1 tbspn olive oil(Italian dishes taste best with Olive Oil but you can use any other oil of your choice)
                  • 2-3 Garlic cloves – finely chopped
                  • 1 small onion – finely chopped
                  • ½ Tspn Crushed pepper or pepper powder
                  • ½ Tspn Dried Oregano
                  • ½ Tspn Sugar
                  • ½ Tspn Salt
                  • ½ Tspn Chilly Flakes(optional)
                  • 1/2 Tspn Dried Basil(if you can source fresh Basil leaves nothing like it. Chop them fine and use)

                  Instructions

                  • In a vessel, add the Tomatoes with water on medium heat
                    Once you see the skin on the tomatoes peeling off, turn off the heat and using a tong, peel off the skins of the tomatoes. It will easily come off. Keep the Tomatoes aside to cool
                  • Once the tomatoes have come to room temperature, turn it into a smooth thick paste in a mixer grinder.
                  • With the help of a strainer, strain the tomato paste in a bowl or vessel
                    Note: you can choose to skip this step if you are ok with the seeds or some lumps
                  • Now in a skillet, add some olive oil, throw in the finely chopped garlic cloves and finely chopped onion and saute this for a bit
                    Note: If you’re going to store this sauce for later, ensure you saute the onions really well for a little longer than you would if using immediately, so that the sauce has a longer shelf life
                    You can skip the onion if you wish. I like to add onion as it elevates the taste of the sauce due to it's sweetness.
                  • Then add the Tomato Paste, add the remaining ½ cup of water into the mixer jar, give it a shake and add the water into the skillet.
                  • Add the Crushed Pepper Powder, Salt, Dried Oregeno, Dried Basil and Sugar and give it a mix, You can also add Chilly flakes to spice it up a bit. But that’s totally optional
                  • Allow this to boil for about 10 minutes or so and add the finely chopped Basil(if using fresh Basil). Once the Sauce begins to thicken, turn off the heat. The Red sauce is Ready!!
                    Note: If you will be storing the sauce for later use, allow the sauce to completely cool down to room temperature. It should not even be warm before transferring them into a jar(s) or else it may get spoilt sooner because of the heat.
                    You can use this sauce for Pasta, Spaghetti or even as a Pizza base sauce. Enjoy!!

                  If you like my recipe, don’t forget to “like” & “share”it with your friends and family. And once you’ve tried my recipe, request youto kindly share your valuable feedback with me. I'd Love to hear from You 🙂

                    Recipe for White Sauce(Bèchamel Sauce)

                    Recipe for White Sauce(Bèchamel Sauce)

                    So at home, there’s always a Pasta team. Some like Red Pasta, some like White and some like a mix of both. There are some days where the teams change too! So, in my opinion, I guess the preference of saucedepends on the kind of…

                    Recipe for Sweet Corn Salad

                    Recipe for Sweet Corn Salad

                    Roasted Sweet Corn Cob or in Mumbai as we call it “Butta” with some salt and Red chilly powder and a squeeze of Lemon is a Monsoon favorite for most Mumbaikars. Another favourite is Hot boiled Sweet Corn with Butter and Lemon….ooohhhh sooo delish!I’m a…

                    Recipe for Upma/Upit

                    Recipe for Upma/Upit


                    Recipe for Upma/Upit

                    I have a love hate relationship with Upma. So, along with the Upma if there is Sheera then I love to eat it but if I have to eat it plain, Blaaaaah!! I'm not really a fan. Also, If Upma isn't sweet, I am no fan! I love my Upma a bit sweetish. Also, If Upma has veggies in it, that's a BIG NO!
                    Faaaaaiiiineeee! I am very fussy about my Upma! So why depend on anyone else's upma right??? I can just make it the way I like to eat and chupp chaap eat na 🙂 🙂
                    I have beautiful Childhood Memories of enjoying a good plate of Sheera and Upma at the Marathi Mahila Mandal Canteen at Elephant Garden where we used to go to play. A group of Women ran a canteen and used to sell many snacks and we used to become like hungry wolves after playing and these garma garam snacks were the bestttttt 🙂
                    Also, The Sheera Upma that is served in the Bombay to Goa Trains is something that My Family and I always look forward to! MEMORIES 🙂
                    Here's the recipe of an Upma just the way I love it 🙂 Hope you like it too!
                    Course Breakfast
                    Cuisine Goan, Indian, Mangalorean, South Indian
                    Keyword Upit, Upma

                    Ingredients

                    • 1 cup Rava
                    • 2 Onions chopped fine
                    • 2-3 green chillies chopped fine
                    • 2 inch piece of ginger chopped fine
                    • 1/2 tspn mustard seeds
                    • 1 tbspn oil
                    • 1 tbspnghee
                    • 2 Cups of water
                    • 1 tspn Salt
                    • 2 tspn sugar(you can add more or less as per your taste)
                    • 6-7 curry leaves

                    Instructions

                    • Dry Roast the Rava for just about 1 minute and keep aside. We don't want the rava to turn brown.
                    • In a kadai, heat the oil and ghee and add the mustard seeds and curry leaves
                    • Add the chopped onions, chillies, ginger and saute until the onions turn translucent
                    • Add the water, salt, sugar ,and the Rava and take a whisk and keep strirring. The whisk will avoid any lumps
                      Keep whisking it gently.
                    • As the water is getting evaporated, add 1/2 tspn oil or ghee and let it cook. This helps the upma to not become very sticky
                      Once all the water evaporates, the upma is ready.
                      Note: follow the same tip like how I've mentioned for pulao. Wider the kadai/container, less sticky will it be
                      Yenjoyyyy!!!!
                    Recipe for Oats and Coconut Pancakes

                    Recipe for Oats and Coconut Pancakes

                    PCOS sometimes gets the better of me. On days when I feel guilty and dull, I try my best to motivate my Kitchen ingredients to behave themselves:) 🙂Here's a simple, no khit pit wala ekdum straight recipe which didn't require me to give any extra…

                    Recipe for Crispy Masala Jowari Bakhri

                    Recipe for Crispy Masala Jowari Bakhri

                    I’ve had many a failed attempt at making Jowar and Bajra Bakhris. I’ve tried so many techniques but I’ve never really enjoyed making or eating them.Due to PCOD and Thyroid issues, I had to STOP consuming All Purpose Flour and Wheat Products, I had no…

                    Recipe for School Tiffin Bende Bhaji(Ladyfinger/Okra bhaji)

                    Recipe for School Tiffin Bende Bhaji(Ladyfinger/Okra bhaji)


                    Recipe for School Tiffin Bende Bhaji(Ladyfinger/Okra bhaji)

                    This is a dish which used to be a regular in my school tiffin box. During the busy mornings, my Mum would quickly whip up this simple yet delicious Bhindi bhaji. Since she used to be extremely busy with her catering business, this dish I guess would be one of the easiest she could make. Ofcourse we used to take whatever she would make for her catering orders ,but Mum had a rule that we had to eat veggies at least twice or thrice a week.
                    As far as my memory goes, I can recollect that Ladyfinger and Cabbage were two veggies which were regulars in my dabba.
                    So here’s the recipe 🙂
                    Course Main, Main Course
                    Cuisine Goan, Indian
                    Keyword Bende, Bhindi, Ladyfinger, Ladyfinger bhaji, Ladyfinger sabzi, okra, Quick recipe
                    Prep Time 30 minutes
                    Cook Time 30 minutes
                    Total Time 1 hour
                    Servings 4 people

                    Ingredients

                    • 500 gms Ladyfinger(washed, napkin dried and cut into 1 inch pieces)
                    • 2 medium sized Onion - chopped fine
                    • 1 medium sized Tomato – chopped fine
                    • 2 green chillies – slit in two
                    • 4 garlic cloves – chopped fine or smashed with a knife
                    • 3-4 Bindna solam(kokum shells)
                    • 1 tspn Vinegar
                    • 1/2 tspn sugar
                    • 1 Tspn Salt
                    • ½ tspn Kashmiri chilly powder
                    • ½ tspn Turmeric powder
                    • ½ tspn dry Coriander powder
                    • ½ tspn Cumin seed powder
                    • 3-4 dry Kashmiri chillies – roughly hand broken
                    • 5-6 sprigs fresh coriander with stem – chopped fine
                    • 2 tbspn Oil

                    Instructions

                    • In a skillet, heat the Oil and add the Kokum
                    • Then add the chopped Onions, Chillies, Garlic and Red Chillies and sauté until the onions begin to turn brown
                    • Then add the Tomatoes and mixit well, lower the heat and cover the skillet
                    • Once the Tomatoes start turning mushy, add the dry spice powders and sugar and mix it well. Cover the skillet
                    • Once the Tomatoes begin to turn mushy, add the cut ladyfinger, vinegar add salt and mix it well and cover the skillet. We allow the ladyfinger to cook in it’s own moisture without water. Covering the skillet will work as a steamer and the vapour will ensure that the ingredients don’t get stuck at the bottom of the pan
                      Note: since I don’t add water in this recipe, I add salt and vinegar at this stage as veggies have a quality of releasing water as soon as salt is added to it. Also, Vinegar adds to the moisture.
                      Note: My Mum used to add all the ingredients together in a vessel and cook it on medium heat by adding a little water so that it would cook evenly in the vessel without any ingredient getting stuck at the bottom of the vessel. This would make the ladyfinger a bit mushy and sticky and I enjoyed it back then. However, along the way I kind of wished the lady finger would be less sticky and I began cooking it a little differently
                      Ladyfinger, once it comes with even a drop of water tends to get sticky. Hence, always ensure you wash the lady finger first, pat it completely dry with a napkin or paper towel and only then cut it so that it doesn’t turn sticky
                    • Mix the ladyfinger well with the masala and ensure every piece of ladyfinger is evenly covered and coated well with the masala
                    • Then add the grated coconut and mix well.
                      Note: If you see any water released in the skillet, then keep the skillet open and increase the heat. If there is no water, then keep the skillet closed
                    • After about 5-7minutes, add the chopped coriander and cook it for another 2-3 minutes and the Dabba style Bende bhaji is ready.
                    • Enjoy this simple delicious goodness with hot chapatis or you can enjoy this as a side dish too

                    If you like my recipe, don’t forget to “like” & “share” it with your friends and family. And once you’ve tried my recipe, request you to kindly share your valuable feedback with me. I'd Love to hear from You 🙂

                      Recipe for Kidney Bean Hummus

                      Recipe for Kidney Bean Hummus

                      The Traditional Hummus is made from Chickpeas. However, there is an Egyptian restaurant in the UAE where I enjoyed a bowl of Red Kidney Bean Hummus and decided to try making Hummus from various pulses after that. I use Black eyed beans, Sprouted Black chickpea,…

                      Recipe for Oarrot Muffs – 5 Muffins

                      Recipe for Oarrot Muffs – 5 Muffins

                        I usually make Carrot Cake or Carrot Muffins using AllPurpose Flour for Tea Time. Since I have reduced the use of All Purpose Flour,I thought of alternating APF with Oats flour and it worked beautifully. Now Isatisfy my Sweet Cravings without feeling guilty and…

                      Recipe for Flourless Cookies

                      Recipe for Flourless Cookies

                      Recipe for Flourless Cookies

                      This was my very first attempt at making a healthy version of Cookies. It was specially requested by a friend for her 16-month old Son who was in this phase of eating ONLY cookies. So she thought why not give him a healthy version and be guilt free. I made these for her and the little champe njoyed them! Happy Me 🙂
                      With some guidance from my SIL Sophie of Sophie’s Kitchen Love and a tip I received from Sascha, a certified Nutritionist in Dubai(Just get rolled oats and make your own flour, she once said. Atleast you’ll know you're eating 100% oats and not a mixture. This you can substitute for all your Maida products)
                      So these are Flourless cookies made with Powders of Mixed Nuts and Rolled Oats, which yesss! I ground at home. Do make these super simple and delish cookies for your kiddos and be free off the guilt of them eating junk.
                      Course Evening Snack, Mid-Meal Snack, Tea Time Snack
                      Keyword Cookies, Flourless cookies, Healthy Cookies, Mixed Nuts cookies, Oat Cookies
                      Prep Time 1 hour
                      Cook Time 20 minutes
                      Total Time 1 hour 20 minutes
                      Servings 1 kg

                      Ingredients

                      • 100 gms Almonds
                      • 100 gms Walnut
                      • 100 gms Pista
                      • 200 gms Rolled Oats
                      • Dry Coconut Powder(optional)
                      • Raisins(Optional)
                      • Chopped Cashew(Optional)
                      • Chopped Dates(Optional)
                      • 3 Eggs
                      • 200gms Raw Sugar Powder
                      • 300gms Jaggery Powder
                      • 1tspn Baking Soda
                      • 1tspn Baking Powder
                      • 2 tspn Vanilla essence
                      • 1 tspn Cinnamon Powder
                      • 1/2 Tspn Salt
                      • 100gms Choco Chips(optional)

                      Instructions

                      • Dry Roast the Almonds, Walnuts and Pistas in a pan
                        In a mixer grinder, grind each Roasted dry fruit separately into a fine Powder
                      • Dry Roast the Oats, and powder this too
                      • In a Wide Bowl add all the Ingredients and gently whisk it
                      • Then take a Spatula and Mix the ingredients so that everything is combined evenly
                      • Pre-Heat the Oven on top and bottom heating for 10 minutes on 200 °C
                        On a Baking Tray, place a Parchment paper(NOT a Butter Paper)
                        With the help of a spoon, drop small portions of the cookie mix on the parchment paper
                        Notes:
                        (1) Don’t worry about the shape, because as the cookie is baking, it flattens into circles.
                        (2) The portions have to be small because as the cookie is baking, it flattens and spreads
                        (3) The distance between each cookie mix should be atleast 2-3 inches as it requires space to spread out
                        Sprinkle some more chocolate chips on each cookie mix if you like
                        Note: You can also sprinkle any chopped dry fruits of your choice
                      • Tuck the Tray into the oven and bake the cookies for 20-25minutes (middle rack) on 180 °C
                        Take the cookies off the paper and place it on a cooling rack till it comes down to room temperature.
                        Note: The cookies will be soft to touch as soon as they are ready. Do not panic. They will turn crunchy once they hit room temperature
                        P.S. This is the other batch where I sprinkled coconut shavings on the cookies. I've used this pic as a reference as I forgot to click a pic of this step for the choco chip cookies 🙂 oops!
                      • Once the cookies come down to room temperature, you can place them in an Air Tight container. It stays at room temperature for about 2 weeks after which you will have to refrigerate them (only if they remain!Hahaha)
                        Note: If the cookies go into the air tight container when they are Hot or even slightly warm, the moisture won’t allow the Cookies to remain crunchy and fresh and you may have fungus growing on the cookies within a day or two. So please ensure the cookies are completely cooled to room temperature before they go into the air tight container

                      If you like my recipe, don’t forget to “like” & “share” it with your friends and family. And once you’ve tried my recipe, request you to kindly share your valuable feedback with me. I'd Love to hear from You 🙂

                        Recipe for Instant Rava Dosa

                        Recipe for Instant Rava Dosa

                        The Recipe for these Shortcut Instant Holey Holes was shared by my Mum’s friend and neighbour, Aunty Sandra. As soon as I saw the ingredient list and procedure to make these dosas, the lazy side of me got so excited because this is so Easy…

                        Recipe for Bombil(Bombay Duck) Xec Xec – A Green Curry without Coconut

                        Recipe for Bombil(Bombay Duck) Xec Xec – A Green Curry without Coconut

                        Bambai see aya mera dost! dost ko salaam karo!!! Rath ko Khao pio, din ko Xec Xec karo! For us in Dubai, to see Fresh Bombay Ducks(Jeetem Bombil) in the market is like seeing Lorna and Remo performing together LIVE…INSANE Excitement Whenever my Bitter Better…

                        Recipe for Xinaneo Rava Fry(Mussels)

                        Recipe for Xinaneo Rava Fry(Mussels)

                        Recipe for Xinaneo Rava Fry(Mussels)

                        My Drool affair with Xinaneo(Mussels) goes way back to my childhood days during my Summer vacation in Goa. I clearly remember, these used to be a delicacy and would be sold at a Fat Price. The Best quality Big sized Xinaneo would go to the Hotels and the Elite and the ones that would get sold in the market used to be the medium sized or small sized chaps but what the heck, since we never got them in Bombay, we would buy a share and come home and all we would ever want is crispy rawa fry Xinaneo.
                        After cleaning the Xinaneo, we would barely get about 10-12 pieces and we were 4 to eat which meant we would get only 3 per person. I remember how I would look into my Brother’s plate to see if he would just feel sorry for me and see my drool but no chance But Dad always to the rescue “Arey take mennnnnn! When I see you’ll eating my stomach gets full” andI so shamelessly would take his share! Hahahahaha without any guilt
                        And till date, This is the First thing I eat as soon as I touch down Goa or if we go to a restaurant in Goa, this has to be on my order list and Yes, I still secretly wish someone suddenly says No to the last piece on the table hahahaha
                        Here, in Dubai, we are so Blessed that we get the Best quality Mussels(and Fish on the whole) which are fairly affordable and I can go and enjoy my stash of Xinaneo. The Two best people I love to share my Food with are MY DAD(because his stomach gets full when we eat) & MY BITTER BETTER(because he isn’t such a huge fan of eating anyway)
                        Here’s my recipe for Rawa Fry Xinaneo
                        Course Appetizer, Side Dish
                        Cuisine Goan, Indian
                        Keyword Mussels, Mussels rava fry, Rava fry, rava fry fish, Semolina, Xinaneo rava fry

                        Ingredients

                        • 1/2 tspn salt
                        • 1 tspn vinegar
                        • 1/2 tspn ginger garlic paste
                        • 1 tspn Turmeric powder
                        • 1 tspn Red chilly powder
                        • 1/2 tspn Sugar

                        Instructions

                        • When you purchase Xinaneo, keep them in the freezer over night
                          Next day, take them off and let them thaw to room temperature
                          They will automatically open up
                        • Now With the help of your thumb, use a little force and open the shell, just as you open a book
                        • Remove the sack-like object from the shells of each Mussel and discard it
                        • Using the back of your thumb, very gently, run the shell all around and Separate it's flesh from the shell. Do this for all the mussels
                        • Place all the mussel meat into a bowl of water and gently wash the mussel flesh
                          Drain off all the water and transfer the mussels into a strainer placed over a bowl and let all the water get drained off completely
                          Note: If there’s even a little water on the mussels, if wont turn crispy while frying or there are chances of the rawa getting separated from the mussel
                          You can also place the Mussels on a muslin cloth or Paper Napkins to further drain off all the excess water
                        • Add all the spices to the Mussels and mix it well
                        • In Pan, heat 2 Tbspn of oil on Medium high heat
                          Note: If the Oil is not to Hot the rawa will separated from the mussel
                          If the Oil is too Hot, The rawa will get cooked first and fast, leaving the mussel chewy and hard. So ensure that the oil is heated well
                        • Coat each marinaded Mussel with fine unroasted Rava(semolina)on both sides
                          Fry the mussels immediately after marinating or else a lot of water will leave from the mussels because of the salt and vinegar, etc.
                        • Transfer the rawa coated mussels into the Pan & shallow fry on medium flame for 5-7 minutes on each sides until kurkurit(crispy)
                          Enjoyyy these yummy kurkurit Mussels as a side or a starter
                          Note: My Mum mixes only Turmeric powder, Chilly powder, Salt and Vinegar and it tastes superb too
                        • I started adding a little sugar and ginger garlic paste after some people suggested the same on a food group on social media. And I enjoy it! But you can try both and see which one you prefer 😊

                        If you like my recipe, don’t forget to “like” & “share” it with your friends and family. And once you’ve tried my recipe, request you to kindly share your valuable feedback with me. I'd Love to hear from You 🙂

                          Recipe for The Boombay Mac Salad

                          Recipe for The Boombay Mac Salad

                          Whenever I go for a wedding reception, my eyes are always looking for the Macaroni salad at the salad counter. I absolutely love macaroni in any form, pasta, soup, salad or plain butter garlic pepper. I usually make Macaroni salads whenever there are left over…

                          Recipe for Momsy’s Beef with Bacon Chilly Fry

                          Recipe for Momsy’s Beef with Bacon Chilly Fry

                          Momsy is known for her extreme love for cooking and feeding her loved ones. She loves to elevate dishes with add ons. For example: Masoor Dal with Chicken, Dal Curry with Bacon, Omelette with Ham and Cheese and her all time fave is Beef Chilly…

                          Recipe for Beef on The Roques!

                          Recipe for Beef on The Roques!


                          Recipe for Beef On The Roques!

                          Very recently on a Food Group on Social Media, I came across a picture of a Beef Dish which was shared by Mr. Roque D’souza from Pakistan. That Beef looked so Succulent, Tender and Droolworthy and I could literally imagine myself digging into that plate with a Chilled Beer on the Beaches of Goa. It looked exactly like the Pepper Beef Steak we as a family enjoy at one of our favourite Restaurants in Goa called Terry’s by the Ferry station in Betim.
                          Beef Steaks are cooked directly on a grill or pan without pressure cooking it and that is something I could never get the confidence to even try out. And when I saw the picture of the Beef that Roque shared, I secretly prayed that he Pressure cooked it!
                          The curious and inquisitive me obviously could not resist requesting Roque for the Recipe and so kindly and painstakingly, not only did he share the Recipe but also shared steps on how to make it PERFECT! And NO!! There was no Pressure cooking used! Ouch!  Hahaha
                          Did I have a doubt or fear of how the dish would turn out???NO Way! That is because he explained it so well and I was confident that it would turn out to be absolutely Lip Smack Delish! And it Did!
                          I immediately sent the recipe and pictures to my Mom and told her how I finally learnt to cook Beef without the Cooker and that we don’t have to wait until we go to Goa to eat our favourite Steaks with Onions and Potatoes and she got so excited and said “arey baap re No cooker? How?? but ok I’ll also try now. You tell me exactly what to do ok” 😊😊
                          This entire dish belongs to Roque and I dedicate this recipe to him. Thank you, Roque, for getting me and My Mum to do what we never had even half an inch of confidence to think of, leave alone giving it a shot. This dish had to have your name on it and hence “BEEF ON THE ROQUES” it is which will also be a perfect chakna with a smooth 90 on the Rocks hahaha!!This is a special one for me, Roque. So, THANK YOU!😊
                          Course Appetizer, Main Course
                          Cuisine Goan, Indian, Pakistani
                          Keyword beef, Beef Cheeks, Beef Steak, Pepper Beef, Sliced Beef
                          Prep Time 1 hour
                          Cook Time 45 minutes
                          Total Time 1 hour 45 minutes
                          Servings 4 people

                          Ingredients

                          • 1kg Beef Beef Chunks
                          • 1.5tspn Salt
                          • 3-4tbspn Vinegar
                          • 1/2cup oil
                          • 5-6 Medium sized onion(cut into quarter inch thick rings)
                          • 2 small Beef stock cubes
                          • 4 Big Potatoes cut into round slices and pan fried (optional)

                          For the Marinade

                          • 2.5tspn Pepper Corns
                          • 1.5tspn Cumin Seeds
                          • 1tspn Coriander Seeds
                          • 1tspn Ajwain Seeds
                          • 2 pieces of 2 inch long Cinnamon stick(broken into pieces)
                          • 8-10 cloves
                          • 1 Full Pod of Garlic flakes
                          •  2 inch piece of Ginger

                          Instructions

                          For the Marinade

                          • First add the Pepper Corns, Cumin seeds, Coriander seeds, Ajwain, Cinnamon and Cloves in a dry grinder and grind into a fine powder
                          • Then add the Garlic flakes and Ginger and grind all these ingredients into a paste
                          • Wash the Beef steaks and drain in a sieve
                            Note1: Get the steaks cut by the butcher or cut it at home if possible. It should be cut into Quarter inch thick and atleast 2 and half inches long slices. Try to get a nice tender cut of Beef
                            Note2: Another tip shared by Roque to get the Beef to turn tender: In a bowl, add the beef slices and add 2.5tspn baking powder to 500 gms beef slices. Mix it well with the Beef slices, cover the bowl and let it rest for 45 minutes. Then, wash the beef and you can start with the marinade process
                          • In a bowl add the washed Beef and to that add the salt, vinegar and the ground marinade paste and mix it well till the beef is well covered. Keep it for atleast 1 hour. I kept it for a day since I had time on hand
                          • In a Pan, heat the oil
                          •  Add the beef slices into the Pan
                          • The meat will release its juices. Keep frying the meat on medium heat for atleast 5 minutes then add the stock cubes and cover the pan
                          • Let this cook on low heat, stirring at regular intervals
                            Note: Cover the pan at all times so that the juices remain intact. If the pan is not covered, the beef will turn dry sooner and the juices will evaporate faster, leaving the Beef to dry out and it may get stuck to the pan. Let the Beef cook in its own juices and Oil. That is the secret to keep it crunchy yet succulent
                          • As the juices begin to evaporate, check for salt and vinegar
                          • After about 30 minutes, Check if the beef is tender and add the sliced onions and keep tossing
                          • Here, leave the pan open if you like the onions crunchy. If you like the onions softer(like my Mum usually does)
                            , cover the pan and let it cook for about 5 minutes. Turn off the heat and keep the pan covered for sometime
                          • If you like Potatoes, you can pan fry potatoes and add to thebeef at the end or as Roque suggested, you can make a mash and have it on theside! We at home are Potato lovers. So, we went for Pan fried Potatoes. Such anAbsolute BEAUTY of a Dish!! Enjoyyyyyyy 😊
                          • This is what Roque had posted. Just look at all that BEEF!! ufffff

                          If you like this recipe, don’t forget to “like” & “share” it with your friends and family. And once you’ve tried my recipe, request you to kindly share your valuable feedback with me. I'd Love to hear from You 🙂 

                            What I did differently

                            • -I used 500 gms beef and reduced the quantities accordingly
                              -I used just a pinch of Ajwain as I'm not such a great fan of it
                              -I didn't have beef cubes so I used Vegetable cubes instead
                              -Since the quantity of my Marinade masala was less, I added 1 tspn water just so I could grind the spices into a paste
                              -
                            Recipe for Sick Khichdi

                            Recipe for Sick Khichdi

                              I make two types of Khichdi 1) Masala khichdi which is super yum and which my mum loves(mum is not a khichdi fan but Masala khichdi she LOVES) 2)Sick Khichdi which is watery, plain and light usually made when one is sick (Not so sure…

                            Recipe for Chicken Heart Chilly Fry

                            Recipe for Chicken Heart Chilly Fry

                            ‘Kalliz gupp gupp zhata’ was something my Nana always said whenever she'd be scared! If she saw me cooking so many hearts, I’m damn sure she’d use her famous line even today! Dedicating this post to Nana in Heaven on her 22nd Death Anniversary! May…

                            Recipe for The Nostalgic Mumbai Masala Milk

                            Recipe for The Nostalgic Mumbai Masala Milk

                            Recipe for The Nostalgic Mumbai Masala Milk

                            Whenever I think of Masala Milk, I immediately think of my White uniform, 1st button off, socks rolled down, shoes full of mud, hair all messed up, after playing in the back garden and looking like a complete riot, super excited to get off that school bus and run to the Aarey milk shop near my lane and have a chilled bottle of Masala Milk Bottoms up! Yummmmmm.... And then when it's over, try hard to get all the dry fruits that are stuck at the bottom of the bottle, by literally banging the bottle into the mouth and the passersby watching and laughing at you....ohhhh the simple joys of childhood!!
                            However, now, whenever I go to India, I always go to an Aarey milk shop and ask for Masala Milk but they say that they’ve stopped producing it now. But I shamelessly go every time to different stores just to check, you never know right???
                            Here, in Dubai as the Summers have creeped in, I decided to try my hand at making Masala Milk at home. That taste and the crunch of the dry fruits is still fresh in my head. Thank God I got into Food which helps me recognise the taste and textures of various ingredients in a dish which often helps me get quite close to my favourite foods that are either unavailable in Dubai or are not even close to what we eat back home.
                            So, here’s how I made the Masala Milk. The measurements of the ingredients are just for your understanding. This recipe does not require exact measurements. Just make it as per your taste
                            Course Beverage
                            Cuisine Indian
                            Keyword Flavoured Milk, Masala Milk, Milk, Sweet Milk, Thandai
                            Prep Time 10 minutes
                            Cook Time 10 minutes
                            Resting time 6 hours
                            Total Time 6 hours 20 minutes

                            Ingredients

                            • 1litre Milk(4 cups approx.)
                            • 2 strands of Saffron(optional)
                            • 1.5 Tspn Green Cardamom Powder(The star ingredient)
                            • 6 Table spoon Sugar(If it's not sweet enough it's going to taste Blah)
                            • 1.5 Tspn Turmeric Powder
                            • ¼ Cup (approx 30 gms) Mixed Nuts – Almonds & Cashews roughly chopped(don't chop them too small)

                            Instructions

                            • In a vessel, add the Milk, Sugar, Turmeric Powder and Saffron and bring it to a Boil
                            • As soon as the Milk begins to boil, add the Cardamom powder and the chopped Nuts and let it boil just once. Turn off the heat and allow it to cool at room temperature
                              Note: Adding the cardamom powder at the end ensures the milk retains maximum flavour from the cardamom. If you add it initially and allow it to boil with the milk, it reduces the flavour
                              Also, adding the chopped nuts towards the end keeps the nuts crunchy. If you boil the nuts along with the milk, it might get soft and lose it’s texture
                            • Once the Milk is cooled, tuck it into the refrigerator and allow it to chill. This drink is best enjoyed nice and chilled.
                              Note: In this recipe, we just have to allow the milk to boil once. We don’t need the milk to continuously boil and thicken. It should have the consistency of a drink and not a milk shake

                            If you like my recipe, don’t forget to “like” & “share” it with your friends and family. And once you’ve tried my recipe, request you to kindly share your valuable feedback with me. I'd Love to hear from You 🙂

                              Recipe for A One Pot Choris Masala Chicken Pulao

                              Recipe for A One Pot Choris Masala Chicken Pulao

                                Long distance phone calls with your loved ones don’t only last longer than you think they will, they also give some super amazing ideas to try some new stuff!So I was talking to my cousin Dalu(my 3rd or 4th cousin I still don’t know…

                              Recipe for Dal Gosht

                              Recipe for Dal Gosht

                              My Bitter Better and I have been craving a good Dal Gosht ever since we came to Dubai 2014. Whatever we’ve tasted are either too Masaledaar or too bland. Our favourite Restaurant in Bombay is Hill View Restaurant in Borivali, which makes the yummiest Dal…

                              Recipe for Goenchem Ankvar Kodi –  Sorak

                              Recipe for Goenchem Ankvar Kodi – Sorak

                              Recipe for Goenchem Ankvar Kodi - Sorak

                              Sorak is a Simple Goan Curry which does not contain any additional Protein. No Fish, No Prawn No Eggs Nothing at all. It draws it's richness from Fresh Grated Coconut and it’s simplicity from the simplest and bare minimum ingredients that are easily available on your Kitchen shelf.
                              In Goa, ‘Ankvar Kodi’ (which translates to “Spinster Curry”) is a fun name given for Sorak since it is a plain curry that contains no Meat or Fish. A very Senior Ranpinn - (The Title given to people who cook Traditional Goan Food in Bulk during Feasts and Functions in the Village) once told me that back in the day, Sorak used to be eaten mostly during the Rainy season when the Fishermen couldn't venture into the Deep Sea to catch fish. They would eat this simple curry with some side dish.
                              You can use the Sorak Masala Paste to make A Goan Fish, Prawn or Egg curry too.
                              My aunt Cecil, used to make the Best Sorak curry that I have ever eaten till date. I used to drink that curry whenever I was at her place and boy! I miss it so much. I had never asked her how she made it(I know such a dhakkan I am) and now that she’s no more, I try my best to make it like how she would. So, very recently, I asked my Antu uncle(who by the way is a damn cook too), her husband to pleeeeeeeease share the exact recipe with me because I wanted it just like how I eat it at their place. And i'm over the moon that it tastes sooooo close to what she used to make. So here’s my Cecil aunty and Antu uncle’s Sorak recipe.
                              Course Main Course
                              Cuisine Goan, Indian
                              Keyword Curry, Goan Curry, Saurak, Sorak, Sorak Curry
                              Prep Time 15 minutes
                              Cook Time 20 minutes
                              Total Time 35 minutes
                              Servings 6 people

                              Ingredients

                              • 1 Cup Fresh grated Coconut
                              • 1 Tspn Cumin seeds or 1/2 Tspn Cumin Seed Powder
                              • 1 Tspn Coriander Seeds or 1/2 Tspn Coriander Seed Powder
                              • ½ Tspn Turmeric Powder
                              • 4 Kashmiri Chillies or 1 Tbspn Kashmiri Chilli Powder
                              • 4 Large Garlic cloves
                              • 1 Onion roughly diced
                              • 3 Tomatoes roughly diced
                              • ½ Cup Water for grinding the Masala

                              Other ingredients

                              • 1 Onion – chopped fine
                              • 1 Tomato – chopped fine
                              • 2 Chillies - slit
                              • 4 dried Kokam shells
                              • 1 Tbspn Oil(I use Coconut Oil)
                              • 1 Stock Cube(approx 6 gms)
                              • 2-3 Cups Water for the Curry

                              Instructions

                              • Grind all the ingredients together in a small mixer jar using water little by little
                                Some Top Secrets: While grinding the Masala, it’s always best to use a small mixer jar(the dry jar) so that all the ingredients break down well and the masala turns into a smooth and fine consistency. If you use the Big Jar, the ingredients may not break down as much and the Masala will remain coarse
                                Also, while grinding the masala, if you add all the water at once, the ingredients won’t break down and in turn, the Masala will remain coarse.  
                                Ensure you use only Kashmiri Chillies/Powder or else the curry may turn Brownish and not Orange. There are some dried red chillies which many people mistake for Kashmiri Chillies. Those are Bedgi or Degi chillies which are very Spicy. Also, some brands use a mix of Chillies for Chilli Powder. Those packets will read as just 'CHILLY POWDER' So you have to be careful to pick up 'KASHMIRI CHILLI POWDER'. Also, if you're buying EVEREST brand of Chilli Powder, they have 3 varieties 1) Kashmiri Mirch 2) Thikhalal 3) Mirchi Powder. So, for our Goan curries, I pick up the Kasnmiri Mirch variety. So just be careful while purchasing
                              • In a vessel, heat the Oil on medium heat. Once the Oil turns Hot, Add the Chillies, Kokam, Onion and Tomatoes in the Hot oil. Saute all this until the Onions turn light Brown.
                              • Then add the Curry Paste
                              • Add 1 cup water into the Mixer Jar, give it a shake and add that water into the vessel
                              • Add some more water into the vessel, add the stock cube, stir it well and cover with a vessel
                              • Allow the curry to boil for about 10 minutes and cook it asper the consistency of your choice. If you like it thick, boil it a little longer with the lid off.
                                If you like it thin and runny, add more water and boil accordingly
                                Note: The Tangy taste comes from the Tomatoes and Kokam. However, if you like the curry to be more Tangy, you can add some Tamarind Pulp as per your taste
                              • Enjoy this curry with plain white rice and a side dish of either Prawn chilly fry or Beef chilly or some fried fish or Prawn or just drink it the way I do😊 😊 And do whisper a small prayer for my loving Cecil aunty in Heaven and my Antu uncle who lives on to cherish all her memories! He’s 75+ and still Rocking the Kitchen!

                              If you like my recipe, don’t forget to “like” &“share” it with your friends and family. And once you’ve tried my recipe, request you to kindly share your valuable feedback with me. I'd Love to hear from You 🙂 

                                Recipe for Methi-Til Besan Chilla

                                Recipe for Methi-Til Besan Chilla

                                The Best Part about a Chilla is that you can mix and match and add whatever veggies you want and it still tastes superb!(infact more the variety of veggies, better is the taste) Chilla is the new cool these days and a Super Healthy and…

                                Recipe for Mommy-in-Law’s Super Delicious Raddish Bhaji

                                Recipe for Mommy-in-Law’s Super Delicious Raddish Bhaji

                                I lurrrrrrrrrve the way my Mommy-in-law makes this raddish bhaji. With plain Hot chapatis, this makes for an amazing light yummy dinner!The traditional Goan way of making raddish is in a foogath style with coconut, an onion a green chilly very little oil and water…

                                Recipe for Tender Coconut Pudding

                                Recipe for Tender Coconut Pudding

                                Recipe for Tender Coconut Pudding

                                I was introduced to Tender Coconut Pudding here in Dubai at a Kerala Restaurant ‘Calicut Paragon’ and I was hell bent on learning how to make it at home. I checked many a Youtube video and the main ingredient used in this pudding is Gelatin or AgarAgar(china grass strands). I checked at so many stores but I couldn’t find unflavoured gelatin or agar agar and was so restless. But until then, I gave Calicut Paragon a lot of business! Hahaha
                                 However, on our Goan group, TGF on Facebook, there were three very kind ladies Ashney Rebello, Shamika Andrade and Sandra Sarkar who shared their recipes and I was hell bent on trying their recipes. I asked in the Dubai community about where I could purchase unflavoured Gelatin and Agar Agar strands from and to my good luck, I finally managed to get my hands on both. I tried out all three recipes shared by the girls, they were super DELISH. But my mind was set on the Calicut Paragon pudding and obviously I couldn’t go and ask the restaurant for their recipe. So I tried nearly 10 different combinations, measures and ingredients and finally I managed to reach close and I danced like my wobbly jiggly Tender Coconut Pudding. I’d love to share with all of you, what I did and how I make my Tender Coconut Pudding now
                                Dedicating this post to Calicut Paragon, Ashney Rebello, Shamika Andrade and Sandra Sarkar for giving me this keeda to taste and enjoy something new, different and so refreshing!
                                After attempting various ratios and combinations, researching, reading (not forgetting wasting hahahaha) all about Agar Agar and Gelatin, I've shared some important tips during the process and at the end of the post as well, so that you guys don't have to face any disappointments while making this delicious Dessert. Do keep all the gyaan in mind before you start making the pudding. Hope it helps 🙂 Enjoyyyyyy!!!
                                 
                                Course Dessert
                                Cuisine Indian
                                Keyword Coconut Pudding, Gelatin Pudding, pudding, Tender coconut, Tender Coconut Pudding
                                Prep Time 20 minutes
                                Cook Time 20 minutes
                                Servings 4 people

                                Ingredients

                                If using Agar Agar Strips

                                • Water of 1 Fresh Tender Coconut(approx 1 Cup)
                                • Flesh of 1 Tender coconut(make a coarse paste or pulp and keep aside) (approx ½ Cup)
                                • 3 gms(or 2 tbspn ) unflavoured Agar Agar strands(cut into 1 inch pieces) (for 3 gms agar agar you need to use 500ml liquid. so the tender coconut water + coconut milk+ coconut pulp together should be 500 ml in total)
                                • ½ Tspn Vanillaessence(optional)
                                • 1/2 Cupthick coconut milk(freshly extracted or tinned)
                                • 5 Tbspn Sugar(you can adjust as per the sweetness of the coconut water)

                                If using Gelatin Powder

                                • Water of 1 Fresh Tender Coconut(approx 1 Cup)
                                • Flesh of 1 Tender coconut(make a coarse paste or pulp and keep aside) (approx ½ Cup)
                                • 10 gms (or 1 Tbspn) unflavoured gelatin powder (for 10gms gelatin, you need to use 500ml liquid. so the tender coconut water + coconut milk+ coconut pulp together should be 500 ml in total)
                                • ½ Tspn Vanilla essence(optional)
                                • 1/2 Cup thick coconut milk(freshly extracted or tinned)
                                • 5 Tbspn Sugar(you can adjust as per the sweetness of the coconut water)

                                Instructions

                                • Transfer the Coconut flesh into a plate
                                • Transfer half the quantity of the Coconut flesh into the mixer grinder to make a thick puree of the Tender coconut flesh by using very little tender coconut water
                                • Randomly cut the remaining half Tender Coconut flesh into small strips or pieces and keep aside

                                If using Agar Agar

                                • Since the agar agar strands are very long and extremely light in weight, it becomes challenging to weigh or measure it accurately, So, This is how you can cut the agar agar strips into 1 inch pieces and fit it into a 2 tbspn measure or weigh 3 gms on the weighing scale. it becomes easier
                                  Note: I like my pudding a little soft hence I use these quantities. The standard ratio is 5gms agar agar to 320 ml liquid. I've tried this ratio and found my pudding very stiff. It is convenient to cut and shape, de-mould, etc. but the pudding was extremely stiff. If you like it that way, you can use the standard ratio of 5gm:320ml
                                • In a vessel, transfer only the Tender coconut water and Soak the Agar Agar in it for 15-20 minutes
                                  Note: this step is very important as it is used for hydrating/activating the agar agar strips
                                • After 15-20minutes,keep this vessel on medium low heat and allow it to boil until all the agar agar has completely dissolved (you may feel it's not working or not getting dissolved but it will after sometime. it takes around 10-15 minutes )
                                  Note: when the agar agar is boiling, please ensure you keep stirring or else the agar agar could get stuck at the bottom of the vessel
                                • As soon as the agar agar is completely dissolved, add the sugar, vanilla essence, coconut milk and coconut pulp and pieces(if using) and bring it to a boil (keep stirring or it may split)
                                  As soon as it comes to a boil, immediately turn off the heat
                                • Pour the mixture into a bowl or several small bowls of your choice. 
                                  Once it comes down to room temperature, put a lid on it or cover with cling wrap or foil sheets and tuck it into the refrigerator and let it chill for around 5-6hours(DO NOT place it in the Deep Freezer)
                                  Note: when pouring into the bowls, it may still be in liquid form. so don’t worry that the pudding hasn't formed or won't form, etc. it gets formed in the fridge
                                  Also, always pour the pudding liquid very slowly and from the closest distance possible in order to avoid air bubbles going into the pudding. If you pour it too fast or from a height, your pudding will have air bubbles on the surface
                                • Once chilled, whatr u waiting for??? ATTACK!!!!! 
                                  Note: Slide a knife or spatula around the pudding and release the edges from the bowl(s). Over turn the bowl into a plate and let the pudding slide through!! Garnish with Mint Leaves and cherries(optional). Iflike me, you're too impatient, just eat it from the bowl(s) itself. Skip the overturning step 🙂

                                If using Gelatin Powder

                                • Take around 1/4 cup of the liquid mixture( Tender coconut water+ Coconut Milk+ Coconut Pulp) aside in a bowl and sprinkle the gelatin in it
                                  Note: Always ensure the liquid is at room temperature. If the liquid is cold(refrigerated) the gelatin won't dissolve and if the liquid is hot, it may clump up
                                • Stir the gelatin and keep aside for 10-15minutes
                                • Add the remaining Coconut Water, Coconut Milk and Coconut Pulp & pieces along with the sugar and vanilla essence
                                • Bring this to boil on Medium heat and immediately turn off the heat(keep stirring)
                                • Pour the soaked gelatin mixture into the hot liquid
                                • Stir until all the gelatin gets completely dissolved in the liquid(do not boil or cook gelatin)
                                • Pour the mixture into a bowl or several small bowls of your choice
                                  Once it comes down to room temperature, put a lid on it or cover with cling wrap or foil sheets and tuck it into the refrigerator and let it chill for around 5-6hours
                                  Note: when pouring into the bowls, it will still be in liquid form. so don't worry that the pudding hasn't formed or won't form, etc. it gets formed in the fridge
                                  Also, always pour the pudding liquid very slowly and from the closest distance possible in order to avoid air bubbles going into the pudding. If you pour it too fast or from a height, your pudding will have air bubbles on the surface(as seen in the picture)
                                • Once chilled, what r u waiting for??? ATTACK!!!!! 
                                  Note: Slide a knife or spatula around the pudding and release the edges from the bowl(s). Over turn the bowl into a plate and let the pudding slide through!! Garnish with Mint Leaves and cherries(optional). If like me, you're too impatient, just eat it from the bowl(s) itself. Skip the overturning step 🙂

                                Some duniya bhar ka bhaashan as the pudding is chilling in the fridge 🙂

                                • 1.  You can make a pulp or coarse paste of Half the Tender coconut Flesh and Cut strips/pieces of the remaining half too. it gives a beautiful texture to the pudding while biting into it
                                  2.  If you are lucky enough and get alot of flesh(malai) from the coconut, you can make the pudding using only Coconut water and the flesh alone, skip the coconut milk
                                  3.  You can make tender coconut jelly too using this recipe. For that u will use only the coconut water, agar agar & sugar
                                  4.  I've tried using milk and condensed milk too. But i preferred the one without because condensed milk and milk make the pudding very thick, creamy and rich and what I eat at Calicut Paragon is Light & Crunchy. But you can sure use it if you like. If using condensed milk, adjust the quantity of sugar accordingly
                                  5. Whatever combination you use, ensure your liquid is 500ml to 10gms of gelatin or 500ml to 5gms of Agar Agar. Anything more ore less will make the pudding either stiff or may remain in liquid form accordingly
                                  5.   I always prefer using Gelatin. It's much easier to work with. But what's important to keep in mind is that Gelatin and Agar Agar, both have totally different textures. With Agar Agar, the pudding will be more firm, crunchy and light while with Gelatin it will be more wobbly, dense and smooth and very velvetty. The choice is yours which one you prefer
                                  6.   Whenever you boil Coconut Milk, especially if it's freshly extracted, do not boil on high heat and do not leave it unattended. You have to continuously keep stirring or else it will split and you will get a grainy curd like consistency. It doesn’t affect the taste but it looks very un appetizing on a pudding. The best is to not allow it to keep boiling. One boil and turn off the heat
                                  7.   When using agar agar, we add the coconut milk later in order to avoid excess boiling of the coconut milk which may increase it's chances of it splitting
                                  8.   When using Gelatin, ensure the 1/4cup of liquid is take from the total 500 ml liquid that is measured. Nothing additional
                                  9. Important Tip: If this is your first attempt, I would recommend using either plastic or silicone moulds/bowls only, especially if you're going to de-mould the pudding. Because when you keep the pudding to set in glass or steel or any metal bowl, it is a little challenging to de-mould or to release the edges and over turning them into a plate can be quite challenging.. You may have to give it a hard hit, pat it hard or bang it on the plate, etc. Hence, better to use silicone or plastic.

                                If you like my recipe, don’t forget to “like” & “share” it with your friends and family. And once you’ve tried my recipe, request you to kindly share your valuable feedback with me. I'd Love to hear from You 🙂

                                  Recipe for Smoked Malai Tangdi Fry

                                  Recipe for Smoked Malai Tangdi Fry

                                    Malai Tangdi Kebabs used to be a regular in Dad’s tiffin! Oh Yeahhh! My Dad never took a tiffin from home, instead he used to get home his share of Lunch and Dinner from the Hotel! Hahah we the lucky kids 😊 Malai Tikkas,…

                                  Recipe for Cream of Mushroom Soup

                                  Recipe for Cream of Mushroom Soup

                                  Mushroom Soup is something I’ve enjoyed at almost all Buffets I’ve been too. And now I sit to  wonder why is this soup so commonly served?? If you know the answer, please feel free to write to me:) And No, I'm not complaining,  I just…

                                  Recipe for Sweet Habibi (Date & Roasted Cashew Bathk)

                                  Recipe for Sweet Habibi (Date & Roasted Cashew Bathk)


                                  Recipe for Sweet Habibi (Date & Roasted Cashew Bathk)

                                  One of The Best things Social Media has done for so many of us is that it has given us some of the Most AMAZING friends and one of them is the Gift of my dearest Linda Gonsalves Fernandes to me! We connected on A Food Group called Traditional Goan Foodies (TGF) on FB and ever since then we're more than just friends.... Like literally 🙂
                                  This Summer, Linda and I recently shot an episode for THE FAMILY KITCHEN here in the UAE for Colors TV. Our Wooooohoooo Moment!! Our Love for GOAN Cuisine is something that we've always been so PROUD of and that's exactly what we cooked on the show as well. Linda made my Favourite Recheado Chicken Wings for me! So Yummmmm And I made a Sweet HABIBI Bathk cake for her. HABIBI in Arabic means "My Darling" or "My Friend" or "My Dear" and that's exactly what Linda is to me 🙂 🙂 🙂
                                  Since Linda and I met and became friends here in Dubai, I decided to create a fusion of Dubai and Goa. The Habibi Cake is A Traditional Goan Bathk made with a twist by adding Dates and Roasted Cashew Nuts, Decorated with Date Cream!
                                  A Huge shoutout to our friend Roma Borges from Colors for observing our Passion for Cooking and considering us worthy for this Great opportunity. Our episode was Aired on Colors TV UAE on Sunday, 16th May 2021 at 7:30 p.m UAE time. You can view it on YOUTUBE(The Family Kitchen episode 6) too. Here's the link https://www.youtube.com/watch?v=z9lhr6LZwSQ. Do try both the Recipes and let us know what you think Your feedback will mean so much to us! Thank You for Always being so Motivating, Kind and Continuously pouring out your Blessings upon the two of us!
                                  Here's the recipe for HABIBI Cake 🙂
                                  Course Dessert, Tea Time Snack
                                  Cuisine Fusion, Goan
                                  Keyword Bathk, Batica, Cake, Coconut cake
                                  Prep Time 1 hour
                                  Cook Time 50 minutes
                                  Total Time 1 hour 50 minutes
                                  Servings 1 kg

                                  Ingredients

                                  • 200gms Dessicated coconut(Dried Coconut)
                                  • 200gms Semolina(unroasted)
                                  • 250gms whole Sugar
                                  • 200gmsDates(de-seeded)
                                  • 120gms Salted butter
                                  • 1/4 cup Oil(Any Oil that doesn’t have a strong flavour. I use Sunflower oil)
                                  • 1.5 Tspn Baking Powder
                                  • 1/2 Cup boiling hot water
                                  • 1/4 Tspn salt
                                  • 2 Tspn Green Cardamom powder
                                  • 1 Tspn Vanilla Essence
                                  • 5 Eggs
                                  • 20-30gms Cashews(adjust as per your preference)

                                  For the Date Cream(thisdoesn’t call for any specific quantities. It all depends upon your taste)

                                  • 2 Tbsp Hot Water
                                  • 50-60 gms de-seeded Dates(adjust the quantity as per preference)
                                  • 1 Cup of Thick Fresh Cream or Stiff Whipped cream(unsweetened)
                                  • ½ Tspn Vanilla essence

                                  Instructions

                                  • In a wide Pan, Roast some Cashew Seeds on Medium Heat and once cooled, roughly chop it and keep aside
                                  • Soak the Dates in Hot water and keep aside until it's cooled down to Room Temperature
                                  • Once the Dates have cooled, you can either blend it in a mixer and make a pulp/pureé or with the help of a Fork you can roughly mash it
                                  • Mix all the Ingredients in a Big Wide Bowl and Keep aside
                                    Note:
                                    The Traditional Bathk doesn't call for Oil. However, here, since I've used Dates in Hot Water, this could de-hydrate the bathk and it may turn dry. Hence, to ensure the bathk retains it's moisture, I've added Oil.
                                  • Traditionally, after mixing all the ingredients in a bowl, we leave the bathk mix aside to soak at room temperature over night. However, I have received many questions where people are not comfortable to keep the ingredients soaked at room temperature for such long hours, considering the extreme Hot climate. So I've tried baking the Bathk immediately without soaking the ingredients (as I’ve seen my Mom and friend’s Mom Aunty Jaunita baking her bathk) and it turned out absolutely Fantastic. SO if you don't wish to soak the mix overnight, you can bake it immediately.
                                    Pre-heat the Oven at 200°c (Top and Bottom Heating simultaneously. If you have an oven that cannot heat top and bottom together, then just bottom heat is fine) for10minutes
                                  • Line a cake tin with Parchment paper and grease with oil(any oil that doesn’t have a strong flavour)
                                    Pour the Cake Mix into the tin and leave around 1 inch space for the Bathk to rise
                                    Note: Since Bathk doesn’t contain flour, it won’t rise as much as any other cake, so 1 inch space is enough
                                    Garnish with some Chopped Dates & Chopped Roasted Cashew
                                    Tuck the Cake into the oven on the lower most rack
                                  • Let it bake for 10minutes on 200°c and then bring the heat down to 180°c and let it bake for the next 30-40 minutes or until the skewer comes out clean
                                    Keep the Cake tin to cool at room temperature
                                    Note:
                                    Do Not be in a hurry to cut the cake when it’s Hot. Not only will you get some big time ‘Chatkas’ but also will the cake break while cutting
                                  • Enjoy your Habibi Bathk with all your Habibis!
                                  • Another Option you have is to make Cupcakes
                                    All steps remain same, except that instead of the cake tin you will line a cupcake Mould with Cupcake paper cups and transfer the cake mix into the paper cups(without greasing with oil)
                                  • Pre-heat the oven for 10minutes on 200°c and Bake the cupcakes for 20 minutes on 180°c on the lower rack

                                  For the Date Cream(This is optional. Usually Bathk is a Tea-time cake and we don't use any cream. But I wanted to make it a little special for Linda:)

                                  • In a small bowl soak the Dates in Hot Water
                                    Once it comes down to room temperature and you feel that the Dates have completely softened, take a whisk and make a thick puree
                                  • Add the Cream and Vanilla essence and whip/mix it well
                                  • Transfer the Date Cream into a piping bag
                                  • Pipe some onto the cupcakes or if you don’t wish to do anything fancy, you can skip the piping step and with the help of a spoon ,just add a spoon full of the cream on the cupcake or just simply use the cream as a dip while eating the cake.

                                  If you like my recipe, don’t forget to “like” & “share” it with your friends and family. And once you’ve tried my recipe, request you to kindly share your valuable feedback with me. I'd Love to hear from You 🙂

                                    Recipe for a Spicy Snake Gourd/Poddolim/Podoi/Padval Bhaji

                                    Recipe for a Spicy Snake Gourd/Poddolim/Podoi/Padval Bhaji

                                      Sometimes All you want is a Simple Bhaji and some Hot Chaps….This is exactly how this dish was created. After a very Fat Feasty Weekend, I just wanted to go All Veg! Oh Yes….The Carnivore Me! hahaha! So, I went to the Market and…

                                    Recipe for Mommy-in-law’s French Bean Bhaji recipe

                                    Recipe for Mommy-in-law’s French Bean Bhaji recipe

                                    If you know me well, you’ll know that I’m not such a fan of veggies. I mean, if you give it to me I will most definitely eat it but if I have to make it, I’m not too happy to make it. But this…

                                    Recipe for Brain Cutlets

                                    Recipe for Brain Cutlets

                                    Recipe for Brain Cutlets

                                    To enjoy some Good Brain cutlets, it’s ok if you don’t have yours in place, because I never do! hahaha
                                    Brain or any other organ meat is a delicacy that is enjoyed mainly by those who have been introduced to it at a very early age or by those who are adventurous eaters.
                                    While My family is a complete Fan of Brain, be it plain fry, Brain Masala, Brain Omelette, Brain Cutlets, et al., my Bitter Better gets so freaked out whenever he sees the Brain kept at the Kitchen table ready to be cooked. He screams “Oh God Not the Science class Human Brain again ya” hahahaha He has tried eating it once, he confessed that he is ok to eat it again but it’s just that it reminds him of the Science class Human Brain that’s on every text book in school and he completely gets put off by it! So, I never force him to eat it, because for me, it’s a complete feast then, because I get to eat it all by myself and I don’t have to share it with him! Yayyyy! 😊
                                    Brain cutlets, Omelettes and Plain rawa Fry is what Mum has been making at home since years. This is a No-Brainer Cutlet recipe that I’d like to share with all of you. Hope you enjoy it as much as we do at home!
                                    P.S. For those who get put off by the slimy, soft texture of Brain, Brain cutlet is the best option for you to enjoy this delicacy, since it’s going to be crispy of the outside and the inside is more like a mixture of many other ingredients. Do give it a try!
                                    Course Appetizer, Snack, Starter
                                    Cuisine Goan, Indian
                                    Keyword beef brain, Beja Cutlet, brain, Brain Cutlets, Cutlets
                                    Prep Time 30 minutes
                                    Cook Time 30 minutes
                                    Total Time 1 hour
                                    Servings 12 pcs

                                    Ingredients

                                    • 1 BeefBrain or Two Mutton Brain(approx 200gms)
                                    • ¼ CupWater
                                    • ½ TspnSalt
                                    • Oilfor Frying the Cutlets

                                    Forthe Cultet batter

                                    • 1Medium sized Onion Chopped fine
                                    • 1small Tomato chopped fine
                                    • 4Green Chillies chopped fine
                                    • 1 TspnGinger Garlic Paste(recipe given below)
                                    • 1.5Tspn Jeerem Meerem Powder(recipe given below)
                                    • 1 TspnVinegar
                                    • 1Tbspn Cornflour(since there’s no egg, this will ensure the cutlets don’t break while frying)
                                    • 2Tbspn Bread Crumbs(this will make the batter a little more thick and firm)
                                    • ½ TspnSalt
                                    • 3-4gms Vegetable or Chicken Stock Cube
                                    • 4-5 Sprigs of Fresh Coriander chopped fine

                                    Instructions

                                    •  Wash the brain thoroughly (ensure the tap is not on full speed or else the brain will get damaged and break into pieces)
                                    • Place the washed brain into a vessel. Add 1/4 cup water and 1/2 tspn salt and allow it to boil for 15 minutes(7-8 minutes on each side) on medium high flame until all the water in evaporated
                                    • Once the brain is ready, keep it aside to cool at room temperature.
                                    • Once the Brain is completely cool, transfer it into a bowl along with all the other ingredients mentioned under the “To mix with the Brain” section
                                    • Gently, mix everything well
                                    • Heat some oil in a pan to shallow fry the cutlets
                                      Note: Brain Cutlets are very delicate and can easily break due to it its delicate and creamy consistency. Hence, we cannot shape the cutlets and fry later. We need to fry them as and when we shape them into discs. Hence, We need to Heat oil in the pan as soon as the cutlet batter is ready and fry the cutlets immediately
                                    • Take a plate or wide bowl with some fine Semolina. Grease a spoon with some oil and scoop out some of the cutlet batter and drop it directly into the Semolina plate. Coat the entire Cutlet ball with Semolina
                                    • On your palm, Flatten this fully coated Semolina cutlet ball into a disc
                                      Note: You can add more semolina while shaping the cutlet into a disc
                                      We need to use a spoon because the batter is not going to be firm and using your hands directly will create a mess and you will find it difficult to handle the cutlets. In the bargain there will a lot of wastage too since the semolina will get stuck to your fingers and you will be forced to discard all that is stuck to your fingers
                                    • Transfer the flattened disc into the Hot Oil
                                      Similarly place around 6-8 cutlets into the Pan(depending upon the size of the Pan)
                                    • Fry the cutlets for 5 minutes on each side or until crisp
                                      Note: Ensure that the oil is not too hot or else the cutlets will quickly turn dark
                                      Brain cutlets are delicate to handle. Therefore do not keep turning them especially at the start. Allow it to get a crispy coat and only then turn it on  the other side
                                    • Once the cutlets are done, Remove them and place them on a Kitchen Paper Napkin and allow the Napkin to soak any excess oil
                                      Enjoy these cutlets when Hot and crisp.
                                      Note: Sometimes My Mum also adds some leftover cooked Beef Mince to the Brain cutlet batter. Tastes Superb too.

                                    If you like my recipe, don’t forget to “like” & “share” it with your friends and family. And once you’ve tried my recipe, request you to kindly share your valuable feedback with me. I'd Love to hear from You 🙂 

                                      Recipe for Brain Masala

                                      Recipe for Brain Masala

                                      Recipe for White Chicken Fry – Tangdi Dahi Chorr

                                      Recipe for White Chicken Fry – Tangdi Dahi Chorr

                                      So, this is just another Chicken Fry Recipe which I created since my Bitter Better and I are a little under the weather and don’t feel like eating anything Spicy.This Chicken Fry Recipe is So simple and with bare minimum ingredients that you’ll easily find…

                                      Recipe for Ireel/Snake Beans/Long Beans/Eeril Bhaji

                                      Recipe for Ireel/Snake Beans/Long Beans/Eeril Bhaji

                                      Recipe for Ireel/Snake Beans/Long Beans/Eeril Bhaji

                                      This Vegetable has a very close place to heart because It has a very Goan emotion to it. This bhaji is called Snake Beans or Long Beans because of it’s long length and it’s look similar to that of a snake.
                                      In Konkani, this is called Eeril/Irvil/Irveel/Virvil/Iril/and so many different pronunciations. The pronunciation and spellings differ in South Goa and North Goa. I am from North Goa and My Mom has always called it “Ireel” bhaji so I’d just like to stick to that 😊 I had a nice brief discussion with my Goan Food Blogger friends and my aunt as well. All gave me different spellings! So cool I thought, I should use them all 😊
                                      I love to eat Ireel Bhaji with Fish curry and Rice in a foogath style(plain with coconut and no masalas). And my Mum always says there’s more fun in hand-breaking each bean than cutting it. So, that’s exactly how I break my beans and trust me, it’s so exciting to do it.
                                      These days, I’ve been craving to eat a nice Veg dish with Hot Chapatis. I had bought a nice big bunch of Ireel Bhaji so I decided I’ll experiment something different with this batch. It turned out So delish so I thought I must share it with all of you. Do give it a try
                                      Course MainCourse, Side Dish
                                      Cuisine Goan, Indian
                                      Keyword Eeril, Erveel, Erweel, Ireel, Irveel, Long Beans, SnakeBeans, Veg Recipe, Virvil
                                      Prep Time 20 minutes
                                      Cook Time 20 minutes
                                      Total Time 40 minutes
                                      Servings 4 people

                                      Ingredients

                                      • 500 gms Ireel Bhaji/Snake Beans/Long Beans
                                      • 1 large Onion – chopped fine
                                      • 1 Large Tomato – chopped fine
                                      • 1 Large Potato – diced(peel, wash, dice and soak in water)
                                      • 2 Green Chillies – chopped fine
                                      • 8-10 curry leaves
                                      • 4-6 Gralic cloves – roughly crushed
                                      • 1 Tspn Mustard Seeds
                                      • 1 Tspn Cumin Seeds
                                      • 1 Tspn Turmeric Powder
                                      • 1 Tspn Chilly Powder
                                      • 1 Tspn Dry Coriander Seed Powder
                                      • 3 Tspn Fresh Grated Coconut
                                      • A small piece of Jagger or ½ Tspn Sugar
                                      • 4-5 sprigs Fresh Coriander with Stem – chopped fine
                                      • 1.5 Tspn Salt or as per taste
                                      • 2 Tbspn Oil

                                      Instructions

                                      • Roughly Hand break the Snake Beans and transfer it into a bowl
                                      • Add some water into the bowl and keep it for 10 minutes
                                        Note: washing the cut beans later helps incase there is any dirt or small insects which sometimes could be inside the bean. If any, it floats on the surface
                                      • In a skillet, heat the Oil on medium heat and add the mustard seeds and cumin seeds once the oil turns hot
                                      • Then add the curry leaves and the crushed Garlic
                                      • When the Garlic begins to turn Brown, add the Onion and Chillies and let it cook well
                                      • Once the Onion turn translucent, add the Potatoes and allow it cook until it has a slight brownish coating
                                        Note: Ensure the Potatoes are peeled and soaked in water. Once Potatoes are peeled and kept open, they get oxidized and turn black. Hence, always kept peeled Potatoes in water
                                        Before Adding the Potatoes into the skillet, discard all the water
                                      • Then add the Turmeric Powder, Chilly Powder, Coriander Powder, Salt, Sugar and Tomatoes. Mix it well and cover the Pan
                                        The tomatoes act as a Natural source of moisture and it will help the Potatoes cook further without it getting burnt or stuck to the vessel
                                      • After about 5-7 minutes, discard all the water off the snakebeans and transfer the snakebeans into the skillet. Add the Coconut too and give it a mix and put the lid on
                                        Let the Vegetable cook in it’s own juices and water. Do not add any water
                                      • After 7-10 minutes, take off the lid and check the Veg and Potatoes, if done and there’s no water, add the chopped coriander and mix for2-3 minutes. If there is water, increase the heat and allow the water to evaporate and the add the Coriander
                                      • Enjoy this Simple yet flavour packed Veggie nice and Hot with Hot Chapatis. So Yum!

                                      If you like my recipe, don’t forget to “like” & “share” it with your friends and family. And once you’ve tried my recipe, request you to kindly share your valuable feedback with me. I'd Love to hear from You 🙂

                                        Recipe for A Simple and Light Gajar ka Halwa with Jaggery

                                        Recipe for A Simple and Light Gajar ka Halwa with Jaggery

                                        GKH is usually prepared during Winter when it’s the season of those Beautiful Plump Sweet Red Carrots. Hence, since most Indian Wedding stake place during the Winter season, GKH is a must have at the Dessert Counter. If it’s not seen on the dessert counter,…

                                        Recipe and Technique for Street Style Baida Roti

                                        Recipe and Technique for Street Style Baida Roti

                                        Baida Roti takes me back to my Childhood days where Mom nDad would take us to the street carts at Crawford Market or Bade Miyan in Colaba, South Bombay to enjoy the most Mouth watering Baida rotis we’ve ever enjoyed. Mum makes these at home…

                                        Recipe for Prawn & Dudhi(Bottlegourd) Caldine

                                        Recipe for Prawn & Dudhi(Bottlegourd) Caldine

                                        Recipe for Prawn & Dudhi(Bottlegourd) Caldine

                                        In this recipe, I’ve used Dudhi(Bottle Gourd) and Fresh Prawns
                                        Nana's Special - Prawn & Dudee Caldine
                                        My Nana Doll would always eat her curry like this, Bread pieces dunked into the Curry where all the Bread would be soaked with the Curry. She would tell us it's Fun to eat like this, but my GrandPops would take us on the side and tell us "Arey mahtari ko daanth nahi hai re, iskeliye".(The Old Lady doesn't have Teeth)... Shhhhh
                                         Oh How I miss my Nana and Papa I'm sure they're laughing from up above
                                        At home, We call Caldine “Sweet Curry” as this is a very mild curry with no spice nor spicy red Chillies like the other Goan curries. Whenever we are under the weather, my Mum makes this light and simple “Sweet Curry” for us. I remember My Mom making this curry for any of our family members who are unwell, especially the Elder folk, she always takes a container of “sweet curry” for them. But she uses White Pomfrets in the curry so that it is easier and light to digest😊
                                        This curry base is so versatile and you can use any Fish and Vegetables of your choice. You can also make this using a combination of various Vegetables.
                                        In this recipe, I’ve used Dudhi(Bottle Gourd) and Fresh White Prawns.
                                        Do give it a try
                                        Course Main, Main Course
                                        Cuisine Goan
                                        Keyword Caldine, Dudhi, Prawn & Dudhi Caldine, Prawn Caldine, Sweet Curry
                                        Prep Time 1 hour
                                        Cook Time 20 minutes
                                        Total Time 1 hour 20 minutes
                                        Servings 6 people

                                        Ingredients

                                        Ingredients for the Curry

                                        • 250 gms Prawns(around 20-25 prawns)
                                        • 800-900 gms Bottle Gourd(Dudee/Dudhi)
                                        • ½ Veg or Chicken Bouillon cube (optional)
                                        • 2-4 Green chillies (slit)
                                        • 1 small Tomato chopped fine
                                        • ½ Medium sized Onion chopped fine
                                        • 1 Tbspn Oil(I prefer using Coconut Oil but you can use anycooking oil of your choice)
                                        • 1 Tspn Salt for the Prawns
                                        • 2 Cups of Water for the curry

                                        For the Masala

                                        • 6Tbsp Fresh Coconut (grated)
                                        • ½ Medium sized Onion (roughly chopped)
                                        • 1/2 Tspn Turmeric Powder
                                        • 4-6 Big Garlic cloves
                                        • 1 Tspn Cumin Seeds
                                        • 1 Tspn Pepper corns
                                        • 1 Tspn Coriander seeds
                                        • 1/2 Tspn Sugar (you can add more later if you like it sweeter)
                                        • 1 Marble size Ball of Tamarind or 1 Tspn Vinegar (you can add more pulp later if you like it more tangy)
                                        • 1/2 Cup Water (for grinding the masala)

                                        Instructions

                                        • Clean and wash the Prawns and apply 1 tspn salt and keep aside
                                        • Grind all the ingredients mentioned under the Masala section into a smooth finepaste by adding water little by little.
                                          Note: I like my Dudhi and Prawn Caldine a little thick so I keep my Masala a little coarse.
                                        • Now in a Vessel, add the oil and Heat it on medium heat
                                          Once the Oil turns hot, add the chopped Onion, Chillies and Tomatoes and saute until the onions turn a little brown
                                        • Then add the Prawns and saute for about 2-3 minutes
                                          Note: Here you have two options
                                          1) Add the Prawns at this stage and cook it all throughout. In this case, the Prawns will be Hard
                                          2) Add the Prawns at the end. In that case the Prawn will have a crunch
                                        • Now add the freshly ground curry paste into the vessel
                                        • Add 1 cup of water into the mixer jar and give it a shake and add that water into the vessel too
                                        • Now, add the bouillon cube, give the curry a stir, cover the vessel with a lid and let it boil on medium flame for About 10-15 minutes
                                        • As the curry is boiling, we go ahead and get the Dudhi ready. Wash it thoroughly under running water
                                          Cut it in circles
                                        • Peel off the skin of each cut circle
                                        • Cut each circle into 4 equal parts. If the circles are too big, you can cut it into 6.
                                          Note:
                                          Do not cut the Dudhi and keep aside for too long. It may get oxidised and turn black. Hence we cut it when the curry is boiling so that when the curry it ready, we immediately put the dudhi into it.
                                          You have one more option of cleaning the Dudhi. You can take a Potato peeler and peel the outer skin of the Dudhi vertically and then cut it.
                                        • Once all the raw taste of the masala is no longer on the curry(Taste the curry for salt, sugar or vinegar/tamarind) we add the Dudhi into the curry and cover the vessel
                                          Note: If you notice the gravy too thick, you can add some water as per your preference, If you like the gravy more runny. I like my Dudhi and Prawn Caldine a little thick and coarse so it may look a little thick at this stage. Also, once the Dudhi goes in, the gravy will begin to get thicker. So adjust the gravy consistency as per your preference
                                        • Once the curry begins to boil, take off the lid and let it boil for not more that 5- 7 minutes
                                          Note: A fully ripe Dudhi takes just about 5-7 minutes to cook. Dudhi is a vegetable that cooks very fast. If it’s overcooked, it becomes extremely soft and loses it’s taste and texture. So be a little careful and vigilant once the Dudhi goes into the curry
                                        • Once the Dudhi is cooked, turn the heat off
                                          Note: If you have decided to add the Prawns last, then add the Prawns into the curry and mark 30seconds and then turn off the heat. If you’re adding the Prawns last, be sure to go easy on the salt in the curry as the Prawns have salt too
                                        • I enjoy my Caldine just the way I used to enjoy it at Nana's place i.e. by dunking in my bread pieces and soaking each piece with the oh so delicious 'Sweet Curry'😋😋
                                          However, you can enjoy Caldine with Kadak Pao, Hot Rice or Chapatis as well

                                        If you like my recipe, don’t forget to “like” & “share” it with your friends and family. And once you’ve tried my recipe, request you to kindly share your valuable feedback/suggestions with me. I'd Love to hear from You 🙂  

                                          Recipe for Spicy Fiery Mumbai Style Anda Burji and Masala Pav

                                          Recipe for Spicy Fiery Mumbai Style Anda Burji and Masala Pav

                                          Anda Burji with some Home Baked Goodness turned into Masala Pav and downing it with some Piping Hot Kadak Cutting! While Some people date over Coffee and Wine, there are some(like my Bitter Betterand me) who date over Missal Pav, Burji Pav, Vada Pav, Ganna Juice, Cutting…

                                          Recipe for Pork Green Curry

                                          Recipe for Pork Green Curry

                                          At Home, we can eat Pork each and every day, especially my Dad! He just LOVES Pork! When we think of Pork the First thing that comes to our mind is a Nice Red Fiery Pork Sorpotel or Vindalho and the next best thing is…

                                          Recipe for Papa’s Fried Masala Meat curry with Methi and Potatoes

                                          Recipe for Papa’s Fried Masala Meat curry with Methi and Potatoes

                                          Recipe for Papa’s Fried Masala Meat curry with Methi and Potatoes

                                          Meat Curry with Coconut Milk or Fresh grated Coconut is one of my faves. But this recipe is extra Special not only because it is made by dry roasting the spices, but also because this is how my Maternal Grandpa who we used to call ‘Papa’ would make it 😊
                                          I have very few but fond memories of my Papa. He passed away when I was just 9 years old. But the memories and pampering he gave me was immense, not only because I was his youngest grandchild but because I was the ONLY girl grandchild, both sides that too Paternal and Maternal! Hahaha yeah yeah I'm the spoilt brat!
                                          He used to own Taxis in Bombay back in the day and his lingo was so Tapori and he was habituated to talk mostly in Hindi and sometimes in Konkani(gaalis included…Oh Yes!) but he didn’t know fluent English. The things he would do with us and for us were Priceless and with his Hindi one liners, OMG life was such a Fun place to be! A small and Humble Home did he have, but filled with so much Love and excitement each time we would visit him. He would call Nana “Buddie” or “Mahtari” (meaning Old) with his sheepish smile and He never failed to play pranks and irritate my grandma and tease her for being a “slow coach” in the kitchen… and the minute she would hear “slow coach” she would try to do things in a hurry and things would fall from her hand and break! Hahahah(and I think, this I get from my Nana…things break from my hand for no reason at all….like, they just fall from my hand) And Yes! My Grandpops was quick in all his work more like a gadbad singh(Maybe in that aspect, I take after him…hehe I’m quite a gadbad singh too) Till the age of 83 he was active and cooked and went to the Market, etc. and loved to be independent. He would walk and walk and could never sit in one place quietly. He was a very Hardworking Man who loved us grand kids to another level! And My Mom is a replica of him in more ways than one.
                                          One of the recipes I very fondly remember is that of the Fried Masala Meat Curry with Methi(sometimes with cluster beans too). Ofcourse, I was too small to take the recipe from him back then, but my Mommy cooks this every once in a while and we think of our Sweet, Fun and Loving Papa! I’m sure he’s watching down upon us and smiling away as I write about him😊
                                          There’s absolutely no Love and Blessings like the Love and Blessings of our Grandparents😊 If you have them, Treasure them, Love them, Never hurt them and make the MOST of them while they’re still with you, because once they’re gone all you will have is only and only Beautiful Memories to Cherish😊
                                          Here’s my Papa’s Fried Masala Meat Curry with Methi and Potatoes!
                                          Do give it a try😊
                                          Course Main, Main Course
                                          Cuisine Goan, Indian
                                          Keyword beef, Beefand Veg Curry, Beer Curry with Methi, Fried Masala, Fried Masala Curry, Fried Masala Meat Curry, Goan Beef Curry, Meat, Meat Curry
                                          Prep Time 1 hour
                                          Cook Time 30 minutes
                                          Total Time 1 hour 30 minutes
                                          Servings 8 people

                                          Ingredients

                                          • 1 Kg Beef
                                          • 4 Large Kashmiri Chillies
                                          • 1.5 Tspn Cumin Seeds
                                          • 1.5 Tspn Pepper
                                          • 2 Tbspn Dry Coriander Seeds
                                          • 5-7 Cloves
                                          • 2 Green Cardamom
                                          • 1 inch Cinnamon
                                          • 1 Tspn Raw Rice(you can use any white rice)
                                          • 3/4th of a Cup Fresh grated Coconut
                                          • 1 Tspn Turmeric Powder
                                          • 8-10 Garlic cloves
                                          • 2 inch Ginger
                                          • 1 small marble sized Tamarind flesh
                                          • Approx 3/4th  Cup of Water
                                          • 1 Small Onion randomly sliced

                                          Other Ingredients

                                          • ½ Cup Fresh Baby Methi (fenugreek)Leaves with Stem – (or youcan also use Cluster Beans)
                                          • 1 Medium sized Onion – chopped fine
                                          • 2 Large Potatoes – Diced or Wedged
                                          • ½ Tspn Salt – For boiling the Beef
                                          • 1 Veg bouillon cube(optional)
                                          • 1 Tspn Sugar
                                          • ½ Tspn Ginger Garlic Paste – for boiling the Beef
                                          • 1 Cup Water – for Boiling the meat
                                          • 3 Cups water for the Curry (you can add more if you like
                                          • 2 Tbspn Oil
                                          • 4 Green Chillies slit
                                          • 8-10 Curry Leaves
                                          • Oil for Deep Frying the Potatoes

                                          Instructions

                                          Follow these steps to make the Masala

                                          • Heat a Pan on Medium Heat and Add the Kashmiri Chillies, Coriander Seeds, Pepper Corns, Cumin Seeds, Cloves, Cinnamon Stick, Cardamoms and Raw Rice. Dry Roast all these spices for about 8-10 minutes
                                          • When you see the Rice turning brown, add the Onion, garlic ginger and grated coconut and roast this for another 5-7 minutes.
                                            Note: When the rice is roasted well, it will be easier to blend or else it may remain coarse in the Masala
                                          • Then add the Turmeric Powder, Mix it well and roast it for another 5 minutes or so and Turn off the Heat and allow this to cool at room temperature.
                                            Tip: If you’re running out of time, you can add room temperature water into the pan and allow it to cool faster
                                          • Now, transfer all the fried spices into a mixer grinder(I suggest you use the small jar so that the Masala grinds nice and fine) and add the Tamarind flesh and some water
                                            Note: Do Not add all the water at once. If you add all the water at once the ingredients might remain coarse and runny
                                          • Grind all this into a smooth fine paste, adding water, little by little. Keep it aside

                                          Boil the Beef and Keep aside

                                          • Cut the Beef into small cubes and Wash the Beef. Transfer it into the Pressure Cooker. Add ½ Tspn Salt, ½ Tspn Ginger Garlic Paste and ½ Cup Water, mix it well, put the lid on and allow the Beef to cook until 2-3whistles are released. Take the lid off only once all the steam is released through the cooker whistle.
                                            Note: Do Not discard the stock that remains. We will use it for the curry

                                          Follow these steps to Cut and wash the Methi

                                          • Cut the roots off the Methi
                                          • Submerge the leaves along with the stem into water
                                            Note: Methi, since it’s grown on the ground, tends to hold on to a lot of Mud. Hence it has to be washed thoroughly and there should be no traces of Mud on the leaves or stem or else while eating, it will completely put you off.
                                          • Wash the Methi and transfer it into another Bowl full of water. Discard the water from Bowl No. 1 and replace it with fresh water.
                                            Note: you will notice a lot of mud in Bowl No. 1
                                          • Then wash the Methi in bowl No. 2 and transfer it back into bowl no.1 filled with water
                                            Note: Continue washing the methi in the same process until there is absolutely no trace of Mud in the water
                                          • Then, cut the Methi as shown in the pic. They don’t have to be perfect cuts, just random

                                          Follow these steps to make the curry

                                          • In a vessel, heat 2 Tbspn Oil on Medium heat and Add the Onions, Curry Leaves and Slit Green Chilly
                                          • Once the Onions begin to turn Brownish, add the Methi leaves and mix it well and allow it cook for about 5 minutes or so
                                          • Then add the ground masala paste into the vessel.
                                            Note: Don’t worry if the Curry looks runny at any stage, because this kind of curry tends to thicken at a later stage due to the Roasted Coconut and Raw Rice that we have used in the Masala. Both are thickening agents and so is Tamarind.
                                            If you’re adding Potatoes, do so at this stage or you have an option of Frying the Potatoes separately and then adding it directly into the curry at the end. My Papa would fry the Potatoes so I do it that way.
                                          • In the same mixer jar add about 2 Cups of Water, give it a mix and add this water too into the vessel. Add another 1 Cup of water to the curry. Cover the vessel with a lid and let the curry boil for about 15-20 minutes on medium heat
                                            Note: Allowing the curry to boil longer will help it cook better and will take away the bitterness that remains from the raw spices
                                          • Now, in the vessel, transfer the boiled Beef along with the stock and add the Sugar and Stock cube and let the curry boil, with the vessel open, on high heat for about 10 minutes
                                            Note: Check for Salt and Tamarind. If required, you can add some
                                          • Then turn off the heat

                                          Follow these steps to Fry the Potatoes

                                          • In a skillet, add some oil to Deep fry the Potatoes and once the Oil turns Hot, Add the Potatoes in
                                          • Allow the Potatoes to fry on medium heat until it turn light brown and gets a crust
                                          • Once the Potatoes are fried, transfer it into the Beef Curry and just boil it for 1-2 minutes and turn off the heat. Enjoy your Fried Masala Meat Curry with Methi and Potatoes just the way my Papa would make it😊 Yummmm!
                                            Note: The curry will turn thick as it begins to cool. You can add some water and boil it at the time of eating
                                          • One of the Best combos to enjoy this curry is with Rice, Papad and Pickle! Drrrrrroooool!

                                          If you like my recipe, don’t forget to “like” & “share”it with your friends and family. And once you’ve tried my recipe, request youto kindly share your valuable feedback with me. I'd Love to hear from You 🙂

                                            Recipe for Jeetem Bombil Rawa Fry (Fresh Bombay Duck Rawa Fry)

                                            Recipe for Jeetem Bombil Rawa Fry (Fresh Bombay Duck Rawa Fry)

                                            Recipe for Jeetem Bombil Rawa Fry (Fresh Bombay Duck Rawa Fry)

                                            After Recheado Pomfret, Bombil Rawa Fry is my Bitter Better’s next favourite Fish. You give him a plate full of Bombils and be rest assured he’s not going to grumble at you for the next 2-3 hours… Oh No Not days at all, that we can’t do! Hahaha
                                            The Gadbad Singh that I am, To get the damn Bombils not to break on the Tawa, Oh Boy! I’ve been through a hell lot of rolling eyes, weird sounds, under breath grumbling, fake smiles and a lot of “it’s ok, like this only you will learn” (which actually means will you just get out of the damn kitchen please) by none other that MOMMY The Great!!! Hahahaa And Yes I got the same treatment for Chaps too…Chapatis baba! not Boys… ufff
                                            Who would ever think that I’d be writing about it today???Those days all I would do is grumble at my Mom for being such a perfectionist and today, I’m ever so Grateful & Thankful to her for that very same quality because she has very conveniently transferred it to me 😊
                                             So here’s my recipe for Bombay Duck Rawa Fry with all the tips and techniques I’ve learnt along the way to perfect it!
                                            Course Side Dish
                                            Cuisine Goan, Indian
                                            Keyword Bombay Duck Fry, Bombil Fry, Bombil Rawa Fry, Fresh Bombay Duck, Rawa Fry
                                            Prep Time 30 minutes
                                            Cook Time 30 minutes
                                            Total Time 1 hour
                                            Servings 14 pcs

                                            Ingredients

                                            • 1Kg Fresh Bombay Duck(approx. 14 pcs)
                                            • 1 Tspn Turmeric Powder
                                            • 2 Tspn Red Chilly Powder
                                            • ½ Tspn Sugar(optional)
                                            • 1 Tspn Ginger Garlic paste(optional)
                                            • 3 Tspn Vinegar
                                            • 1.5 Tspn Salt
                                            • Approx 1 Cup Fine Semolina(not roasted)
                                            • Oil for Frying

                                            Instructions

                                            • Wash the Bombils
                                              Note: I always prefer washing the Bombils first because Bombil tend to hold on to water and they are very slimy in texture, so if you wash the Bombils after cleaning, a lot of water will be retained on the fish
                                              Also, while cleaning Bombils, there’s this really tiny part like a mini fin on the bottom side just above the tail and that has to be removed off. Not sure how far it’s true, but my Mum gets rally paranoid about this being removed. She says that tiny little thing can create a havoc in your tummy!  So, I blindly trust My Mom and just take it off..
                                            • Now, using a very sharp knife, slit in the centre of the Bombil
                                            • Further, make a deeper Slit in the Bombils all around the main bone
                                            • With the help of the Pointed edge of the knife, run it all around the Bone and Remove the bone
                                            • The Bombil will now be a flat filet or cutlet
                                            • This is the amount of water that is released
                                            • Place a Muslin cloth or Kitchen paper Napkin on a large tray and place all the bombil filets on the tray to drain off all the excess water and let it sit on the tray for about 15 minutes
                                            • Now in a Pan, heat some oil on Medium heat for frying the Bombils
                                              Note: As soon as we coat the Bombils with masala, we need to immediately coat with Semolina and fry them. If kept to marinate, Due to the salt and vinegar, a lot of water is released from the bombil and the masala doesn’t hold on to the bombil and when coating with semolina later, it gets soggy and the semolina separates from the bombil while frying
                                            • In a Plate, add the semolina and spread in all across the plate
                                            • Transfer the Bombils into a Bowl and add the Salt, Vinegar, Turmeric and Chilly Powder and Sugar and Ginger Garlic Paste
                                            • Mix it well and ensure each Bombil is covered with the Masala
                                            • Coat each Bombil with Semolina
                                            • When the Oil turns Hot, Place the Bombils on the Hot Pan and Let the Bombils Fry on each side for 5-7 minutes or until Crispy
                                              Notes
                                              1) If the Oil is not very Hot, the Semolina will gets evaporated from the Bombil
                                              2) If you’re not using a Non-stick Pan and the Oil is not Hot enough, the Semolina coating may get stuck on to the Pan
                                              3) If the Oil is too Hot, The Semolina will immediately turn dark and crispy, leaving the Bombil raw and uncooked. Hence, check the heat of the Pan well before placing the Bombils into it
                                              4) Do Not cover the Pan or else there will be water released due to the steam and the Bombils won’t turn crispy
                                              5) Please do Not Be in a Hurry to Turn the Bombil. Too much contact with the Bombil will cause it to Break since this is an extremely delicate fish
                                            • Once the Bombil gets a nice crispy coat on one side, using a Flat spatula, turn it to the other side and drizzle some oil so that it doesn’t get burnt and it cooks to its crispy consistency on the other side too
                                              Tip: Do Not over crowd your Pan with Bombils or else it will be very challenging for you to work with it. If your Pan is over crowded, while flipping the bombils, the other ones in the Pan may break, the semolina coating could peel off, etc.
                                            • Once fried, transfer each Bombil fry on to a Kitchen Napkin to drain off any excess oil.
                                              Enjoy these crispies nice and Hot as a starter or as a side!

                                            If you like my recipe, don’t forget to “like” & “share” it with your friends and family. And once you’ve tried my recipe, request you to kindly share your valuable feedback with me. I'd Love to hear from You 🙂

                                              Recipe for Goan Tambdi Bhaji Foogath mixed with Palak and Chana(Red & Green Spinach with Roasted Gram)

                                              Recipe for Goan Tambdi Bhaji Foogath mixed with Palak and Chana(Red & Green Spinach with Roasted Gram)

                                              Recipe for Goan Tambdi Bhaji Foogath mixed with Palak and Chana(Red & Green Spinach with Roasted Gram)

                                              Tambdi Bhaji or Red Spinach is a popular Leafy Vegetable which is a Goan favourite. This bhaji(like we Goans call it) is one of my Mum’s favourite bhajis. I am not such a big fan of this veggie(but then I’m not a fan of most veggies☹) But, my trip to the Vegetable market this week, got me super attracted to purchase not only Tambdi Bhaji but so many other Greens because they were so Fresh, never seen vegetables more Fresh! But then Yes! As winter approaches, it’s the season of Greens and Leafy Veggies. The best time to enjoy Fresh Leafy vegetables and Greens is during the Winter season!
                                              Here’s one of the preps I made out of the 2 bundles of Red Spinach that I purchased.
                                              The simple Goan preparation doesn’t call for Roasted Gram, Turmeric powder & Chilly powder. I’ve just added it for extra texture and flavour.
                                              Course Main, Main Course, Side Dish
                                              Cuisine Goan, Indian
                                              Keyword Foogath, Red Amaranth, Red Spinach, Spinach Bhaji, Tambdi Bhaji, vegetable
                                              Prep Time 15 minutes
                                              Cook Time 15 minutes
                                              Total Time 30 minutes
                                              Servings 4 people

                                              Ingredients

                                              • 1 Bundle Red Spinach(Separate the leaves from the stem,transfer all the leaves into a bowl of water, wash it well, cut the leaveshorizontally and keep aside)
                                              • 1 Cup Green Spinach (In a Large vessel filled with water, transferthe spinach along with the stem, take off the roots, wash the Spinach until there’sno mud left on it, cut the Spinach horizontally along with the stem, keep aside)
                                              • 3 Tbspn Fresh grated Coconut
                                              • 1 Green Chilly slit
                                              • 1 small onion chopped fine
                                              • 1 Tbspn Roasted Chickpea(optional)
                                              • ½ Tspn Salt
                                              • ½ Tspn Turmeric Powder(optional)
                                              • ½ Tspn Chilly Powder(optional)
                                              • 1 Tspn Oil

                                              Instructions

                                              • In a vessel add all the above-mentioned ingredients, mix it all well and cove the vessel
                                                Note: We do not add any water while cooking Spinach or most leafy vegetables as a lot of water is released while it’s getting cooked
                                              • Allow this to cook on medium heat for about 5-7n minutes
                                              • Take off the lid and allow the vegetable to cook until all the water is evaporated
                                                Once the water is evaporated, turn off the heat and enjoy this bhaji as a side dish with your Rice and Curry or enjoy as a main dish with Hot Chapatis!
                                                 

                                              If you like my recipe, don’t forget to “like” & “share” it with your friends and family. And once you’ve tried my recipe, request you to kindly share your valuable feedback with me. I'd Love to hear from You 🙂

                                                Recipe for a Simple No-Fuss Khakra Pizza

                                                Recipe for a Simple No-Fuss Khakra Pizza

                                                Recipe for a Simple No-Fuss Khakra Pizza

                                                Breakfast time is always “Running like a Headless Chicken” Time…There’s absolutely No time to even Think, leave alone making something Creative. But, when there’s previous Night’s Leftovers, it gives me some time to allow my Creative juices to flow and sometimes overflow! Haha
                                                Since there were leftover Red Spinach Chapatis(recipe link given below), I decided to crisp it up on a Pan, smear some Pizza sauce and add some Cheese and enjoy a simple yet exciting No Fuss Khakra Pizza! So Good! Trust me when I say this, your bacchus(kids) will go crazy over this breaky…and so will you!
                                                Khakra is a popular Gujrathi snack. It is prepared by frying thin crepes of dough until Crisp. They are round like Chapatis but they are Crunchy like fryums. So, whenever I would make chapatis that would turn out a little hard, My Mum and the other elders would tease me saying "Oh God! Today's chapatis are like Khakra" hahaha ,,,SAVAGE! Hence, I decided to call this "KHAKRA PIZZA"
                                                And Yes! I am a Pizza L.O.V.E.R just incase you weren't aware….. A Freak if you may call me…
                                                So here’s What and How I Made it…
                                                Course Bread, Breakfast, Evening Snack, Tea Time Snack
                                                Cuisine Fusion, Indian
                                                Keyword Chapati Pizza, Homemeadepizza, Khakra Pizza, Leftover, Pizza, Simple, Simple Pizza
                                                Prep Time 15 minutes
                                                Cook Time 10 minutes
                                                Total Time 25 minutes
                                                Servings 4

                                                Ingredients

                                                • 4 Leftover Chapatis
                                                • 4 Slices of Cheddar Cheese or Cheddar Cheese cube(grated) or Mozzarella Cheese(grated)
                                                • Pizza Sauce as per your preference(you can also use Tomato Ketchup if you don’t have Pizza sauce)
                                                • Garlic Butter(optional)
                                                • Dried Oregano flakes(optional)

                                                Instructions

                                                • Heat a Pan on Medium High Heat, Add the Chapati onto the Pan(You can add any kind of Chapati or Paratha that you have left over)
                                                • Flip it over, once it turns crispy, smear some Garlic butter(optional) and let the other side cook until crispy. It should become crispy like a Khakra/Papad
                                                  Note: It will take around 5-7 minutes on each side to turn crispy
                                                • Once done, Transfer the Khakra it into a Microwave friendly plate(if using a Micro) or into a Baking tray(if using an OTG), smear some Pizza Sauce and Spread Cheese all across the Khakra
                                                  Cover it and heat it in the Microwave oven for 30 seconds or until the Cheese melts
                                                  Note: if using an OTG, pre heat the oven at 220 degrees celcius for 10 minutes, turn off the oven and tuck the Khakra Pizza into the Hot oven. It just requires heat for the cheese to Melt
                                                  Note: if you do not have an OTG or a Microwave oven, you can heat the khakra on a pan on medium heat, but do not forget to cover it. Covering it with a lid will create an oven like atmosphere which will help the Cheese to melt with the heat
                                                • Once the Cheese Melts, transfer the Khakra Pizza on the Chopping Board
                                                • Cut the khakra into 4 equal parts, sprinkle some dried Oregano flakes and enjoy these crispy Pizzas nice and Hot either for Breakfast or Evening Tea
                                                  Note: You can add any toppings of your choice and make it more colourful and creative if you like!

                                                If you like my recipe, don’t forget to “like” & “share” it with your friends and family. And once you’ve tried my recipe, request you to kindly share your valuable feedback with me. I'd Love to hear from You 🙂

                                                  Recipe for Crispy Fried Kheema Pattice

                                                  Recipe for Crispy Fried Kheema Pattice

                                                  Recipe for Crispy Fried Kheema Pattice

                                                  “What for Chai?” is a line very commonly used at my place as soon as we are done with lunch or sometimes even during Lunch. Evening Tea time snacks has been such an exciting meal of the day for many families. I always wondered why and all I can ever think of is could be because everyone used to be back home from school, college, work, etc. and have that meal together as a Family.
                                                  At my place back in Bombay, the tradition of Evening snacks has been carried on right from my Mom’s schooling days(as told by my late Nana) until now where the grandkids excitedly ask My Mom “Nana what for Chai” 😊
                                                  My Mom makes different things each day, from Sheera,Filosk,Shevyo,Alle Belle,etc. but one of my favorites are the Deep Fried Beef Patties! Yummmm and especially when Mom puts it directly into our plates Garma Garam! Droooool! I always found it cunningly funny and annoyingly weird at the same time when Mom would call them “Pattice” I would often snap at her or laugh and say(like those cunning kids) “what Pattice Pattice? You get Pattice only in the bakery”. And she would say “These are Goan Homemade Pattice, what you know, don’t be extra smart ok” hahahah (Mother-daughter madness). As I grew and got to know that these are actually what we Goans call them, the joke was on Me & all I I had to do is quietly zip it! Hahaha Yeah Yeah! MOM is ALWAYS right!!! 😊
                                                  This savory snack is made usually using leftover Chapati Dough and leftover Dry Beef Mince (atleast that’s what my Mom does). It is so delicious and crispy and with some ketchup on the side, life is Beautiful😊
                                                  Do give these Pattice/Patties a try!
                                                  Course Appetizer, Evening Snack, Snack, Tea Time Snack
                                                  Cuisine Goan, Indian
                                                  Keyword Crispy Pattice, Deep Fried Snack, Fried Pattice, Goan Beef Pattice, Kheema Pattice
                                                  Prep Time 30 minutes
                                                  Cook Time 1 hour
                                                  Total Time 1 hour 30 minutes

                                                  Instructions

                                                  Follow these steps to make the Patties

                                                  • In a skillet, add oil for Deep frying and place it on medium heat.
                                                    Note: If the oil is placed on high heat, the outer covering will get cooked quickly and will turn dark while the inside might remain raw
                                                  • Make Medium sized balls of the Dough
                                                  • Lightly flour the kitchen surface with wheat flour and flatten each dough ball with the help of a rolling pin. Similarly, Roll all the dough balls
                                                  • Now place all the flattened outer coverings(chapatis) on the kitchen surface and add approximately 1.5 Tbspn of the Kheema in the centre of each chapati
                                                  • Dip your finger into the water bowl and spread some water around the edges of the chapati and fold from left to centre and press it in the centre so that it doesn’t open up
                                                  • Then, fold it from right to centre and ensure to sticks it well
                                                    Note: If you do not add water, the pattice will open up while frying
                                                  • Next, Press the Top and Bottom edges, apply some water, fold and seal
                                                    Note: You can use a fork to seal it on the edges. That way you can get a nice design too. However, My Mum doesn’t use a fork, so I just follow her simple method
                                                  • This is how it will look after it is completely folded and sealed
                                                  • Now, once the Oil is Hot, put the folded patties into the oil
                                                    Note: If you don’t wish to Deep Fry them, you can Pan fry them too. Also, you can use All Purpose Flour for the dough if you’d like them crispier.
                                                  • Fry these Kheema Patties on both sides until they turn brown and crispy
                                                  • Transfer the Patties on a Kitchen paper napkin
                                                  • Enjoy these Fried Kheema Patties for breakfast or as an evening snack with a nice hot cup of Tea or Coffee. These should be eaten Hot and you enjoy them with some yummy ketchup on the side!! Don’t forget to think of my Mum & Me while you go Crunch Crunch Crunch😊

                                                  If you like my recipe, don’t forget to “like” & “share”it with your friends and family. And once you’ve tried my recipe, request you to kindly share your valuable feedback with me. I'd Love to hear from You 🙂

                                                    Recipe for No Cook Goddachem Fov(Sweet Poha)

                                                    Recipe for No Cook Goddachem Fov(Sweet Poha)

                                                    Recipe for No Cook Goddachem Fov(Sweet Poha)

                                                    My Mum is my First and Best Kitchen Guru! All that I have ever learnt and All that I am, is because of her!
                                                    Till date, our WhatsApp conversations revolve around "what are u making for lunch" "arey kantala is coming,What to make for chai" "what to make for breakfast, give some ideas" "I'm making so and so you also try" and so on..😄
                                                    First her life used to revolve around my Brother and Me and now it's all about the Grandkids!❤️
                                                    Yesterday during our "What are you making" conversation Mum said she's making Sweet Fov.. and she always tries to make Traditional things every now and then so that the kids get to learn of it and enjoy it..
                                                    My mom is not great at quantities.. hers is 'matshem ye gaal Matshem tem gaal'(put a little of this and a little of that)
                                                    I followed her Instructions and made this for Evening Tea🥰❤️ This is by far the Fastest thing I've ever made 😄😄😄👌 I worked on the quantities. So here goes!
                                                    Course Breakfast, Evening Snack
                                                    Cuisine Goan
                                                    Keyword Goddachem Fov, Poha, Sweet Poha
                                                    Prep Time 10 minutes
                                                    Total Time 10 minutes
                                                    Servings 4 people

                                                    Ingredients

                                                    • 3/4 cup Flattened Rice(Poha/Fov) –
                                                    • 50 gms Palm Jaggery (sliced or grated)
                                                    • 30 gms Fresh Coconut(grated)
                                                    • A pinch of salt

                                                    Instructions

                                                    • Place the Fov/Poha into a strainer and wash the Fov/Poha under running water until the water runs clear and keep it over a bowl or vessel for all the water to get drained off completely
                                                    • Transfer the Fov/Poha into a Plate and all the other ingredients too
                                                    • Mix it well and eat! Yup that’s it! 🙂

                                                    If you like my recipe, don’t forget to “like” & “share”it with your friends and family. And once you’ve tried my recipe, request you to kindly share your valuable feedback with me. I'd Love to hear from You 🙂

                                                      Recipe for Mango Pudding

                                                      Recipe for Mango Pudding

                                                      Recipe for Mango Pudding

                                                      If you're Indian, you ought to Love the King of Fruits – MANGOES! All this while I've been enjoying my share of Tender Coconut pudding(Also baptised as Dancing Pudding for it's smooth wobbly consistency)..
                                                      As I stepped out of my Home after 5 months of the lockdown, I spotted Mangoes in the Supermarket and went totally insane! So I decided to try my hand at making a nice Wobbly Mango Pudding for a change. Although my favourite Alphonso Mangoes were out of Season, I managed to get some really Good Pakistani Mangoes which were quite Yum!
                                                      The Pudding turned out Super Yum and the Best part is that it is so Easy and Quick to make!
                                                      Do give it a try. I'm sure you'll love it
                                                      Course Dessert
                                                      Keyword Mango, pudding, Sweet
                                                      Prep Time 15 minutes
                                                      Cook Time 10 minutes
                                                      Resting TIme 8 hours
                                                      Total Time 8 hours 25 minutes
                                                      Servings 4 people

                                                      Ingredients

                                                      • 300 ml Room Temperature Milk(approx 1 and a quarter Cup) –Keep half Cup aside for blooming the Gelatin
                                                      • 200 ml Full Fat Cooking Cream(approx. 1 Cup)
                                                      • 1 Large Mango
                                                      • 10 gms Unflavoured Gelatin powder(1 Tbsp)
                                                      • 70 gms Sugarcane Jaggery(White) or 3 Tbspn Sugar(you can addmore if the Mango is not too sweet)
                                                      • 1 Tspn Vanilla essence(optional)
                                                      • 3 drops of Lemon Yellow Edible Food Colour(optional)

                                                      Instructions

                                                      Note: Very Important to Follow Steps 1, 2, 3 and 4 First before boiling the Milk or else if you do it after the milk is boiled, it will not retain it’s heat for the gelatin to dissolve.

                                                      • In a bowl, add ½ Cup Room Temperature Milk and Add theGelatin powder into the milk
                                                        Note: Just leave it to be. Don’t stir. It takes about 15minutes to bloom and dissolve in the milk
                                                      • Peel the Mango and cut it in half. Scoop the flesh of one half and transfer it into a mixer jar
                                                        Note: You have some options here.
                                                        a)    You Puree the entire Mango and transfer into the Pudding without straining the pulp
                                                        b)    You Puree the entire Mango and strain the pulp to obtain a smooth pudding
                                                        c)    You Puree half the Mango and either strain or don’t strain the pulp and Cut the other half into small cubes to transfer into the pudding
                                                        d)    You cut cubes of the entire Mango to transfer into the pudding
                                                      • Make a smooth Puree of the Mango and keep it aside
                                                      • Cut small cubes of the Other Half and Keep it aside
                                                      • In a vessel, Add the remaining Milk, Cooking Cream, Vanilla Essence and Jaggery or Sugar and bring it to a boil. Turn off the flame as soon as the Milk comes to a boil
                                                      • Now stir and mix the gelatin into the milk and transfer into the boiled Milk and Stir until dissolved
                                                        Note: Even if you find the gelatin not fully dissolved into the raw Milk or you find small lumps, do not worry, it will dissolve in the Hot Milk.
                                                      • Pour the Gelatin mix, Mango pulp and Mango cubes into the Hot Milk and stir well and Pour into Moulds or Bowls and keep it aside to cool at Room Temperature
                                                        Note: I kept my pudding lumpy and decided not to strain the pulp
                                                      • Once it comes down to room temperature, tuck it into the refrigerator to chill. It takes about 7-8 hours to fully set
                                                        Note: when it’s at room temperature it will still be in liquid form. Once it chills, it will get firm.
                                                        Note: You can also make a Jelly and Mango Pudding in a glass or bowl. Once the Jelly is chilled and set, pour the Mango pudding(When slightly warm or else the Jelly will melt) over the jelly and let it set
                                                      • Once it’s chilled and formed, you can either flip the pudding onto a plate or enjoy it directly from the bowls!

                                                      If you like my recipe, don’t forget to “like” &“share”it with your friends and family. And once you’ve tried my recipe,request you to kindly share your valuable feedback with me. I'd Love to hear from You 🙂 

                                                        Recipe for Oil Free Curry with Two Meats in a Pot(Pork & Beef)

                                                        Recipe for Oil Free Curry with Two Meats in a Pot(Pork & Beef)

                                                        Recipe for Oil Free Curry with Two Meats in a Pot(Pork & Beef)

                                                        This curry that I made using Two Meats in a Pot is a Simple,Oil Free, Quick and Easy Peasy Recipe that I created when I had some meats left from making my Goan Wedding Stew last week.
                                                        The Lazy side of me is more active than it should be these days and I can’t stop myself from experimenting Quick recipes, but what theheck! it’s working out fine and I’m not finding it difficult to trick my Tummy either😊But, this one was the ultimate because I’ve never made a Two meat curry that too in a cooker.
                                                        Since my Bitter Better was at Home and I wanted to spend some time with him rather than be in the kitchen too long, I decided to make just one No Fuss dish and came up with this Idea since Red Curry is his absolute favourite. Turned out BEAUTIFUL!
                                                        So, Me khush, Tummy khush and BB khush too(because there’s no oil in the curry)! 😊
                                                        Here’s what I did!
                                                        Course Main Course
                                                        Cuisine Goan
                                                        Keyword beef, Curry, Goan Red Curry, pork, Pork & Beef, Pork & Beef Curry
                                                        Prep Time 15 minutes
                                                        Cook Time 20 minutes
                                                        Total Time 35 minutes
                                                        Servings 4 people

                                                        Ingredients

                                                        For the Curry

                                                        • 500 gms Mix Meat (Pork and Beef) – washed and cut into 2inch pieces(I’ve used Beef with Bone and Pork Belly)
                                                        • 2 Green Chillies slit
                                                        • ½ Onion(julienne)
                                                        • ½ Tomato(julienne)
                                                        • 1 Tspn Salt
                                                        • 1.5 Tspn Ginger Garlic paste
                                                        • 1.5 Cup Water

                                                        For the Masala(make a smooth paste)

                                                        • 10 Kashmiri Chillies(Use only Kashmiri Chilly powder because any other Chilly powder is usually much spicier and will not give you this vibrant Red colour)
                                                        • 2 Green Cardamom
                                                        • 10 Pepper corns
                                                        • 6-8 Cloves
                                                        • 1 inch piece Cinnamon
                                                        • ½ Tspn Cumin Seeds
                                                        • 4 Garlic cloves
                                                        • ½ Onion roughly chopped
                                                        • ½ Tomato roughly chopped
                                                        • 1 Tbspn Vinegar
                                                        • 1 Tspn Jaggery or Sugar
                                                        • Water for grinding

                                                        Instructions

                                                        • In a Pressure Cooker, add the Meats, Onions, Tomato, slit Chillies, Salt, Ginger Garlic paste and the Masala paste. Add 1.5 cups in the Mixer and shake shake shake and add this water into the cooker and close the cooker and place the cooker on Medium low heat
                                                        • Cook this until Two whistles are released and turn off the heat and just leave it aside
                                                          Note: Here in Dubai, the Beef and Pork gets ready in two whistles. If you think you’re not sure about the time it takes to cook the meats,I would suggest you boil the meats separately and then make this curry. But in my opinion, 2-3 whistles should be fine
                                                          Safety Tip: Open the Cooker only once all the steam releases.Before opening the Lid of the cooker, release the whistle and then open to avoid any accidents
                                                        • Open the Cooker and Boil the curry for 5-7 minutes and turn off the heat
                                                        • Enjoy the curry Hot with either Pulao or Steamed white Rice

                                                        Some Further Shortcut gyaan for the Lazier and Busy Bees 🙂

                                                        • If you Don’t wish to grind the masala, you can directly make the curry by using ½ Cup Kashmiri chilly powder, 1.5 Tspn Jeerem Meerem powder, ¼ Tspn Cardamom powder and mixing it with all the other ingredients into the cooker

                                                        If you like my recipe, don’t forget to “like” & “share”it with your friends and family. And once you’ve tried my recipe, request you to kindly share your valuable feedback with me. I'd Love to hear from You 🙂

                                                          Recipe for Moong & Oats Dosa

                                                          Recipe for Moong & Oats Dosa

                                                          Recipe for Moong & Oats Dosa

                                                          Dosas are a Family favourite Breakfast. Although Dosas are not made on a regular basis at our place, we enjoy eating them at Restaurants or purchase ready batters and prepare Dosas at Home.
                                                          These days all of us are becoming Health conscious and running short on time with our Busy Lives. Since everyone is into all things Instant and Quick these days, this is one such Super Healthy and Super Yummy Moong and Oats Dosa recipe given to me by my cousin, Dalreen D’sa who is a Health Freak and is always busy crafting Healthy yet Yummy recipes for her Family. Whenever she shares a recipe with me, I blindly give it a shot because I know that it’s going to be A No Fail recipe and Yummy at the same time.
                                                          5th April, being my Bitter Better’s Birthday, he being a Health Freak I decided to Surprise him with a Healthy Breakfast by making this Special, Simple and Quick Moong & Oats Dosa.
                                                          The reaction that I got from him, was Priceless!
                                                          With Dalreen’s permission and being extremely Thankful to her, I am sharing her recipe with all of you. Thanks Dal 🙂
                                                          Hope you all like as much as we enjoyed it!
                                                          Course Breakfast, Snack
                                                          Cuisine Indian, South Indian
                                                          Keyword Dosa, Instant Dosa, Moong, Moong Dosa, Oats
                                                          Prep Time 20 minutes
                                                          Cook Time 30 minutes
                                                          Total Time 50 minutes
                                                          Servings 10 pcs

                                                          Ingredients

                                                          Ingredients for the Dosa

                                                          • 1 Cup Sprouted Moong
                                                          • ½ Cup Oats(Soaked in ½ Cup water for 10 minutes)
                                                          • 2 inch Ginger piece
                                                          • 2 Green Chillies
                                                          • 3-4 Garlic cloves
                                                          • 8-10 sprigs of Fresh Coriander
                                                          • 1/2 Tspn Salt
                                                          • 1/2 cup Water for grinding
                                                          • 1/2 cup Water for Mixing the batter

                                                          For the Chutney

                                                          • 1 Cup Fresh Coconut
                                                          • 1 Inch Ginger
                                                          • 1.5 Tbspn Roasted skinless whole Gram
                                                          • ¼ Tspn Salt(you can add more if you like)
                                                          • ½ Tspn Mustard Seeds
                                                          • ½ Tspn Urad Dal(Split black gram)
                                                          • 1 Green Chilly(optional)
                                                          • 6-8 Curry leaves
                                                          • 2 Dried Red Chillies
                                                          • 1 Tspn Oil

                                                          Instructions

                                                          For the Sprouted Moong

                                                          • If you get ready to use Sprouted Moong you can use that.
                                                          • If you wish to sprout Moong at home, follow these steps
                                                          • Take 2 Cups of whole Moong and Soak it with Water in a vessel overnight or for 6-8 hours
                                                          • After 6-8 hours, drain off all the Water from the Moong and let it be in the strainer over a vessel
                                                          • Place a damp cloth over the Moong and let it be covered for 24 hours
                                                          • After 24 hours, just toss the moong and cover it again with a damp cloth for 24 hours
                                                          • It takes 48 hours to Sprout Moong
                                                          • Use how much ever Sprouted Moong you require and you can store the remaining into the refrigerator

                                                          For the Chutney

                                                          • In a Mixer Jar, Add the Fresh Coconut, Ginger, Chillies,Salt, Water and Roasted Gram and grind into a Coarse mixture and transfer it into a bowl
                                                          • In a tadka Pan, add the oil and heat it on medium flame
                                                          • Once the oil turns Hot, add the Mustard Seeds and Urad Dal
                                                          • Then add the Curry Leaves and Red Chillies and immediately turn off the flame
                                                            Note: Do not wait until the Red Chillies and Curry Leaves turn Brown or Black
                                                          • Immediately, Transfer this tadka into the chutney and gently mix it all together and the chutney is ready to use

                                                          For the Dosa

                                                          • In a Small mixer Jar, Add the Coriander,Ginger, Chillies, Garlic, Salt, and blend it to a Fine paste
                                                          • Then add the Sprouted Moong and make a smooth paste
                                                          • Then add Soaked Oats and grind to a coarse paste, Just start and stop the mixer
                                                          • Transfer this mixture into a Bowl
                                                          • Add Water to this mixture and stir it well
                                                          • Place a Dosa Pan on Medium High heat Take a Cloth and a bowl of water and keep it aside
                                                          • Once the Pan becomes Hot, splash some water on the Pan and wipe it off with the cloth
                                                            Note: This is the secret tip to Crispy Dosas
                                                          • Pour One ladle of the batter on the Hot Pan and spread it across the Pan
                                                            Note: Since Oats tend to become sticky, you can cover the pan
                                                          • Once the Dosa turns crisp and is cooked on the other side,use a flat spoon and release the sides of the Dosa and transfer it into a plate
                                                          • Sprinkle Water on the Pan again and wipe it with the cloth
                                                            Note: Each time, before you Pour the Dosa batter on the Hot Pan, Sprinkle Water on the Pan and wipe the Pan with a cloth.

                                                          If you like my recipe, don’t forget to “like” & “share”it with your friends and family. And once you’ve tried my recipe, request you to kindly share your valuable feedback with me. I'd Love to hear from You 🙂

                                                            Recipe for Indo-Chinese Schezwan Chicken Fried Rice

                                                            Recipe for Indo-Chinese Schezwan Chicken Fried Rice

                                                            Recipe for Indo-Chinese Schezwan Chicken Fried Rice

                                                            Schezwan Fried Rice is for the Spicy Food Lovers and the ones who love the colour RED!
                                                            I remember my very First Schezwan Noodles and Fried Rice that I ate when our Catering Cook Bahadur introduced us to this flavour. OMG! I went insane at the age of 8 and I absolutely loved it and after that I wanted schezwan with all my Chinese Food, even with Corn Soup… crazy.. I know I know… Schezwan(Shezlon, like my uncle Antoo used to say 😊) Chicken, Fried Rice, Noodles, etc. became such a Hit among our building friends and the kids of the lane, that when the Menu for my 1st Holy Communion was being decided, we had an All Chinese Menu, where Bahadur and My Mom cooked everything for our 150+ guests and Schezwan Fried Rice, Schezwan Chicken Gravy and Schezwan Noodles were topping the buffet table! I was the cool kid in town because not everyone had heard about these dishes back then! So cool right! 😊
                                                            But the sad part is that, Mum & I didn’t learn how to make Schezwan Sauce from Bahadur nor Raja Chinese ☹…I regret it… but I hope to learn it soon and share it with you all. If you have a Good recipe for Schezwan Sauce, Do share it with Me and I’ll feature you with your recipe in my Schezwan Sauce Post. Until then,you can enjoy a bottle of a Nice Spicy store bought Schezwan sauce and Toss it into your Fried Rice, Thank Me laterzzzz!
                                                            Course Main Course
                                                            Cuisine Chinese, Indo-Chinese
                                                            Keyword Chicken Fried Rice, Chinese Fried Rice, fried rice, Schezwan, Schezwan Fried Rice, Schezwan Rice
                                                            Prep Time 30 minutes
                                                            Cook Time 15 minutes
                                                            Total Time 45 minutes
                                                            Servings 4 people

                                                            Ingredients

                                                            • 2 Cups Basmati Rice(Soaked in 4 Cups Water for 30 minutesand then gently washed until the water runs clear)
                                                            • 300 gms Boneless Chicken(Washed, Boiled with Salt and Cutinto cubes)
                                                            • 2 Large Eggs(Beaten with ¼ Tspn Salt and kept aside)
                                                            • 5-6 Spring Onions(Washed and chopped. Bulb and Green keptseparate)
                                                            • 3 Tbspn Shezwan Sauce(adjust as per preference)
                                                            • ½ Tspn Orange Red Food Colour(optional)
                                                            • 4 Tbspn Oil(for Tossing the Rice)
                                                            • A large vessel filled to ¾ of its level with Water(for boiling the Rice)
                                                            • 3 Tbspn Oil for adding to the Water while boiling the Rice
                                                            • 3 Tbpn Salt to be added to the water while boiling the rice

                                                            Instructions

                                                            • First, in the large vessel, add the Water, Oil and Salt and Keep it on High Flame for Boiling
                                                              Note: Adding Oil to the water is a very important step. If oil isn’t added, the Rice will get sticky. The Oil helps the Rice to remain loose and grainy
                                                            • As soon as the water begins to boil, add the Rice into the boiling water Boil the Rice until it is 75% cooked only
                                                              Immediately, Strain the Rice into a large strainer
                                                              Note: The Rice will be tossed on High flame later so if the Rice is fully cooked, the Rice will further get cooked and will become extremely soft and that’s not the texture we want for Fried Rice. Hence do not fully cook the Rice.
                                                              Note: Ensure the Rice is not kept in the water. Or else it will get further cooked and become sticky
                                                            • Once the water is completely drained off, immediately transfer the Rice into a large wide tray so that the Rice doesn’t further cook with its own heat and steam. Let the Rice come down to room temperature
                                                              Note: Do not cover the Tray
                                                              Bringing the Rice to room temperature is extremely important because Hot Rice is Soft and tossing Hot Rice will tend to break the Rice and you will not be able to retain Long grains.
                                                              Prep all your ingredients in advance because we will be cooking this on Extremely High Flame and you will not have a chance to chop or get things in between
                                                            • Once the Rice comes to Room temperature, Take a Large Wok or Skillet and Add 4 Tbspn Oil and place it on High flame
                                                            • Once the Oil turns Hot, Add the beaten Eggs and the chopped Spring Onion bulbs(the white part) and with a flat spoon break down the egg in the Hot Oil
                                                              Note: Spring Onion and Egg are a very Important ingredients because the Main flavours come from these two ingredients when tossed in Extremely Hot Oil
                                                            • Add the Rice, Boiled Chicken, chopped spring Onion greens, Colour(if using)Salt and Schezwan Sauce
                                                            • Once every grain is coated with Schezwan Sauce, turn the flame off and Enjoy your Hot, Cart Style Chicken Fried Rice.You can sprinkle some Spring Onions over the Fried Rice while eating.
                                                              Note: If Spring Onions are Raw and for any reason you’re notable to finish the Fried Rice and have to keep it for the next day, it may tend to smell. Hence if you wish to sprinkle Spring Onion over your Fried Rice, You may do so, into your individual plates, at the time of Eating and not into the entire batch.

                                                            If you like my recipe, don’t forget to “like” & “share”it with your friends and family. And once you’ve tried my recipe, request you to kindly share your valuable feedback with me. I'd Love to hear from You 🙂

                                                              Recipe for Sev Puri

                                                              Recipe for Sev Puri

                                                              Recipe for Sev Puri

                                                              Sev Puri or Sev Batata Puri is one of our favourite evening snacks at home. With so many stalls selling these chaats on the Streets of Mumbai, there is no chance that you haven’t enjoyed a delicious Sev Puri in your neighbourhood!
                                                              And let’s admit it, we all have that “favourite bhaiyya” and we feel there is nobody who can make Sev Puri or any of our favourite chaats better than him.
                                                              As I always say in most of my posts that Street Food is something that I miss terribly about Mumbai. And although we get everything available here in Dubai in the most fancy of platings, I still want my Sev puri served in that Magazine paper or a Newspaper…it’s an unexplainable emotion!
                                                              When in Mumbai, Mum makes Chaats for Dinner sometimes. And we purchase the puris from a local vendor and all we have to do is prepare the other ingredients.
                                                              But living in Dubai, I’ve learned to make everything from scratch using Mum’s recipe and some tricks and tips by watching some food videos.
                                                              Here’s my recipe for Sev Puri. Do give it a try! Trust me,if you love to cook, this will take you on a different trip because everything is made from scratch. Surprise your family! These were my Bitter Better’s words “you’ll give the Bhaiyyas and the Big shots a run for the Money! Masterchef material this is”
                                                              And In my mind this is what I went through “The lockdown has toned my bugger off so much that he’s shooting compliments after compliments or is it that my cooking skills are really improving…..hmmmmmm Food for thought” hahahahaa  
                                                              Course Evening Snack, finger snack
                                                              Cuisine Indian
                                                              Keyword Sev Batata Puri, Sev Puri
                                                              Servings 15 puris

                                                              Ingredients

                                                              Ingredients for the Papdi

                                                              • 1 Cup All Purpose Flour
                                                              • ½ Tspn Salt
                                                              • 1 Tbspn Oil
                                                              • ¼ Tspn Carom seeds (Ajwain) – optional
                                                              • ¼ Tspn Cumin seeds (Jeera) – optional
                                                              • Oil for Deep frying
                                                              • Water for kneading

                                                              Ingredients for the Sev

                                                              • 3 Tbspn Rice Flour
                                                              • 1 Tbspn Semolina
                                                              • ¼ Tspn Turmeric powder
                                                              • 1 Tbsp oil
                                                              • 1.5 Tbspn Water

                                                              Ingredients for the Meetha Chutney

                                                              • ¼ Cup Tamarind(without seeds)
                                                              • 15 Medium sized Dates(de seeded)
                                                              • ½ Cup Jaggery
                                                              • 2 Tbspn Sugar
                                                              • 1 Tspn Cumin Seeds(dry roasted & crushed into a powder)
                                                              • ½ Tspn Fennel Seeds(dry roasted & crushed into a powder)
                                                              • ½ Tspn Red Chilly Powder
                                                              • ½ Tspn Black Salt
                                                              • ½ Tspn Ginger Powder
                                                              • 4 cups water

                                                              Ingredients for the Spicy Green Chutney

                                                              • 6 Green Chillies
                                                              • ½ Cup Fresh Coriander
                                                              • ½ Cup Mint Leaves
                                                              • ½ Tspn Salt
                                                              • 1 inch Ginger

                                                              Ingredients for the Spicy Red Chutney

                                                              • 10 Kashmiri chillies(soaked in 1.5 Cups Hot Water for 1hour)
                                                              • 6 Garlic cloves(roughly chopped)
                                                              • ½ Tspn Salt
                                                              • 1 Tbspn Water(for grinding the chutney)

                                                              Other Ingredients for the Sev Puri

                                                              • 1 Onion (chopped fine)
                                                              • 1 Tomato (chopped fine)
                                                              • 1 Potato (peeled, washed, boiled with salt and mashed)
                                                              • 1-2 Tbspn salted chana Dal(optional)
                                                              • Some finely cut Raw Mango(optional)
                                                              • 1 Lemon
                                                              • 2-3 Sprigs of Fresh Coriander(chopped fine)

                                                              Instructions

                                                              Follow these steps to make Papdis

                                                              • Add all the ingredients in a bowl
                                                              • Then knead all this into a dough by adding water little by little
                                                              • Make a Big ball and roll it into a thin sheet and With the help of a fork, randomly pierce the sheet all across
                                                                Note: Piercing the discs will help the puris/papdi remainflat and will prevent it from puffing up in the oil
                                                              • Using a round cutter, cut circles
                                                              • In a skillet heat oil for deep frying
                                                              • Once the oil turns hot, fry the discs in batches
                                                                Note: The oil has to be on medium heat. If the Oil is hot,there are chances of the papdis puffing up.
                                                              • Once it starts turning brown, just keep turning them at intervals. Once the oil stops bubbling it means the papdis are ready.
                                                              • Remove them from the oil and transfer them on a kitchen paper napkin to drain off any excess oil.
                                                                You can use up what you require and store the remaining in an airtight container

                                                              Follow these steps to make the Sev

                                                              • In a bowl, mix the dry ingredients
                                                              • Then add the oil a and water and knead it into a dough
                                                              • Heat Oil in a skillet on medium flame
                                                              • Grease the Sev Maker with Oil and stuff the Sev maker with some of the Sev dough
                                                              • Once the oil turns hot, press the dough down into the hot oil and let it fry
                                                                Note: I’ve used my Garlic crusher since I don't have a Sev maker
                                                              • Once the oil stops bubbling, remove the sev on a kitchen paper towel to drain off all the extra oil
                                                              • Once the Sev cools at room temperature, the Sev is ready to use. You can crush and sprinkle it as you like!
                                                              • My little Sev Innovation Story that I’m super excited about,so I’m sharing it here 😊: The traditional Sev is usually made using Gram flour.
                                                                I’ve tried making Sev with Gram flour, but it’s always been a total disaster. This time when I tried adding rice flour and semolina to the gram flour mixture, I noticed it was getting a little better while frying, but still a disaster. That’s how I decided to make the Sev with Rice flour and Semolina and skipped the Gram flour and yayyyy it worked!
                                                                Since I don’t have a Sev maker, I made the sev using my Garlic crusher! So cool right! You can also make it with a ginger grater, it’s just that it doesn’t become extremely fine but these were my lockdown inventions! Hahaha.. I had no choice. If you’re using a Garlic crusher, you will have to grease the crusher with oil first and then continue making the Sev.
                                                                The pic that you see is the one with gram flour in it and I've used my ginger grater

                                                              Follow these steps to make the Meetha Chutney

                                                              • Soak the Dates and Tamarind in 3 Cups of Water for about 30 minutes
                                                              • Boil this mixture until the dates and tamarind becomes soft and the mixture turns thick
                                                              • Grind the Dates and Tamarind to a smooth fine paste and strain it using a strainer
                                                              • Mix the Jaggery and remaining 1 cup water into the Date and Tamarind mixture and cook it until the jaggery completely melts
                                                              • Then add the Cumin powder, Fennel Powder, Red Chilly powder,Black salt, Sugar and Ginger powder and stir it well
                                                                Also, by adding red chilly powder, and all the other spices into the Meetha chutney, it will elevate the flavour of the chutney
                                                              • Continuously stir the chutney and allow it to boil until it turns thick.
                                                                Once it turns thick, you can decide at what consistency to turn the heat off. Here the choice is yours.
                                                                Meetha chutney is ready. Keep it aside to cool. Once it comes down to room temperature, you can keep it in the refrigerator

                                                              Follow these steps to make the Spicy Green Chutney

                                                              • Make a smooth paste of all the ingredients mentioned under the ingredients list

                                                              Follow these steps to make the Spicy Red Chutney

                                                              • In a Mixer grinder add the Soaked chillies, garlic and salt and grind using water little by little to a smooth thick consistency

                                                              To make the Sev Puri

                                                              • Place the Papdis on a Plate
                                                                First add the Potato then the onion and tomato. Sprinkle some salt and chaat masala if you like
                                                                Then add all the chutneys
                                                                Top it with some Sev and you can finish it off with some fresh cut coriander and sprinkle some finely chopped Raw Mango and Spicy Chana Dal and lastly squeeze some lime all over the Sev Puri ! Yummmmm!
                                                              Recipe for ‘Jaggeny’ (Jaggery+Honey) Caramel Pudding – A Healthier version

                                                              Recipe for ‘Jaggeny’ (Jaggery+Honey) Caramel Pudding – A Healthier version

                                                              Recipe for ‘Jaggeny’ (Jaggery + Honey) Caramel Pudding – A Healthier version

                                                              Caramel Pudding, is one of our favourite desserts. Over theyears, with everyone being health conscious and knocking Sugar off theirKitchen shelves, I decided to create a healthier version of Caramel Pudding sothat Everyone can enjoy this smooth delicious dessert, Guilt-Free.
                                                              It has a slight Nutty flavour but the difference in taste isvery negligible and there’s absolutely no difference in consistency and texture.
                                                              When I shared my Mug Caramel Pudding recipe, our neighbourfriend Aunty Sandra, went ahead and tried out the recipe and due to health issues,she said she’s knocked off Sugar completely and said that she used jaggery tomake the Caramel. I got inspired to give this a shot and I’m so happy it didn’tfail or disappoint me😊
                                                              Course Dessert
                                                              Cuisine Goan
                                                              Keyword Caramel Pudding, Egg Pudding, Healthy Caramel Pudding, Pudding with Jaggery
                                                              Prep Time 30 minutes
                                                              Cook Time 30 minutes
                                                              Refrigerate 5 hours
                                                              Total Time 6 hours
                                                              Servings 4 people

                                                              Ingredients

                                                              For the Caramel

                                                              • 50 gms Sugarcane Jaggery
                                                              • ¼ Cup water

                                                              For the Pudding

                                                              • ½ Litre Milk(2 Cups)
                                                              • ½ Cup Honey(or ½ Cup Cut Jaggery or you can alter as per taste)
                                                              • 3 Eggs
                                                              • 1 tsp Vanilla essence or ½ Tspn Cardamom powder

                                                              Instructions

                                                              For the Caramel

                                                              • In a vessel, add the Jaggery and Water and let it boil on Medium flame. Once it begins to boil you will notice a lot of bubbles forming.Continuously keep stirring the mixture or else it will get burnt.
                                                              • Once the Mixture turns dark brown and thick and starts coating on to your spoon, turnoff the heat and keep it aside to cool at room temperature.

                                                              For the Pudding

                                                              • In a bowl or Vessel, add the Eggs, Honey, Cardamom Powder or Vanilla essence and gently beat it with a fork or whisk. If you beat it hard where bubbles are formed, it will form air pockets(holes) in your pudding
                                                              • Add the Milk to this mixture and gently stir it well
                                                                Note: Ensure that the Milk is at Room temperature. I haven’t boiled the milk here. You can boil it and bring it down to room temperature or just use it without boiling. But ensure the Milk is not cold from the refrigerator
                                                                If you’re using Jaggery, you will have to Boil the Milk along with the jaggery or else the jaggery will not melt. As soon as the milk begins to boil, turn the heat off
                                                              • Once the Caramel turns completely cool, with the help of a fine net strainer, strain the milk mixture into the Caramel vessel and put a lid on
                                                                Note: If you don't strain the milk mixture, there will be egg lumps in the pudding
                                                              • Take a Big Vessel add 3 Cups of water into it and Place the Caramel Vessel into it and put the lid on and allow this to steam for the first 10 minutes on extremely High Heat and for the Next 30 minutes on low heat and then turn the Heat off and immediately remove the Pudding vessel from the Big vessel and keep it aside to cool at room temperature with the lid slightly open
                                                                 
                                                                Note: If you have a stand you can place the caramel vessel on the stand inside the Big vessel
                                                                I have used 3 cups of water because my vessel is Big. The water has to be at a level where the caramel vessel is not floating. The caramel vessel has to be firm. Also, the water, whilst boiling, should not get into the Caramel vessel or else your pudding will not form. So if you need a level for your understanding, let the water be at a 1 Inch level of the bottom of the Pudding Vessel
                                                                If you find your pudding a bit wobbly, do not panic. This will get further heat from its own steam and heat and once you tuck it into the refrigerator, it will become more firm
                                                                If you do not immediately remove the pudding vessel from the Big vessel, it will further cook with the heat of the vessel and the texture will not remain as smooth
                                                              • Once the pudding comes down to room temperature, tuck it into the refrigerator to cool for about 4-5 hours. Once chilled, release the sides of the pudding with the help of a knife and flip/overturn the pudding onto a plate or tray and enjoy it nice and cold

                                                              If you like my recipe, don’t forget to “like” & “share”it with your friends and family. And once you’ve tried my recipe, request you to kindly share your valuable feedback with me. I'd Love to hear from You 🙂

                                                                Recipe for Catch ‘n’ Cook Chicken Wings

                                                                Recipe for Catch ‘n’ Cook Chicken Wings

                                                                Recipe for Catch ‘n’ Cook Chicken Wings

                                                                This is a recipe that I’ve created during the lockdown with whatever ingredients were available in my Refrigerator. My Bitter Better &I love Chicken Wings and when they are Sweet and Fiery Hot at the same time,it’s a Feast for us..
                                                                I usually make Recheado(A Traditional Goan Spice Paste)Chicken Wings but this time I wanted to try out something different and quick.This recipe is more like a DIY(Do It Yourself) recipe where you can add your favourite sauces and spices to Toss up your favourite base for the Chicken Wings.
                                                                Since I Created this out of whatever I found in my Kitchen, I decided to name the Dish ”Catch‘n’ Cook Chicken Wings”
                                                                I’d love to hear from you once you give it a try
                                                                Course Side Dish, Starter
                                                                Cuisine Fusion
                                                                Keyword CatchnCook WIngs, chicken wings, Fiery WIngs, Spicy WIngs
                                                                Prep Time 10 minutes
                                                                Cook Time 20 minutes
                                                                Total Time 30 minutes
                                                                Servings 20 pcs

                                                                Ingredients

                                                                • 10 Chicken Wings
                                                                • 2 Tsp Soy Sauce
                                                                • 2 Tsp Chilly Sauce
                                                                • 1 Tspn Worcestershire Sauce(optional)
                                                                • 2 Tspn Vinegar
                                                                • ½ Tspn Honey or Sugar
                                                                • 2 Tspn Ketchup
                                                                • 1 Tspn Sesame Seeds(Optional)
                                                                • 1 Tspn Paprika(Optional)
                                                                • 1 Tspn Dried Oregano flakes
                                                                • 6-8 Garlic Cloves(chopped fine)
                                                                • 8-10 gms Ginger(chopped fine)
                                                                • 10-12 Spicy Green Chillies cut into slants(alter as per taste. We enjoy this really spicy)
                                                                • ½ Tspn Salt
                                                                • ½ Tspn Ginger Garlic Paste
                                                                • 2 Tbspn Oil

                                                                If your’re makingthis with Chicken strips or cubes (Since not everyone is a fan of Wings), we first fry the Boneless chicken cubes and all other steps remain the same

                                                                • 400 gms Boneless(Washed and Cut into cubes)
                                                                • 2 Tbspn Corn Flour
                                                                • 1.5 Tbspn All Purpose Flour
                                                                • 1 Egg
                                                                • 1 Tspn Ginger Garlic Paste
                                                                • ½ Tspn Soy Sauce
                                                                • ½ Tspn Red Chilly Sauce
                                                                • 1 Tspn Salt
                                                                • Oil for Deep Frying

                                                                Instructions

                                                                • Clean, thoroughly wash and cut the Wings into two and discard the edge of the wing
                                                                • Transfer the Wings into a bowl and coat the wings with ½ Tspn Soy Sauce, Chilly Sauce, Salt and Ginger Garlic Paste
                                                                  Note: No need to marinate. Fry them immediately
                                                                • In a Pan heat 1 Tbspn Oil and Fry the Chicken Wings for about 3-4 minutes on each side on High flame until it gets a slightly crispy coating and transfer them into a bowl and keep aside
                                                                   
                                                                  Note: Do Not Fully Fry the Wings as we will be further cooking the Wings later
                                                                  Steps 2 and 3 are optional. If you’re running out of time,you can skip steps 2 & 3 and add the Chicken wings directly into the sauce later and allow it to cook
                                                                • In the same Pan, heat 1 Tbspn Oil on Medium High heat
                                                                • Once the Oil turns hot add the Chillies, Ginger and Garlic
                                                                • Once the Garlic begins to turn brown, add all the Sauces and Spices except the Sesame Seeds and Spring Onions and mix it well
                                                                  Note: At this stage, Do Not add salt if you’re following steps 2 & 3 as we’ve already added salt to the Wings. Also, most store-bought sauces have a high salt content in it, it is not necessary to add more salt. But you can add if you require
                                                                • Reduce the heat a little and add the Wings into the Sauce and Mix it well
                                                                  Note: If you’re going to skip step 2 & 3 you can cover the Pan at this stage so that the Wings get cooked. If you’re following step 2& 3 you can leave the Pan open and let the Chicken cook on medium heat for about 7-9 minutes on either side
                                                                • Once the Chicken in cooked and coated with the Sauce, add the Sesame seeds and Spring onions
                                                                • Mix it well and Toss it on High Heat until the Spring Onions are fully cooked
                                                                • Turn off the Heat and Enjoy these Fiery, Hot, Sweet, Sticky Catch ‘n’ Cook Chicken Wings as a starter.

                                                                If you're going to make it with Chicken Strips or Cubes

                                                                • In a skillet, heat oil on medium flame for deep frying
                                                                • In a bowl, add all the ingredients mentioned under the Ingredients for the Batter Fried Chicken section and mix it well
                                                                • Once the Oil turns Hot, add each coated chicken cube into the hot oil and fry the Chicken in batches
                                                                  Note: Fry the Chicken in batches. If all the chicken is fried together there will be over crowding in the oil and the oil will not retain its heat and the batter will get separated from the Chicken
                                                                  If the Oil is not too hot, the batter will be separated from the Chicken
                                                                  If the Oil is too Hot, the Batter will turn brown and cook faster and the chicken will remain raw
                                                                • Once the Chicken is Fried, drain off all the excess oil and transfer it on a Kitchen Napkin and keep aside
                                                                • All other steps remain the same. Your Catch n Cook Chicken is Ready! I hope to see this on your menu at your First Party immediately after the Lockdown! Until then do give it a Try and Don’t forget to make it your own!Remember as I mentioned at the start This is a DIY recipe! ENJOY 😊

                                                                If you like my recipe, don’t forget to “like” & “share”it with your friends and family. And once you’ve tried my recipe, request you to kindly share your valuable feedback with me. I'd Love to hear from You 🙂

                                                                  Recipe for Falooda Ice-Cream

                                                                  Recipe for Falooda Ice-Cream

                                                                  Recipe for Falooda Ice-Cream

                                                                  Falooda is one of our favourite beverages right from our childhood days. It’s a Milk based drink, served with Ice-Cream. It comes in various flavours but Rose flavour is a common favourite.
                                                                  Whenever we are in Goa during the summers, we enjoy our share of Falooda at our favourite place called Café Xavier in the Mapuca Market. Till date, my Mum never misses her chance of sipping on her favourite Rose Falooda and Café Xavier
                                                                  This is the First year after So many years of going to Goa, that my Parents cannot go to Goa due to the Global Lockdown. Also, since we are unable to go out now due to the Lockdown, I decided to give it a try to make some Falooda at Home.
                                                                  Instead of Making a separate Falooda and Ice-Cream, I decided to try making a Falooda Ice-Cream.
                                                                  When we were kids, for our birthdays, Mum would prepare various kinds of Ice-Creams, Kulfis and Casatas for all the kids at the Party.But my Mom doesn’t have the habit of writing down recipes so when I asked her for a base recipe of Ice-Cream, she couldn’t recollect. So, I decided to brush it up a little and made her rack her memory. And she very vaguely gave me some ingredients that she used to use for preparing Ice-Creams. I tried my Best and put them all together and decided to whip up an Ice-Cream with whatever I had available at hand.
                                                                  Since it is Mother’s Day on 10th May, I’d like to dedicate this Recipe to her😊
                                                                  Course Dessert
                                                                  Cuisine Indian
                                                                  Keyword Falooda, Falooda Ice Cream, Ice Cream, Rooh Afza Ice Cream
                                                                  Prep Time 20 minutes
                                                                  Cook Time 10 minutes
                                                                  Chilling Time 8 hours
                                                                  Total Time 8 hours 30 minutes
                                                                  Servings 6 People

                                                                  Ingredients

                                                                  For the Ice Cream

                                                                  • 1 Cup Cold Whipping Cream or Heavy Cream(Fat content 35%)(Mum said she used only Milk but since I had Cream at home, I used it)
                                                                  • 1 Cup Cold Full Fat Milk
                                                                  • 1 Tbspn Corn Flour(My Mum used to use Custard Powder. But since I was making a Rose Flavoured Ice Cream, I didn’t want to add flavoured custard powder)
                                                                  • ½ Cup Sugar
                                                                  • 1.5 Tbspn Rooh Afza
                                                                  • 1/2 tspn Vanilla essence

                                                                  Other Ingredients

                                                                  • 1 Tbsp Sabja seeds(soaked in ½ Cup water for 30 minutes)
                                                                  • ¼ Cup Fine white Vermicelli
                                                                  • Assorted Nuts/Dry Fruits(Optional)

                                                                  Instructions

                                                                  • Soak the Sabja in Water for 30 minutes
                                                                  • Before starting, place a Large bowl inside the Deep Freezer
                                                                    Note:For whipping the Cream, the bowl has to be chilled or else the cream will split
                                                                  • Next we go ahead and boil the Vermicelli. In a small vessel, add water and once it begins to boil, add the Vermicelli into it. Once it is done, drain off all the excess water
                                                                  • Transfer the vermicelli into a bowl and fill it with either cold or room temperature water so that the vermicelli doesn’t get further cooked with it’s own heat and steam. Keep it aside
                                                                  • In a vessel, Add 1 Cup Cold Milk and 1 Tbspn Corn Flour and whisk it well so that no lumps form and place it on low flame
                                                                    Note:If you add cornflour to hot milk, it will turn lumpy
                                                                  • Continuously keep stirring this Mixture and once it begins to thicken add ½ Cup Sugar and few drops of Vanilla essence
                                                                  • Once the Sugar melts, stir it for a little while until the mixture turns into a liquid custard like consistency.
                                                                  • Add the Rooh Afza and remaining Vanilla essence, turn off the flame and keep the vessel aside to cool
                                                                  • Once this mixture comes down to room temperature, remove the bowl from the freezer and add 1 Cup of Cream into it
                                                                  • With the help of an electric beater, beat the cream until it turns thick
                                                                    Note: we do not want stiff peaks or else the ice cream will turn extremely creamy like a cream consistency and not Ice-Cream consistency.But if you like your Ice Cream extremely Creamy, you can whisk until the cream turns into stiff peaks
                                                                  • Then Transfer the Whipped Cream and the Milk mixture in a Mixer Jar
                                                                    Note: If you’re going to whip your whipping cream into stiff peaks, you can skip this step
                                                                  • Blend this mixture well until you begin seeing bubbles
                                                                    Note: Do not let the Mixer keep rotating continuously or else the Mixture will turn hot and may split. Use the start and stop method at 10 seconds intervals
                                                                  • Now, Drain off all the water from the Sabja and Vermicelli and add it to this mixture. Gently using a Spatula, mix it all together. DO NOT ROTATE THE MIXER GRINDER AT THIS STAGE. Or else the Sabja and Vermicelli will blend it and we Don’t want that.
                                                                  • Pour this entire mixture into an Aluminum Cake tin or you can pour them into individual moulds
                                                                  • Since this is a Falooda Ice-Cream, I’ve just sprinkled some mixed Nuts over the Ice Cream to give it a Falooda feel
                                                                  • Cover with a cling wrap or foil sheet and place a lid over the Ice Cream so that it doesn’t have an Icy layer later
                                                                  • Tuck it into the Deep Freezer for about 6-8 hours and you can then enjoy your Favourite Falooda Ice-Cream on a Hot Summer Afternoon!

                                                                  If you like my recipe, don’t forget to “like” & “share”it with your friends and family. And once you’ve tried my recipe, request you to kindly share your valuable feedback with me. I'd Love to hear from You 🙂 

                                                                    Recipe for Cart Style Indo-Chinese Fried Rice

                                                                    Recipe for Cart Style Indo-Chinese Fried Rice

                                                                    Print Pin
                                                                    5 from 1 vote

                                                                    Recipe for Cart Style Indo-Chinese Fried Rice

                                                                    If you've lived in Bombay and Never eaten at an Indo-Chinese Cart, you've probably missed out on a lot of Fun & Flavour!
                                                                    My Brother, Joel and I have many Precious Childhood Memories attached to Indo- Chinese Carts
                                                                    Fried Rice is one of Joel's favourites. Whenever we go out to eat, however full he may be(which he NEVER is), he always calls for a Fried Rice! And if it's like street style Fried Rice, he eats the entire bowl and we have to sit & stare at his face
                                                                     
                                                                    This also happens to be Lola's fave!Lola is Blanche Sequeira my Sister-in-law’s Mum.Whenever we go out, we know she's only going to order her favourite 'FRY RICE'(That's what she calls it)
                                                                     
                                                                    Lola and Joel, this post is for both of you
                                                                     
                                                                    P.S. If Chinese Food is NOT cooked on High flame, you’re going to run out of Flavour.
                                                                    Course Main Course
                                                                    Cuisine Chinese, Indian
                                                                    Keyword Chicken Fried Rice, Chinese Rice, fried rice
                                                                    Prep Time 30 minutes
                                                                    Cook Time 1 hour
                                                                    Total Time 1 hour 30 minutes
                                                                    Servings 4 people

                                                                    Ingredients

                                                                    • 2 Cups Basmati Rice(Soaked in 4 Cups Water for 30 minutes)
                                                                    • 300 gms Boneless Chicken(Washed, Boiled with Salt and Cutinto cubes)
                                                                    • 2 Large Eggs(Beaten with ¼ Tspn Salt and kept aside)
                                                                    • 5-6 Spring Onions(Washed and chopped. Bulb and Green kept separate)
                                                                    • 2 Tspn Soya Sauce
                                                                    • Approx 1 Tspn Salt or more if you like
                                                                    • 4 Tbspn Oil(for Tossing the Rice)
                                                                    • A large vessel filled to ¾ of its level with Water(for boiling the Rice)
                                                                    • 3 Tbspn Oil for adding to the Water while boiling the Rice
                                                                    • 3 Tbpn Salt to be added to the water while boiling the rice

                                                                    Instructions

                                                                    • First, in the large vessel, add the Water, Oil and Salt and Keep it on High Flame for Boiling. Simultaneously, gently wash the Rice until the water runs clear
                                                                      Note: Adding Oil to the water is a very important step. If oil isn’t added, the Rice will get sticky. The Oil helps the Rice to remain loose and grainy
                                                                    • As soon as the water begins to boil, add the Rice into the boiling water.
                                                                    • Boil the Rice until it is 75% cooked only and Immediately, Strain the Rice into a large strainer and just gently spread it with the back of a fork
                                                                      Note: Ensure the Rice is not kept in the water. Or else it will get further cooked and become sticky
                                                                      Note: The Rice will be tossed on High flame later so if the Rice is fully cooked, the Rice will further get cooked and will become extremely soft and that’s not the texture we want for Fried Rice. Hence do not fully cook the Rice.
                                                                    • Once the water is completely drained off, immediately transfer the Rice into a large wide tray so that the Rice doesn’t further cook with it's own heat and steam. Let the Rice come down to room temperature
                                                                      Note: Do not cover the Tray.
                                                                      Bringing the Rice to room temperature is extremely important because Hot Rice is Soft and tossing Hot Rice will tend to break the Rice and you will not be able to retain Long grains.
                                                                    • Prep all your ingredients in advance because we will be cooking this on Extremely High Flame and you will not have a chance to chop or get things in between
                                                                    • Once the Rice comes to Room temperature, Take a Large Wok or Skillet and Add 4 Tbspn Oil and place it on High flame
                                                                    • Once the Oil turns Hot, Add the beaten Eggs and the chopped Spring Onion bulbs(the white part) and with a flat spoon break down the egg in the Hot Oil
                                                                    • Add the Rice, Boiled Chicken, chopped spring Onion greens, Salt and Soy Sauce
                                                                    • Toss the Wok on high flame and let all the ingredients mix well
                                                                      Note: Once the Rice goes in, kindly ensure that you do not use a Spoon or Spatula to Mix the Fried Rice. Hold the handle of the Wok and Toss the Rice because using a Spoon or Spatula, might break the rice. If you are finding it difficult to toss, Use a Flat Spatula at intervals but do it extremely gently
                                                                    • Once every grain is coated with Soy Sauce, turn the flame off and Enjoy your Hot, Cart Style Chicken Fried Rice. You can sprinkle some Spring Onions over the Fried Rice while eating.
                                                                      Note: If Spring Onions are Raw and for any reason you’re notable to finish the Fried Rice and have to keep it for the next day, it may tend to smell. Hence if you wish to sprinkle Spring Onion over your Fried Rice, You may do so, into your individual plates, at the time of Eating and not into the entire batch.

                                                                    If you like my recipe, don’t forget to “like” & “share”it with your friends and family. And once you’ve tried my recipe, request you to kindly share your valuable feedback with me. I'd Love to hear from You 🙂

                                                                      Recipe for Easy Peasy Baida Bombs

                                                                      Recipe for Easy Peasy Baida Bombs

                                                                      Easy Peasy Recipe for Baida Bombs

                                                                      This was my lazy deal!
                                                                      So, I woke up late, I was too hungry, I wanted to eat Eggs but I didn’t want to get into chopping all those Onions and Tomatoes. At the same time, this had to be heavy as I didn’t want to eat bread. I spotted my latest favourite Appe pan and decided to try out something new.
                                                                      Remembered how When my Mum makes us Omelettes, it’s never a simple one. Its always loaded with Ham or Salami or leftover Corned Beef or Chicken and not forgetting her favourite Ingredient CHEESE!
                                                                      I decided to work this up on those lines and created these fully loaded Baida Bombs for breakfast.
                                                                      These are super simple to make. The best part is that you can pair your Eggs with ingredients of your choice to create your own Baida Bombs.More like DIY Baida Bombs 😊
                                                                      Cheat Trick: I’ve used my Appe Pan so that it looks like alot in number so that I feel like I’m eating a lot(Simple Mind games into eating less). If you don’t have an Appe Pan, You can just fry Flat Mini Omelettes.
                                                                      Course Breakfast
                                                                      Cuisine Fusion, Indian
                                                                      Keyword Baida Bombs, DIY, Egg, Egg Bomb, Omelette
                                                                      Prep Time 15 minutes
                                                                      Cook Time 7 minutes
                                                                      Total Time 22 minutes
                                                                      Servings 12 pieces

                                                                      Ingredients

                                                                      • 3 Eggs
                                                                      • 2 Chicken Franks(chopped fine)
                                                                      • 2 Garlic cloves(chopped fine)
                                                                      • 2 Sprigs of Coriander(chopped fine)
                                                                      • 1 Green Chilly(chopped fine)
                                                                      • 1 cheese slice cut into 12 squares(You can use grated cheese as well)
                                                                      • ½ Tspn Chilly Flakes(optional)
                                                                      • ½ Tspn Dried Oregano(optional)
                                                                      • ¼ Tspn Paprika(Optional)
                                                                      • Oil or Butter for brushing the Appe Cavities
                                                                      • Salt only if required(since cheese, franks and some oregano contains salts)

                                                                      Instructions

                                                                      • Grease the Appe Cavities with some Oil or Butter and place it on medium flame
                                                                      • Mix all the above mentioned ingredients in a bowl
                                                                      • Add one spoon each of the mixture and drop it into each cavity of the pan and add the cheese and Cover it with a lid
                                                                        Note:-The lid is a must as this will help the egg get cooked all throughout since this is a no flip egg
                                                                      • As soon as the cheese melts and the egg begins to cook and looks hard on top, turn the flame off and keep the lid on for a minute or two and let it cook with its own heat
                                                                        Note:- It took me exactly 7 minutes for the entire process
                                                                        Don’t flip them or else the cheese will get stuck to the pan
                                                                      • Enjoy these beauties nice and Hot with some Tomato Ketchup! Yummmm!
                                                                        Note:- Don’t forget go gaga on the amount of Cheese. I’ve gone easy since I was being monitored by my Bitter Better! Hahaha!

                                                                      If you like my recipe, don’t forget to “like” &“share”it with your friends and family. And once you’ve tried my recipe,request youto kindly share your valuable feedback with me. I'd Love to hearfrom You 🙂

                                                                        Recipe for Hot & Tangy Chicken Curry

                                                                        Recipe for Hot & Tangy Chicken Curry

                                                                        Recipe for Hot & Tangy Chicken Curry

                                                                        This version of Chicken Curry was created when I had some extra Sorpotel Masala on hand. I didn’t want to make Chicken Sorpotel but I thought how about using this Masala to make a Chicken curry instead??
                                                                        Since we always make Green Chicken, or Xacuti or a Coconut based curry, I wanted to try something different.
                                                                        When the curry was ready, my family was quite impressed. But for some reason, I found something missing in it. So, When I made it the second time, I decided to enhance it further by adding a few extra ingredients that I thought could make it taste better and Yayyyy!! it became even more tastier.
                                                                        Since this is a quick recipe and requires no fancy ingredients either, I cook this up whenever I get a call that someone is coming over!! The best part is when your guests enjoy it and ask for the recipe! 😊😊 and shower you with unending praises! I mean, who doesn’t like being praised and appreciated right?? hehe..
                                                                        To my surprise, out of all the Chicken curries we make at home, this one's my Bitter Better’s favourite. And it excites me to make it for him whenever he’s at Home and there's Chicken on the Menu! Especially during the Winters!
                                                                        As always… I’d love to share my recipe with all of you too!
                                                                        Course Main Course
                                                                        Cuisine Goan, Indian
                                                                        Keyword Chicken curry, Chicken Curry without coconut, Hot & Tangy Chicken Curry, Spicy Curry
                                                                        Prep Time 30 minutes
                                                                        Cook Time 30 minutes
                                                                        Total Time 1 hour

                                                                        Ingredients

                                                                        Ingredients for the Masala

                                                                        • 8 Kashmiri Chillies
                                                                        • 1 Tspn Cumin Seeds
                                                                        • 12 Pepper corns
                                                                        • 8 Cloves
                                                                        • 1 inch Cinnamon stick
                                                                        • 3 Green Cardamoms
                                                                        • 8 Medium sized Garlic cloves
                                                                        • ½ Tspn Turmeric Powder(Optional)
                                                                        • 1 Tspn Sugar or Jaggery or 2 Tspn Ketchup
                                                                        • 1.5 Tbspn Vinegar
                                                                        • ½ Cup Water for grinding the Masala

                                                                        Other Ingredients for the Chicken Curry

                                                                        • 1 Kg Chicken
                                                                        • 1 Large Onion(cut into Julienne strips)
                                                                        • 1 Small Tomato(cut into Julienne strips)
                                                                        • 2 Large Potatoes(Diced into large cubes)
                                                                        • 3 Green Chillies(slit)
                                                                        • 6-8 Curry Leaves
                                                                        • 1 Tspn Ginger Garlic paste
                                                                        • 4-6 Sprigs of Fresh Coriander(chopped fine)
                                                                        • 1 Tbspn Oil or Ghee
                                                                        • 1 Cup Water
                                                                        • 1/2 Tspn Ginger Garlic Paste for Marinating the Chicken
                                                                        • 1 Tspn Rock Salt or 1/2 Tspn Table Salt for Marinating the Chicken

                                                                        Instructions

                                                                        • Cut & wash the Chicken thoroughly. Marinade the Chicken with Salt and Ginger Garlic paste and kept aside for atleast 30 minutes to 1 hour (you can use the cuts of your choice and keep the skin on if you like as well)
                                                                        • Make a Smooth Thick paste of the Ingredients mentioned under the Masala section and keep aside
                                                                          Note:  Add the Water little by Little or else the Masala may remain coarse if all the water is added at once
                                                                          If you don’t have access to Kashmiri chillies, you can use any other Red Chillies but ensure to reduce the quantity as they may be hotter
                                                                          I use the small Mixer Jar because the curry paste becomes smooth
                                                                        • In a vessel, add the Onions, Curry Leaves, Chillies, Tomatoes and Oil/Ghee and place it on medium flame
                                                                        • As soon as the onions begin to turn golden brown, add the Ginger Garlic paste and mix it well
                                                                        • Once the raw smell of the Ginger Garlic paste reduces, add the curry Masala paste.
                                                                        • In the same Mixer jar add about a cup of water or more if required, shake it well and add that water into the vessel
                                                                          Cover the vessel and let it cook for about 10-15 minutes on Medium flame
                                                                          Note:If you don’t give the curry enough time to cook, it may taste bitter
                                                                        • Then Add the Chicken and Potatoes into the gravy and cover the vessel
                                                                        • Once it begins to boil, take off the lid and let the curry boil
                                                                          Note: Check for Salt, Vinegar or Sugar/Jaggery or Ketchup
                                                                        • Once the Potatoes are cooked, add the Fresh Chopped Coriander and give it a stir
                                                                        • Let it boil for another 2-3 minutes or so and turn off the flame
                                                                        • Enjoy this flavour burst Hot & Tangy Chicken Curry with Hot Bread or Steamed White Rice or Pulao! Yummmm!
                                                                          Note: If your’re making this dish for kids, you can add coconut milk to the curry. Also, you may want to reduce the Spice level. You can skip the green chillies or the reduce the number of pepper corns.

                                                                        If you like my recipe, don’t forget to “like” & “share”it with your friends and family. And once you’ve tried my recipe, request youto kindly share your valuable feedback with me. I'd Love to hear from You 🙂

                                                                          Recipe for Dal Vada

                                                                          Recipe for Dal Vada

                                                                          Recipe for Dal Vada

                                                                          Dav Vadas are a common Mumbai Street Food snack, especially found on the carts during evening. I started eating and enjoying Dal Vadas because they are one of my Husband’s favourite Tea-Time snacks and whenever we went rambling, we would pick up Vada Pao and Dal vada!
                                                                          Here, in Dubai, we terribly miss our Mumbai Street Food,although we get these items at fancy restaurants, but nothing to beat Street Food!
                                                                          Since it was Valentine’s week and I hadn’t planned anything this year for Valentine’s I decided to cook my Husband’s faves, each day! And Dal Vadas made it to Day 5!
                                                                          This is a combination of various recipes put together.
                                                                          Here’s my version of the recipe.
                                                                          Course Evening Snack
                                                                          Cuisine Indian
                                                                          Keyword Dal Vada, Deep Fried Snack, Evening snack
                                                                          Prep Time 30 minutes
                                                                          Cook Time 20 minutes
                                                                          Resting Time 8 hours
                                                                          Total Time 8 hours 50 minutes

                                                                          Ingredients

                                                                          • 1 Cup Chana Dal
                                                                          • ¼ Cup Urad Dal
                                                                          • 10 Curry Leaves(chopped fine)
                                                                          • 7-8 Sprigs of Coriander leaves (chopped fine)
                                                                          • 2 Green Chillies
                                                                          • 3 gms Ginger
                                                                          • 1 Small Onion(chopped fine)
                                                                          • ½ Tspn Cumin Seeds(Jeera)
                                                                          • ¼ Cup Besan(gram flour)
                                                                          • ½ Tspn Red Chilly Powder
                                                                          • 1 Tspn Coriander Powder
                                                                          • 1 Tspn Garam Masala Powder
                                                                          • 1 Tspn Salt

                                                                          Instructions

                                                                          • In around 2 cups of water, Soak the Chana Dal and Urad Dal together, over night.
                                                                            Note:-  Keep aside 2 tbspn Chana Dal and soak that separately
                                                                            Next Morning, drain off all the water and wash the Chana Daland Urad Dal. Also, drain off all the water from the separately soaked Chana Dal,wash it and keep aside
                                                                          • Transfer both the Chana Dal and Urad Dal into a mixer jar and add the Ginger and Green Chilies to it and grind all these ingredients to a coarse paste
                                                                            Note:- Do not add any water while grinding since the Dals are already soaked in water. Adding water while grinding will make it difficult to shape the vadas. You may find it difficult initially, but keep giving your mixer short burts and scrape off the sides of the jar and bring the ingredients together and rotate the mixer
                                                                          • Transfer it into the coarse paste into a bowl and add the separately soaked chana dal into the bowl.
                                                                          • Now to this paste, add the separately soaked Chala Dal, Salt, Garam Masala,Chilly Powder, Coriander Seed Powder, Chopped Onion, Chopped Coriander, Chopped Curry Leaves and Cumin Seeds
                                                                          • Mix all these ingredients well
                                                                          • In a Deep fry pan, Heat the Oil on Medium flame
                                                                            Note: Ensure the flame is not high or else the outer covering of the vadas will fry quickly leaving the inside raw
                                                                          • Grease your palms with some oil, Divide the dough into equal parts and flatten each part on your palms, into discs not more that 2-3 inches in width and drop the flattened discs in to the hot oil and let it fry until they turn Golden brown in colour
                                                                            Note: It may take some time to fry so do not be in a hurry or impatient to turn up the heat
                                                                          • Once it turns golden brown, remove them from the oil and drain off all the excess oil
                                                                          • Transfer them on to a kitchen paper napkin to drain off any extra oil
                                                                          • Your Dal Vadas are now ready to be attacked! Dal Vadas are best enjoyed when Hot with a nice Hot cup of Tea or Coffee!

                                                                          If you like my recipe, don’t forget to “like” & “share”it with your friends and family. And once you’ve tried my recipe, request you to kindly share your valuable feedback with me. I'd Love to hear from You 🙂

                                                                            Recipe for Chocolate Caramel Pudding

                                                                            Recipe for Chocolate Caramel Pudding

                                                                            Recipe for Chocolate Caramel Pudding

                                                                            Chocolate is my All Time Favourite! I can eat anything and everything Chocolate. And if it’s Dark, hmmm… even better!
                                                                            Caramel Pudding is my Favourite Goan Dessert. It’s a family favourite and I’ve been eating it from like forever…. My Mum’s caramel pudding is to die for!
                                                                            Since I wanted to do something different on Women’s day, I decided to blend two of my favourites to create a simple yet flavour packed dessert.
                                                                            It was my first attempt and I got a Thumbs up from my Bitter Better half, so I was super excited and decided to share the recipe with all of you!
                                                                            Hope you enjoy it too!
                                                                            Course Dessert
                                                                            Cuisine Goan
                                                                            Keyword Bread Pudding, Caramel, Caramel custard, Chocolate Pudding
                                                                            Prep Time 30 minutes
                                                                            Cook Time 1 hour
                                                                            Resting Time 2 hours
                                                                            Total Time 3 hours 30 minutes
                                                                            Servings 4 people

                                                                            Ingredients

                                                                            • 1/2 litre Full Fat Milk
                                                                            • 2 Eggs (beaten) You can use 3 if the Eggs are small
                                                                            • 1/4 cup Hersheys Cocoa Powder or 1/4 cup melted unsweetend Chocolate chips (I prefer using Hersheys. You can use any unsweetened cocoa powder of your choice)
                                                                            • 5 tbspn White Granulated Sugar (keep aside 1.5 for caramelising)
                                                                            • 1/2 tspn Green Cardamom powder
                                                                            • ½ tspn Vanilla essence(optional)

                                                                            Instructions

                                                                            • Boil the milk with the Chocolate Powder, Cardamom powder and 3.5 tbspns sugar and keep it aside to cool
                                                                            • Once the milk is completely cooled, add in the two beaten eggs and gently mix it with the milk mixture. We'll name this (M1)
                                                                              Note:- Beat the eggs with a whisk or fork, separately in a bowl and then add the beaten eggs to the milk
                                                                            • In another vessel, caramelise 1.5 tbspn sugar and let it cool. We name this (M2)
                                                                              Note:- For caramelising, take a steel or aluminium vessel and add 1.5 tbspn sugar in it.Place it on medium high flame. Once the sugar begins to melt, Take a cloth/vessel holder and hold the vessel and keep rotating it on the flame. Once the sugar starts to melt., keep rotating the vessel, for two main reasons :-
                                                                              a)The caramel has to spread throughout the vessel
                                                                              b)If the vessel is not rotated, the sugar will get burnt.
                                                                            • Once (M2) has cooled completely, using a fine net strainer or muslin cloth pour (M1) into (M2) and cover it with a lid. We'll name this entire thing (M3)
                                                                            • Now take a big vessel(Double the size or much bigger than that of M3) and add water into it.
                                                                              (M3) has to fit into a bigger vessel for the purpose of double boiling
                                                                              Note:- Double boiling is a method wherein An ingredient is placed into a vessel and that vessel with the ingredient in it is placed into another big vessel which has water in it. The main purpose of Double boiling is that there are certain dishes that require only steam for them to get cooked and not direct heat from the gas flame. 
                                                                              The Water should reach just 1 inch level of the smaller vessel. If the water is too much, the small vessel will float inside and while boiling it will move and the pudding will crack. The small vessel should be firm and should move. So adjust your water level accordingly.
                                                                              Also, if the water level is too high, at the time of boiling, the water may enter the small vessel and will come in contact with the pudding and that is something we don't want.
                                                                            • Place the (M3) vessel into this big vessel with water and cover the big vessel. 
                                                                            • Place it on high flamefor the first 10 minutes. Reduce the flame to low, for the next 30 minutes.
                                                                            • After that, turn the gas off and immediately remove the (M3) vessel from the big vessel or else it may get further cooked with the heat/steam, if left inside. Let it cool completely at room temperature
                                                                            • Once cooled, Place the Pudding into the refrigerator for 2-3 hours or until chilled. (DO NOT forget to cover it with either cling wrap or a lid while placing it in the refrigerator or else the outer layer will turn hard)
                                                                            • Once chilled, take a nice sharp knife and run it through the outer sides of the entire Pudding so that it is released from the sides of the vessel.
                                                                              Note:- if you try to do this step when the pudding is hot, it may break since it is still going to be very soft
                                                                            • Note:-
                                                                              * If you don't wish to follow the double boiling method, You can also bake the Pudding in the oven.
                                                                              *If you’re going with baking, you will have to caramelise the sugar in an aluminium baking tray or a cake container(this will have to be done on a gas flame). Except steps 5-8, all other steps remain the same.
                                                                              Pre-heat the oven at 250^c for 10 minutes. Cover the Pudding Tin with a foil sheet. Place the Pudding Tin which contains the Pudding mixture(use only a baking tin here. If you use a vessel, chances are that it may not get baked) into a Large Baking tray filled with 1 inch level of water inside the oven. Bake it at 200^c for the first 10 mins and 180^c for the next 30-40 minutes, depending upon your Oven .

                                                                            If you like my recipe, don’t forget to “like” & “share”it with your friends and family. And once you’ve tried my recipe, request youto kindly share your valuable feedback with me. I'd Love to hear from You 🙂

                                                                              Meat Loaf/Corned Beef Luncheon Meat

                                                                              Meat Loaf/Corned Beef Luncheon Meat

                                                                              Print Pin
                                                                              5 from 1 vote

                                                                              Meat Loaf/Corned Beef/Luncheon Meat

                                                                              My Mum always told me Don't Loaf around, come straight home. So I used to come Home and Loaf around haha
                                                                              Meat Loaf sandwiches used to be my favourite after-school snack. My Mum used to Love the store-bought tinned Meat Loaf that our relatives living abroad would get for us. But when she learnt to make it at home, we never really enjoyed the tinned stuff anymore.
                                                                              My Mum usually makes a paste form which is easier to spread on sandwiches. Very recently, a friend wanted to enjoy a baked MeatLoaf which she had enjoyed years ago & that's hows I landed up making this after many years.
                                                                              Course Appetizer, Breakfast, Salad
                                                                              Keyword Chicken loaf, Corned Beef, Luncheon Meat, MeatLoaf, Mixed Meat
                                                                              Prep Time 20 minutes
                                                                              Cook Time 45 minutes
                                                                              Total Time 1 hour 5 minutes
                                                                              Servings 6 people

                                                                              Ingredients

                                                                              • 500 gms Beef Mince
                                                                              • 350 gms Pork Bacon strips or Bacon Mince

                                                                              • 2 Eggs

                                                                              • 3 Slices of bread or 1 Bread roll

                                                                              • 1.5 Tspn Pepper Powder

                                                                              • 1 Tspn Cinnamon powder(if your're using store bought cinnamon powder use 1 Tspn because it's very light. If you're grinding fresh Cinnamon at home or using Organic Cinnamon powder, use just about 1/2 Tspn because the flavour is always stronger)
                                                                              • 2 Tbspn Lemon Juice

                                                                              • 1 Tspn Salt

                                                                              • Rose Pink Food Colour

                                                                              • Some Butter or Oil for greasing the tin

                                                                              Instructions

                                                                              • In a wide bowl, Soak the bread slices/Bread Roll
                                                                              • Grease a baking tin with oil or butter, on all sides and keep aside
                                                                                Note:- I've used a 4 x 9 inches tin with 3 inches height

                                                                              If using Bacon Strip

                                                                              • Squeeze out all the juices off the bacon strips and roughly chop them into small bits
                                                                              • Transfer the chopped Bacon strips into a small mixer jar and make a paste out of it
                                                                              • In bowl or vessel, add all the ingredients (except butter) mentioned above
                                                                                Note: Squeeze out all the water from the soaked bread and transfer the bread into the bowl
                                                                              • Now using your hands, Mix all these ingredients well

                                                                              • Transfer this mix into the greased tin and gently flatten it and cover/seal it with an aluminium foil sheet

                                                                              • In a Large Vessel, place a metal stand and Add 2 cups of water into the vessel and place the MeatLoaf tin on the stand
                                                                                Note: The Metal Stand is optional. You can place the tin directly into the vessel with water


                                                                              • Cover the large vessel with a lid and let this steam for 45 minutes on medium flame

                                                                              • Once done, do not take off the foil sheet until the Meat Loaf tin comes to room temperature. You can then eat it immediately or keep it in the chiller section of your refrigerator.
                                                                                Notes
                                                                                -Placing the MeatLoaf into the refrigerator will make the Meatloaf more firm and will help you cut better slices
                                                                                -You can also make a paste out of the Meatloaf and add Butter or Mayonnaise to the Meatloaf paste and spread it on Sandwich bread! Yummm! 🙂


                                                                              • Enjoy this Simple, Easy, yet extremely flavorful Meatloaf to make Sandwiches, Salads, Chilly fry or Cutlets.


                                                                              • The best part is that this recipe is Kid-friendly! 
                                                                                Note: You can avoid adding artificial food colour to the Meatloaf if you wish. Food colour does not in anyway enhance flavour or Taste. It is used only to enhance appearance/look.If you can get Natural Beetroot colour or can make it at home(Peel,Grate,Sun Dry the beetroots till brittle and then grind it into a powder) you can use that as well, especially if making it for kiddies.
                                                                                The one you see in this picture, is made without any food colour

                                                                              • Note:
                                                                                For those who do not eat Pork or Beef, you can substitute Beef Mince with Chicken Mince and Pork Bacon with Turkey Bacon

                                                                              If you like my recipe, don’t forget to “like” & “share” it with your friends and family. And once you’ve tried my recipe, request you to kindly share your valuable feedback with me. I'd Love to hear from You 🙂

                                                                                Recipe for Lagori Goan Beef Roast

                                                                                Recipe for Lagori Goan Beef Roast

                                                                                Recipe for Lagori Goan Beef Roast

                                                                                As a child i loved to play 7 Tiles which is locally known as 'Lagori' in India.
                                                                                For me, My Kitchen has always been a Playground and Cooking(and Eating, if I may add:) has always been my Favourite game. As I was racking the Creative side of my Brain to come up with a concept to click this Beautiful Beef Roast, I tried keeping the slices one above the other and it felt so Nostalgic because it reminded me of 'Lagori' and that's how I thought of naming this dish 'Lagori Beef Roast'
                                                                                There are Three types of Beef Roast recipes that I've shared here. You can choose whichever one you like!
                                                                                Course Appetizer, Side Dish
                                                                                Cuisine Goan
                                                                                Keyword beef, Beef Roast, Goan Beef Roast, Goan roast, Roast
                                                                                Prep Time 20 minutes
                                                                                Cook Time 30 minutes
                                                                                Marination 6 hours
                                                                                Total Time 6 hours 50 minutes
                                                                                Servings 4 People

                                                                                Ingredients

                                                                                Type 1 – Brown Beef Roast

                                                                                • 1/2 kg Beef(sliced)
                                                                                • 1 Medium sized onion (sliced)
                                                                                • 2 Green chillies(slit)
                                                                                • 4-5 Cloves garlic(roughly crushed)
                                                                                • t 4-5 Sprigs fresh coriander chopped fine
                                                                                • 1 Tbspn Ghee or oil
                                                                                • 1-2 Green cardamom
                                                                                • 5-6 Pepper corns
                                                                                • 2-3 Cinamon sticks(broken ito small pieces)
                                                                                • 1/4 Cup Water

                                                                                For the marinade(i marinade the beef overnight for approx 7-8 hrs in the refrigerator)

                                                                                • 2 Tspn Jeerem Meerem powder
                                                                                • 1/4 Tspn turmeric powder
                                                                                • 2 Kashmiri chillies(roughly broken)
                                                                                • 1/2 Tspn Salt
                                                                                • 1 Green chilly slit
                                                                                • 2 Tspn ginger garlic paste
                                                                                • 2 Tspn vinegar
                                                                                • 4-5 Sprigs fresh coriander chopped fine

                                                                                Type 2 – My Mom's Recipe

                                                                                • 1/2 Kg Beef Chunks
                                                                                • 1/2 Tspn Turmeric Powder
                                                                                • 1/2 Tspn Chilly Powder
                                                                                • 1 Tbspn Ginger Garlic Paste
                                                                                • 2 Tspn Jeerem Meerem Powder
                                                                                • 2 Tspn Vinegar(you can add more if you like)
                                                                                • 1/2 Tspn Salt(or as per taste)
                                                                                • 1/4 Cup Water

                                                                                Type 3- Green Masala Beef Roast

                                                                                • 1/2 Kg Beef Roast(Sliced)
                                                                                • 1 Tbspn Ghee or Oil
                                                                                • 3 Dried Kashmiri Chillies(roughly hand broken)
                                                                                • 1 Medium Sized Onion(sliced)
                                                                                • 2 Tspn Ginger Garlic Paste
                                                                                • 1/2 Tspn Salt

                                                                                For the Masala

                                                                                • 1/2 Cup Fresh Coriander(with stem)
                                                                                • 1/2 Tspn Pepper Corns
                                                                                • 1/2 Tspn Cumin Seeds
                                                                                • 1/2 Tspn Coriander Seeds
                                                                                • 1 Green Cardamom
                                                                                • 1/2 Inch Cinamon
                                                                                • 2-3 Cloves
                                                                                • 1/4 Tspn Turmeric Powder
                                                                                • 6 Garlic Cloves(roughly chopped)
                                                                                • 2 Green chillies(you can add more if you like it spicy)
                                                                                • 1/2 Tspn Sugar or Ketchup(optional)
                                                                                • 2 Tspn Vinegar
                                                                                • 1/4 Cup Water

                                                                                Instructions

                                                                                Follow these steps to make Type 1 – Brown Beef Roast

                                                                                • Wash the beef slices and drain all the water thoroughly & Add all the ingredients mentioned in the 'marinade' section to the beef and mix well
                                                                                • Cover it Tight & Place it in the fridge overnight or for 6-8 hours
                                                                                • After 6-8 hours, In a cooker, heat 1 tbspn oil
                                                                                  Once the oil is nice and hot, add the cardamom, cloves, pepper corns and cinnamon sticks till all the flavour is infused in the oil
                                                                                • Add the onions, crushed garlic and green chillies
                                                                                • Sauté well until the onions turn golden brown & Add in the Marinaded Beef and 1/4 cup water, give it a nice stir & close the cooker
                                                                                • Let it cook on medium flame until 2 whistles and you can check if the beef is cooked, if not cooked, then cover it again and give it some more time to cook. If yes, then open the cooker lid and turn the flame to high and let the gravy thicken
                                                                                • As it starts to boil and thicken, check for salt & vinegar. If required, add it at this stage.
                                                                                • Add the chopped coriander leaves and stir it with the beef and allow all the water to dry up and your Beef Roast is Ready!
                                                                                  Note:- You may have to give it some stirs at intervals here or else there are chances of the beef getting stuck and burnt at the bottom of the cooker

                                                                                Type 2- My Mom's recipe

                                                                                • What My Mom makes is a Simple One Pot recipe and I make it when Im running out of time!
                                                                                • Into a Pressure Cooker, Just add Beef Chunks, Jeerem Meerem Powder, Vinegar, Ginger Garlic Paste, Turmeric Powder, Chilly Powder and Salt. Mix it well and add about 1/4 cup Water and let it cook until the meat is completely done.
                                                                                • Once done, Open the Pressure cooker, place it on High flame and let the gravy thicken
                                                                                • Cut Slices of the Beef Chunks for sandwiches or cubes for Chilly Fry!

                                                                                Follow these Steps to make Type 2 – Green Masala Beef Roast

                                                                                • Wash the Beef Slices, place it into a Pressure Cooker and season with Salt & Ginger Garlic Paste and keep
                                                                                  Note:- You can marinade it in a bowl as well. But since we have to directly bowl it in the pressure cooker, I marinade it directly in the pressure cooker
                                                                                • In a Mixer grinder, add all the ingredients mentioned under the 'masala' section of the recipe
                                                                                • Make a smooth fine paste of these ingredients
                                                                                  Note:- The vinegar should be enough for the paste to be formed. But incase you're having difficultly, you can add some water to make the paste
                                                                                • Once the paste is ready, Add this to the Beef slices and mix it well. Add about 1/4 cup water into the mixer jar and shake it well and add this water too, to the marinade. Cover it and tuck it into the refrigerator and let it marinade overnight or for 6-8 hours
                                                                                • After 6-8 hours, place the Pressure cooker with the marinaded Beef Slices on Medium flame amd allow it to cook until 2 whistles are released. Then turn off the flame and allow the pressure cooker to rest until all the steam is released from it
                                                                                • As the cooker is resting, In a vessel, heat 1 Tbspn Ghee or Oil
                                                                                • Add 1 sliced Onion and 3 broken Kashmiri Chillies to the oil
                                                                                • Once the Onions turn brownish(not burnt), Carefully open the lid of the cooker and transfer the Beef along with all the juices into the vessel and stir it
                                                                                • Add the Kashmiri Chillies and Allow this to boil on medium flame until the beef is fully cooked. Check for Salt or Vinegar.
                                                                                • Once the beef is cooked, increase the flame to High and allow all the juices to thicken
                                                                                • Once it turns dry, you can turn off the flame and it is ready to be attacked!
                                                                                • You can fry some potatoes and add it to the beef roast as well!
                                                                                • Beef roast is ready to be eaten Hot with either Pao or in a sandwich form or as a side dish or chakna!

                                                                                If you like my recipe, don’t forget to “like” & “share” it with your friends and family. And once you’ve tried my recipe, request you to kindly share your valuable feedback with me. I'd Love to hear from You 🙂

                                                                                  Notes

                                                                                  Recipe Link for Ginger Garlic Paste
                                                                                  https://chrizzosgrubscene.com/2019/08/14/recipe-for-home-made-ginger-garlic-paste/
                                                                                  Recipe Link for Jeerem Meerem Powder
                                                                                  https://chrizzosgrubscene.com/2019/09/03/recipe-for-goan-jeerem-meerem-spice-powder/
                                                                                   
                                                                                  Recipe for Russian Salad

                                                                                  Recipe for Russian Salad

                                                                                  Recipe for Russian Salad

                                                                                  No Goan Wedding or Party is complete without a Russian Salad.
                                                                                  Russian Salad is my Mom's favourite and it has to be part of almost all ocassions celebrad at home! The best part about this recipe that I've shared is that the Mayonnaise is Home-made.
                                                                                  This is a creamy salad made out of finely cut boiled vegetables and some fruits mixed with Mayonnaise! It goes well with spicy gravies. Russian salad can also be served on salty Biscuits or Canapés or Croutons. You can also enjoy Russian Salad as a sandwich spread.
                                                                                  Do give it a try and share your feedback with me.
                                                                                  Course Appetizer, Salad, Starter
                                                                                  Keyword Mayonnaise salad, Russian Salad, Salad
                                                                                  Prep Time 1 hour
                                                                                  Cook Time 20 minutes
                                                                                  Cooling time 5 hours
                                                                                  Total Time 6 hours 20 minutes
                                                                                  Servings 6 people

                                                                                  Ingredients

                                                                                  Vegetables to be used

                                                                                  • 1 Large Potato(cut into small cubes)
                                                                                  • 100 gms Green Peas(after peeling)
                                                                                  • 100 gms French Beans(cut into small cubes)
                                                                                  • 100 gms Carrot(cut into small cubes)
                                                                                  • 100 gms Cucumber(cut into small cubes)

                                                                                  Fruits you can use(optional)

                                                                                  • 50 gms Grapes(cut into small cubes)
                                                                                  • 1 Apple(cut into small cubes)
                                                                                  • 50 Gms Pineapple(cut into small cubes)

                                                                                  Ingredients for the Mayonnaise

                                                                                  • 3 Large Eggs
                                                                                  • 3 Tspn Sugar(You can add more Sugar if you like it Sweet. I like to add a little extra Sugar)
                                                                                  • 1/2 Tspn White Vinegar
                                                                                  • 1/4 Tspn Pepper Powder
                                                                                  • 1/4 Tspn Mustard Powder
                                                                                  • 500 ml Refined Sunflower Oil(Do Not use oils which have strong flavours or else the Mayo won't taste good) You may land up using more or less oil depending on the size of the eggs

                                                                                  Other Ingredients

                                                                                  • 1 litre Water to boil the Vegetables
                                                                                  • 3 Tspn Salt
                                                                                  • 2 Tspn Oil

                                                                                  Instructions

                                                                                  Method of Boiling the Vegetables

                                                                                  • Clean and Wash all the vegetables thoroughly and cut them into small cubes
                                                                                  • In a Large Vessel, Add 1 litre water, 3 Tspn Salt and 2 Tspn Oil and Place it on High Flame
                                                                                    Note:- The Oil helps to keep the vegetables separated and not stick to each other
                                                                                  • As soon as the water starts boiling, add the Potatoes, Peas, French Beans and Carrots into the vessel and let the vegetables cook till done
                                                                                    Note:- Do not over cook the vegetables
                                                                                  • Once the Vegetables are cooked, Transfer them into a strainer and drain off all the water and keep it aside to cool at room temperature
                                                                                    Note:- You can keep the Vegetable stock if you like, to use it in Pulao, Curries, etc. If not using it immediately, you can store it in the deep freezer

                                                                                  Follow these steps to make the Mayonnaise

                                                                                  • Add all the ingredients mentioned under the Mayonnaise section, except Oil, in a big mixer grinder and spin it for about 10 seconds(I use the start and stop method)
                                                                                    Note:- Please ensure that the Mixer jar, ring and cover are completely dry before adding the ingredients
                                                                                  • Open the lid of the mixer jar, Add 1 table spoon of oil, cover the lid and spin again
                                                                                    Note:- Always use the start and stop method while rotating the mixer while making Mayonnaise
                                                                                    Too much pressure on the mixer will push the mayonnaise to split. Hence, always rotate (start and stop) it at the lowest speed
                                                                                    Also, if the mixer is continuously spinning, there could be chances of the Mayonnaise splitting
                                                                                  • Keep adding 1 table spoon of oil and starting and stoping the mixer at intervals till the mixture turns thick
                                                                                  • Once the Mayonnaise turns thick,it is ready to use
                                                                                    Tip:- To check if the mayo is done, just lift some with the help of a spoon. if it doesn't fall off the spoon easily, it means the Mayo is ready

                                                                                  Notes

                                                                                  • If you add all the oil at the beginning or if you add too much of oil in one go, the Mayonnaise will split. So don't be in a hurry
                                                                                  • For those who do not like/eat eggs and still wish to enjoy mayo, you can replace eggs with milk for the mayo(3 eggs = 1 cup milk). All other ingredients and method of preparation stays the same.
                                                                                  • For those who do not like/eat Eggs and still wish to enjoy mayo, you can replace Eggs with milk for the mayo(3 eggs = 1 cup milk). All other ingredients and method of preparation stays the same.
                                                                                  • You can store mayonnaise in an air tight glass jar in the fridge for upto 15days

                                                                                  For The Russian Salad

                                                                                  • Once the Vegetables come down to room temperature, transfer the vegetables into a vessel or bowl and add the cut fruits and cucumber too
                                                                                  • Now add the Mayonnaise to the Fruits and Vegetables and Mix well
                                                                                  • Tuck the Bowl of Russian Salad into the refrigerator and serve once chilled.

                                                                                  If you like my recipe, don’t forget to “like” & “share” it with your friends and family. And once you’ve tried my recipe, request you to kindly share your valuable feedback with me. I'd Love to hear from You 🙂

                                                                                    Simple Recipe for Tesreo/Clams Sukha with Potatoes

                                                                                    Simple Recipe for Tesreo/Clams Sukha with Potatoes

                                                                                    Simple Recipe for Tesreo/Clams Sukha with Potatoes

                                                                                    When you hear of Tesreos/Clams and Potatoes, it may not sound as one of the most appealing combinations.
                                                                                    But trust me, once you've tasted it, you'll be Happy to have done so! And if you're a Potato Lover, then it's a Cherry on the Cake!
                                                                                    At home, we make this simple Tesreo Sukha with Potatoes, whenever there's a spicy seafood curry being prepared so that the sweetness of the fresh coconut and potatoes from this dish, cuts down the spice level in the curry and helps balance the taste.
                                                                                    This is a No-fuss, quick and easy recipe.
                                                                                    Do give it a try!
                                                                                    Hope You like it as much as we do at home!
                                                                                    Course Side Dish
                                                                                    Cuisine Goan
                                                                                    Keyword Clams, Shell fish, Tesreo, Tesreo sukha, Tisreo
                                                                                    Prep Time 30 minutes
                                                                                    Cook Time 20 minutes
                                                                                    Freezing time 6 hours
                                                                                    Total Time 6 hours 50 minutes
                                                                                    Servings 4 people

                                                                                    Ingredients

                                                                                    • 1.5 Kg Tesreos(Clams/Shellfish)
                                                                                    • 1.5 Cups Water
                                                                                    • 1 Large Potato(cut into medium sized cubes)
                                                                                    • 2 Medium sized onions(chopped fine)
                                                                                    • 2 Green chillies(chopped fine)
                                                                                    • 100gms fresh grated coconut
                                                                                    • 1 Tbspn oil
                                                                                    • 1/2 Tspn sugar
                                                                                    • 1 Tspn vinegar
                                                                                    • 1/4 Tspn turmeric powder

                                                                                    Instructions

                                                                                    Follow these steps to clean the Tesreos/Clams

                                                                                    • As soon as you get the clams, transfer them into a plastic bowl, cover it and place the bowl into the deep freezer
                                                                                    • Next day, remove the clams from the freezer and let it come to room temperature. You will notice that the shells will open up. Add 1.5 cups of water to the shells
                                                                                    • Split open the shell and transfer the fleshy side of the shell into another bowl and discard the empty side
                                                                                    • Now Tesreos have to be washed in the same water(that's what I was taught in Goa by my neighbour aunty Rosy) thrice or until all the 'czherr czherr' dirt come out. Basically the fine stones/sand/mud and particles alike. So now you have a bowl with the Tesreos and a Bowl with the water.
                                                                                    • Gently, pour the water in such a manner that you don't disturb the bottom of the water(that's where all the dirt settles down) into your Tesreo bowl and discard all the dirt particles that remain, by washing the bowl.
                                                                                    • Gently wash each shell in the same water, and remove any excess dirt/fine particle and transfer the cleaned shell into the empty bowl.
                                                                                    • Repeat steps 1 to 4 till you feel the water is completely free from any dirt particles😉 It takes about 4-5 times to wash the tesreos
                                                                                    • Note:- If you're comfortable breaking open the tesreos on the Traditional Coconut scraper(Kaanthne/Adavo), you can do that too. In that case you can skip the freezer step.

                                                                                    Follow these steps to cook the Tesreo/Clams Sukha

                                                                                    • Add all the Tesreos with the flesh, in a vessel. Add the onions, green chillies, fresh grated coconut, oil, sugar, vinegar turmeric powder and the tesreo water. Give it a nice stir, cover the vessel and place it on medium flame
                                                                                      Note:- we do not add salt because Clams are naturally very salty
                                                                                    • As soon as the gravy begins to boil, add in the potatoes . Stir and cover the vessel
                                                                                    • Taste it and Add in some more chillies and other ingredients if u required. Check if the potatoes are nearly done. If they are and If u find the taste of the gravy is perfect, leave the vessel open and turn your flame to high and allow all the water to dry up(in this process, the potatoes will get fully done)
                                                                                    • Once all the water evaporates, the Tesreo Sukha is ready!!
                                                                                    • At home, we enjoy Tesreo Sukha with potatoes as a dish to our Goan Traditional Rice and Curry!

                                                                                    If you like my recipe, don’t forget to “like” & “share” it with your friends and family. And once you’ve tried my recipe, request you to kindly share your valuable feedback with me. I'd Love to hear from You 🙂

                                                                                      Recipe for Aloo Achari Paratha

                                                                                      Recipe for Aloo Achari Paratha

                                                                                      Recipe for Aloo Achari Paratha

                                                                                      Aloo Achari Paratha is Potato stuffed Flatbread.
                                                                                      'Aloo' is the Hindi word for Potatoes, 'Achari' is the Hindi word for Pickled and Paratha is a Pan roasted flatbread of Indian origin.
                                                                                      As a kid, I used to enjoy simple Aloo Parathas out of my friends' tiffin boxes when we all used to sit together and share our tiffins during break time.
                                                                                      As a family, we became huge fans of Aloo Parathas when we shifted to the Mumbai Suburbs. In our Church, we have a group of Women who make and sell fresh ready to eat food items every Sunday Morning! And one of the ladies' named 'Savitri' makes the Yummiest Heart Winning Aloo Parathas and we were regulars at her stall whenever we went for Sunday morning mass!
                                                                                      This how my Mum and I got inspired to learn how to make Aloo Parathas at home where 'Aunty Josephine' a sweet lady who used to come to help us with the cooking, taught us how to make her version of Aloo Parathas.
                                                                                      The best part about Aloo Parathas is that you can add whatever additional ingredient you like, the base and techniques remain the same.
                                                                                      In this recipe, I've added Pickle, hence the name 'Aloo Achari'. I also love to add Cheese, Chopped Methi leaves, Chopped Garlic, Boiled Corn, Shezwan Chutney, etc. to my Aloo Parathas! They taste Delish!
                                                                                      I wish I can treat Savitri and Aunty Josephine, to my version of Aloo Parathas, some day soon😊
                                                                                      Course Breakfast
                                                                                      Cuisine Indian
                                                                                      Keyword Aloo achari paratha, Aloo parantha, Aloo Paratha, Potato stuffed Flatbread, Stuffed paratha
                                                                                      Prep Time 30 minutes
                                                                                      Cook Time 30 minutes
                                                                                      Total Time 1 hour
                                                                                      Servings 8 pcs

                                                                                      Ingredients

                                                                                      For the Outer Covering

                                                                                      • 1 Cup Whole Wheat Flour
                                                                                      • 1/2 Cup Room temperature Water
                                                                                      • 1/2 Tspn Salt
                                                                                      • 1 Tbspn Ghee or Oil(I prefer using Ghee)

                                                                                      For the Stuffing

                                                                                      • 2 medium sized potatoes
                                                                                      • 1 medium sized onion(chopped fine)
                                                                                      • 2 Tbspn ghee
                                                                                      • 1-2 Spicy green chillies(chopped fine)
                                                                                      • 1/2 Tspn cumin seeds
                                                                                      • 1/2 Tspn Kashmiri chilli powder
                                                                                      • 1/4 Tspn Asafoetida -Hing (optional)
                                                                                      • 1/2 Tspn Dry Mango powder(amchur)
                                                                                      • 1/2 Tspn Garam masala powder(optional)
                                                                                      • 1 Tspn Pickle of your choice(if the vegetable pieces are too big, cut them fine)
                                                                                      • 4-5 sprigs fresh coriander (chopped fine
                                                                                      • Salt as per taste

                                                                                      Instructions

                                                                                      For the outer covering

                                                                                      • Add the Wheat Flour, Ghee and salt in a Wide bowl
                                                                                      • Add water little by little and bring all the ingredients together to form a dough
                                                                                      • Knead the Dough for about 5 minutes till smooth and soft
                                                                                        Note: For 1 cup Flour I use exactly half cup water
                                                                                      • Cover the dough and keep it aside

                                                                                      Follow these steps to make the stuffing

                                                                                      • Peel the Potatoes, cut them into quarters, transfer them into a pressure cooker and wash them till the water runs clear
                                                                                      • Add a 1 tspn Salt and 1/2 cup water into the pressure cooker and mix it well with the potatoes
                                                                                      • Close the cooker with it's lid, allow the potatoes to cook on medium flame until 2-3 whistles are released and turn off the gas flame.
                                                                                      • Keep the pressure cooker aside until all the steam is released. Once all the steam is released, open the cooker, drain off all the water
                                                                                        Tip:- Do not let the potatoes rest in the water, once the cooker is open. This may lead to the potatoes turning sticky due to the starch. You have to immediately drain off the water
                                                                                      • Immediately with the help of a Potato masher or the back of a Fork, mash the potatoes and keep aside
                                                                                        Tip:- I prefer mashing potatoes when they are Hot. It not only makes it easier to mash but also avoids it from turning sticky
                                                                                      • In a skillet, heat 2 tbspn ghee and once the Ghee turns Hot, add the Cumin seeds and Asafoetida
                                                                                      • Once the Cumin Seeds sputter, add the onions and chillies
                                                                                      • Once the onions turn translucent, add the mashed potatoes, chilly powder, amchur powder, Garam masala(if using), and fresh coriander
                                                                                      • Mix all this well until the mashed potato is coated well with all the spices
                                                                                      • Add the Pickle and mix well
                                                                                      • Check for salt(since the potatoes were boiled with salt and Pickles contain salt too) if required you can add it at this stage
                                                                                      • Mix well and Turn the flame off and allow the stuffing to cool completely, at room temperature!
                                                                                        Note:- If you use the stuffing when it's still Hot, the parathas will tear open as the heat will make the dough soft and tacky.

                                                                                      Follow these steps to make the Aloo Achari Parathas

                                                                                      • Make medium size balls of the dough(Slightly bigger than what u make for chapatis)
                                                                                      • With the help of a rolling pin, flatten each ball into a disc of approximately 5-6 inches in diameter
                                                                                      • Add about 1.5 tbspn of the stuffing in the centre of the disc
                                                                                      • Bring all the edges of the disc together in the centre and wrap and seal it like a pouch
                                                                                      • Now, on a lightly floured surface, very gently roll each pouch into a thick flat disc of around 7-8 inches in diameter with 1 inch thickness
                                                                                        Note:- Do Not be in a hurry to roll the pouches. Also, do not put too much pressure on the rolling pin, while rolling out the pouches or else all the stuffing will start oozing out
                                                                                      • Heat a pan on medium flame
                                                                                      • Once it turns hot, transfer one Paratha on the Pan
                                                                                        Note:- Do Not be in a hurry. Wait until the pan turns hot because only then will the parathas puff up
                                                                                      • When you see bubbles forming on the other side, flip the paratha
                                                                                      • When you see bubbles forming on the other side, flip it again and lightly brush it with ghee.
                                                                                      • You will notice as soon as you brush it with ghee, it will puff up
                                                                                      • After 30 seconds or so, flip it again and brush the other side with ghee
                                                                                      • Flip it every 30 seconds until it's brown and done
                                                                                        Note:- ensure not to leave it unattended or else it will get burnt. I'd suggest you roll out all the parathas first and then only concentrate on frying them. Or if you have help, get someone to fry, while you roll them.
                                                                                      • Once done, transfer the parathas into a Hot case and put the lid
                                                                                      • Follow steps 7-13 for all the Parathas & Let the Parathas rest in the Hot case for around 5 minutes or so
                                                                                      • You can then enjoy these Hot & Yummy Aloo Achari Parathas with a bowl of Unsweetened Yogurt and some Spicy Fried Chicken or Tdoori Chicken! Yum!

                                                                                      If you like my recipe, don’t forget to “like” & “share” it with your friends and family. And once you’ve tried my recipe, request you to kindly share your valuable feedback with me. I'd Love to hear from You 🙂

                                                                                        Recipe for Tender Coconut Kheer

                                                                                        Recipe for Tender Coconut Kheer

                                                                                        Recipe for Tender Coconut Kheer

                                                                                        For that Stubborn Sweet Tooth😬🌴
                                                                                        Tender Coconut Ice-cream, Kulkfi and Pudding are my absolute favourite!!
                                                                                        I've been looking everywhere here in Dubai for Agar Agar powder or Gelatin crystals to make a luscious Tender Coconut pudding, but in vain☹️☹️ So, as I was sipping on my Nariyal Pani, I decided to get another one with 'Patla Malai' and decided to try making a Tender Coconut Kheer!
                                                                                        It's official now, that I'm a fan of Tender Coconut Anything!🤷😛 I'm Insanely Happy with the result. 😬🙈✌️
                                                                                        The quality check of my Tender Coconut Kheer was conducted by my Husband's office colleagues!! So, be rest assured that it's Tried, Tested Approved and Delish😋
                                                                                        Course Dessert
                                                                                        Cuisine Indian
                                                                                        Keyword Chilled kheer, Coconut Kheer, Kheer, Tender coconut, Tender Coconut Kheer
                                                                                        Prep Time 20 minutes
                                                                                        Cook Time 30 minutes
                                                                                        Total Time 50 minutes
                                                                                        Servings 6 People

                                                                                        Ingredients

                                                                                        • 750 ml Milk
                                                                                        • 50 gms Sugar
                                                                                        • Water of 1 Tender Coconut(approximately 400ml)
                                                                                        • 1/2 cup Tender Coconut pieces(chopped or sliced as per your preference)
                                                                                        • 1/4 Tspn Salt
                                                                                        • 1/2 Tspn Cardamom Powder(I always prefer using home made Cardamom powder or crushing Cardamom seeds on the spot. It has a stronger flavour as compared to store bought Cardamom powder)

                                                                                        Instructions

                                                                                        • In a mixer grinder, add 1/4 of the chopped Tender coconut pieces and about 1/4 cup of the coconut water and make a smooth paste and keep aside
                                                                                        • In a large vessel or skillet, add the Milk and Coconut water and place the vessel on High flame and continuously keep stirring so that the milk doesn't get stck at the bottom of the vessel
                                                                                          Note:- Please use only a silicon, nylon or wooden spoon to stire, because if your skillet is an aluminium one and you use a steel or aluminium spoon to stir, the friction of the spoon and the vessel may cause the vessel to release a certain amount of aluminium which is not only bad for your health but can result in making your Kheer Grey in colour.
                                                                                        • Let the Milk reduce to 3/4th of its quantity and then add the Sugar and Tender Coconut paste. Reduce the gas flame to medium and Continue stirring and scraping the sides of the vessel
                                                                                          Note:- The tender coconut that I had was nice and sweet, hence I've added only 50gms of sugar. However, you can add more of you like.
                                                                                        • After about 10-15 minutes or so, add the remaining Tender Coconut pieces, Cardamom powder, Salt and Dry fruits(if using). Continue stirring and bring it to a boil
                                                                                        • Now, you have 2 options. You can either turn off the flame if you like your kheer runny or you can continue boiling the kheer further if you like thick kheer
                                                                                          Note:- Just a small tip. Tender Coconut kheer tends to thicken once its kept aside to cool and also when it's kept in the refrigerator. So you can manage the cooking time accordingly.
                                                                                        • Once the kheer is ready, turn off the flame and keep the kheer aside to cool at room temperature.
                                                                                        • Once it's brought down to room temperature, put a lid on it and tuck it into the refrigerator for it to turn nice and chilled
                                                                                          Note:- Unlike other kheers, Tender coconut Kheer is best enjoyed when served chilled
                                                                                          Enjoy!!😊😊

                                                                                        If you like my recipe, don’t forget to “like” & “share” it with your friends and family. And once you’ve tried my recipe, request you to kindly share your valuable feedback with me. I'd Love to hear from You 🙂

                                                                                          Recipe for Home-made Ginger Garlic Paste

                                                                                          Recipe for Home-made Ginger Garlic Paste

                                                                                          Recipe for Home-made Ginger Garlic Paste

                                                                                          Ginger Garlic Paste is one ingredient that goes into almost all my food preparations.
                                                                                          The aroma of Freshly ground Ginger Garlic paste is something that can instantly get me excited!
                                                                                          As a child, Ive always seen my Mum making Ginger Garlic paste at home. Maybe thats the reason why I don't really fancy the taste of store bought Ginger Garlic paste. I've always loved making fresh Ginger Garlic paste at home. It is so simple, quick and cost effective to make it at home. These days, you get ready peeled garlic cloves. So, if you don't have the time to skin a bunch of garlic, you can buy a pack of the pre-peeled ones.
                                                                                          Start making your own Ginger Garlic paste at home, if you haven't started yet! Trust me, You will smell and taste the difference for yourself!
                                                                                          Sharing with you all, my recipe and storing techniques for the most loved Ginger Garlic paste!
                                                                                          Keyword Aale Losoon, Adhrak lehsun, Garlic Ginger Paste, Ginger Garlic paste
                                                                                          Prep Time 20 minutes
                                                                                          Total Time 20 minutes

                                                                                          Ingredients

                                                                                          • 200 gms Garlic(skinned and roughly chopped)
                                                                                          • 120 gms Ginger (thoroughly washed and roughly chopped. You can remove the skin of the ginger if you wish. I don't. However, you can do it the way you're comfortable)

                                                                                          Instructions

                                                                                          • Add both the ingredients into a mixer grinder
                                                                                          • Grind both ingredients to a thick fine paste
                                                                                            Note:- Do not let the grinder run for too long at a stretch. Rotate it at intervals or use the start and stop method. Too much pressure causes heat and heat causes the ginger garlic paste to turn green in colour. It is the Garlic that causes the green colour. When Garlic is cut and exposed to sudden extreme temperatures, it tends to change colour sometimes. You can add a tspn of oil while rotating the paste. Oil acts as a preservative and also prevents the Ginger Garlic Paste from changing colour.
                                                                                          • Transfer this paste into an Air Tight container
                                                                                          • As soon as the paste is ready, it will be slightly hot/warm, due to the pressure of the mixer rotation. Please wait until the paste has turned completely cool and only then cover it with a lid
                                                                                          • Ginger Garlic paste should be stored in the refrigerator. It can be stored up to 15-20 days and used as and when you like
                                                                                            Note:- Always use a dry spoon when scooping out the paste from the container. Any contact with water, can cause the Ginger Garlic paste to either change colour or get spoilt.

                                                                                          If you like my recipe, don’t forget to “like” & “share” it with your friends and family. And once you’ve tried my recipe, request you to kindly share your valuable feedback with me. I'd Love to hear from You 🙂

                                                                                            Recipe for a Simple, Light and Fluffy Jeera Rice

                                                                                            Recipe for a Simple, Light and Fluffy Jeera Rice

                                                                                            Recipe for a Simple, Light and Fluffy Jeera Rice

                                                                                            Course Main Course
                                                                                            Cuisine Indian
                                                                                            Keyword Cumin Seed Rice, Cumin Seeds, Indian Rice, Jeera, Jeera Rice, Zeera
                                                                                            Prep Time 30 minutes
                                                                                            Cook Time 1 hour
                                                                                            Resting Time 30 minutes
                                                                                            Total Time 2 hours
                                                                                            Servings 8 People

                                                                                            Ingredients

                                                                                            • 1 kg Basmati Rice
                                                                                            • 2 Tbspn Cumin Seeds/Jeera
                                                                                            • 4 tbspn Ghee or Oil
                                                                                            • 1/4 cup Fresh Coriander(chopped fine)
                                                                                            • 4 Tbspn Oil
                                                                                            • Water for Boiling the rice
                                                                                            • 3 Tbspn Salt
                                                                                            • 5-6 Dried Bay leaves

                                                                                            Instructions

                                                                                            • Soak the rice in room temperature water for 20 minutes
                                                                                            • After 20 minutes, fill a large vessel with 3/4 level of water and add the salt, 4 tbspn of Oil and the Bay leaves and Place it on High Flame
                                                                                              Note:- The vessel that I've used is 13 inches in diameter. The important element to keep the rice fluffy and separated is to add oil to the water and to ensure that you're using a large Vessel so that there is enough space for the rice to breathe
                                                                                              If you have any lemon peels of leftover lemons, add it into the rice water.
                                                                                            • Wash the rice very gently till the water runs clear. Approximately 4-5 times
                                                                                              Note:- The other important step to get fluffy and separated rice grains, is to ensure that the rice is off any starch. Hence, the rice water has to run clear.
                                                                                              Also, ensure that the water pressure is not too high because if it is, then the rice grains may break
                                                                                              Also, do not be in a hurry to wash the rice nor should you wash it rigourously. Wash it very gently
                                                                                            • As soon as the water begins to boil, add the rice into the boiling water
                                                                                            • Allow the rice to boil till it is 75% cooked and turn off the flame
                                                                                              Note:- The rice should not be fully cooked because rice further cooks with its steam when kept to cool. So, if the rice is fully cooked, The Jeera rice will become extremely soft and that's not a texture we're looking for
                                                                                            • Immediately, Pour the rice into a rice strainer and drain off all the water
                                                                                              Note:- Once you turn off the gas flame, If you allow the rice sit in the hot water even for a minute, the rice will start turning starchy. Hence, you have to immediately strain the rice.
                                                                                            • Immediately, transfer half the quantity of the cooked rice into a large tray or wide skillet
                                                                                            • With the help of a fork, very gently spread the rice all over the tray/skillet and let the rice cool at room temperature
                                                                                              Note:-Once spread, Do not touch, stir or mix the rice
                                                                                            • Once the rice is completely cool, In a wide skillet, heat 4 tbspn of ghee on high flame
                                                                                              Note:- This step is important because if you work with hot rice, chances are it will break or turn mushy when mixing/tossing
                                                                                            • Once the ghee melts and becomes hot, add the Jeera/Cumin seeds and let it sputter
                                                                                            • Once the Jeera/Cumin seeds sputter, Add in the cooked rice and chopped Coriander and gently Toss it so that the Jeera/Cumin seeds spread evenly throughout the rice
                                                                                              Note:- You can make it in two batches. I have a big skillet(15 inch in diameter), so i make it in one batch
                                                                                              Another method you can use, is to pour the tempering over the rice and gently mix it with a fork , if you don't wish to toss the rice in the skillet
                                                                                            • If tossing in the skillet, Once the Jeera rice is tossed/mixed, gently transfer it from the skillet back into the big vessel so that it doesn't cook further
                                                                                            • Enjoy this Light, Fluffy and Delicious Jeera Rice with any gravy of your choice. It tastes best with Dal tadka and Chicken Fry! Yummmm
                                                                                              Note:- Lesser the contact with the rice, Better will be the

                                                                                            If you like my recipe, don’t forget to “like” & “share” it with your friends and family. And once you’ve tried my recipe, request you to kindly share your valuable feedback with me. I'd Love to hear from You 🙂

                                                                                              Quick Recipe for Kheema/Mince with Peas and Potatoes

                                                                                              Quick Recipe for Kheema/Mince with Peas and Potatoes

                                                                                              Quick recipe for Kheema/Mince with Peas and Potatoes

                                                                                              Course Main Course
                                                                                              Cuisine Goan, Indian
                                                                                              Keyword Beef Kheema, Mince
                                                                                              Prep Time 30 minutes
                                                                                              Cook Time 1 hour
                                                                                              Servings 6 People

                                                                                              Ingredients

                                                                                              • 1 kg Mince(Either Beef, Chicken or Mutton. I have used Beef Mince)
                                                                                              • 3 Large Potatoes(cut into 1 inch sized cubes)
                                                                                              • 200 gms or approx 1.5 cups Green peas(after peeling)
                                                                                              • 4 Large onions(chopped fine)
                                                                                              • 2 Medium sized Tomatoes(chopped fine)
                                                                                              • 8-10 Green chillies(chopped fine)
                                                                                              • 8-10 Garlic cloves(chopped fine)
                                                                                              • 12-15 Curry leaves
                                                                                              • 2 tbspn Ginger Garlic Paste
                                                                                              • 3 tbsp Jeerem Meerem Powder(recipe given below)
                                                                                              • 2 Veg Bouillon cubes
                                                                                              • 1 tspn Turmeric Powder
                                                                                              • 2 tspn Chilly Powder
                                                                                              • 1/2 cup Vinegar
                                                                                              • 1 tbspn Tomato Ketchup or 1.5 tspn Sugar
                                                                                              • 1/2 cup Fresh Coriander Leaves with stem(chopped fine. Very important ingredient)
                                                                                              • Salt as per taste(i used around 1.5 tspn sea/fat salt)
                                                                                              • 4 tbspn Oil(I use 2 tbspn Ghee and 2 tbspn oil)
                                                                                              • 3 Cups Water(you can alter the quantity as per your preferred consistency)

                                                                                              Instructions

                                                                                              • In a wide skillet, add the Onions, Tomatoes, Chillies, Garlic, Curdy leaves and Oil, give it a mix and place it on medium flame
                                                                                              • Once the onions start turing translucent, add the ginger garlic paste, mix well and put the lid on
                                                                                              • Once the raw smell of the ginger garlic paste begins to reduce, add the Beef Mince, Turmeric powder, Chilly powder, Jeerem Meerem powder, Vinegar, Veg cubes, water(add only 2 cups, you can add more later ) and green peas. Mix it well and let it cook. Put the lid on
                                                                                              • As soon as it starts boiling, add the potatoes, mix well and put the lid on
                                                                                              • After about 20-25 minutes, check if more water is required, you can add it if you like. If you like it abit dry, don't add more water.
                                                                                              • Add the chopped coriander and mix it well and now keep the skillet open and let it boil. Check for salt, Vinegar, etc. add it at this stage if required
                                                                                              • Once the potatoes and peas and fully cooked, turn off the gas flame
                                                                                              • Enjoy this super delicious Home style Kheema with some Hot Chapatis, Bread, Rice, Pulao or Parathas!
                                                                                              • Note:- Mince doesn't take too much time to cook. Hence, the checkpoint is the potatoes and peas. Once these two are ready, the Mince is ready!

                                                                                              Follow these steps to make the Jeerem Meerem Powder

                                                                                              • Add the following into to a mixer grinder*100gms Cumin seeds*100gms Pepper corns*50gms Cloves (if its too strong, you can add about 25-30gms)*50gms Cinnamon (if you don’t like the cinnamon flavor much, add only 30gms)-Grind all these ingredients to a fine powder-Transfer this spice mix into an Air Tight container -As soon as the powder is ready, it will be hot, due to the pressure of the mixer rotation. Please wait until the spice powder has turned completely cool and only then cover it with a lid-You can use Jeerem Meerem powder to make curries, chilly fries, cutlets, etc. Add the required quantity as per your taste(Please use only a DRY spoon while removing the Jeerem Meerem powder from the Air Tight container)-Jeerem Meerem powder should be stored in a dry place. It can be stored up to 1 year. 

                                                                                              Follow these steps to make the Ginger Garlic Paste

                                                                                              • Add the following into a mixer grinder*100 gms Garlic (skinned and roughly chopped)*60 gms Ginger (thoroughly washed and roughly chopped. Some people like to remove the skin of the ginger. I don't. However, you can do it the way you are comfortable :)-Grind these two ingredients to a thick fine paste-Transfer this paste into an Air Tight container-As soon as the paste is ready, it will be hot, due to the pressure of the mixer rotation. Please wait until the paste has turned completely cool and only then cover it with a lid-Ginger Garlic paste should be stored in the refrigerator. It can be stored up to 15-20 days

                                                                                              If you like my recipe, don’t forget to “like” & “share” it with your friends and family. And once you’ve tried my recipe, request you to kindly share your valuable feedback with me. I'd Love to hear from You 🙂

                                                                                                Recipe for Bhindi/Ladyfinger/Okra and Potato Masala

                                                                                                Recipe for Bhindi/Ladyfinger/Okra and Potato Masala

                                                                                                Recipe for Crispy Bhindi/Ladyfinger/Okra and Potato Masala

                                                                                                Course Main Course
                                                                                                Cuisine Goan, Indian
                                                                                                Keyword Bhindi, Ladyfinger, masala, okra
                                                                                                Prep Time 1 hour
                                                                                                Cook Time 30 minutes
                                                                                                Total Time 1 hour 30 minutes
                                                                                                Servings 4 People

                                                                                                Ingredients

                                                                                                • 500 gms Ladyfinger
                                                                                                • 1 large Potato
                                                                                                • 2 large Onions(chopped fine)
                                                                                                • 1 Medium sized Tomato(chopped fine)
                                                                                                • 2 Green chillies(chopped fine)
                                                                                                • 4-5 Garlic cloves (crushed)
                                                                                                • 6-8 Curry Leaves
                                                                                                • 1 tspn Jeerem Meerem powder or any Garam Masala powder
                                                                                                • 1 tspn Ginger Garlic paste
                                                                                                • 1/2 tspn Sugar
                                                                                                • 1/2 tspn Dry Mango powder (Amchur powder) or Vinegar
                                                                                                • 1/2 tspn Turmeric powder
                                                                                                • 1/2 tspn Kashmiri Chilly Powder
                                                                                                • 4-5 sprigs Fresh Coriander Leaves with stem(chopped fine)
                                                                                                • Salt as per taste (approx 1/2 tspn)
                                                                                                • 2 tbspn Oil
                                                                                                • Oil for deep frying

                                                                                                Instructions

                                                                                                • Peel, wash and cut the potato into 1 inch pieces and soak it in water
                                                                                                • Wash the Ladyfinger and place it on a dry cloth and wipe them completely dry
                                                                                                • Cut each Ladyfinger into small pieces
                                                                                                  Note:- while cutting the ladyfinger, ensure that your chopping board and knife are completely dry. If the ladyfinger comes in contact with any water, it will get very sticky and messy
                                                                                                • Add oil in a deep fry pan and place it on high flame
                                                                                                • Once the oil turns hot, put the cut ladyfingers into the oil and fry till it becomes crisp(but not dark brown)
                                                                                                  Note:- The gas flame has to be high or else the ladyfinger will not turn crisp and will remain soggy
                                                                                                • With the help of a deep fry ladle, remove the fried ladyfinger, drain out all the oil
                                                                                                • Transfer the fried ladyfinger on kitchen paper napkins to drain out all the excess oil
                                                                                                • Drain off all the water from the potatoes & Add them into the deep fry pan
                                                                                                • Allow the potatoes to fry until it gets a nice Golden brown colour
                                                                                                • Remove the fried potatoes with the help of a deep fry ladle Transfer the potatoes on a Kitchen paper napkin to drain off any excess oil
                                                                                                • Keep the fried ladyfinger and potatoes aside
                                                                                                  Note:- If you have an air fryer, you can fry the ladyfinger and potatoes in that too, if you don't want to deep fry.
                                                                                                  For that, once the ladyfinger is cut, pour 1 tspn oil all over the cut ladyfinger & potato and gently mix it with your hands till all the lady finger & potato is lightly coated with oil. You can then place the greased ladyfinger aand potato into the Air fryer and fry till crisp. I would suggest you fry the ladyfinger and potatoes separately.
                                                                                                • In a skillet, add the Oil, Onions, Tomatoes, Chillies, Crushed Garlic and Curry Leaves, Mix it well
                                                                                                • Once the onions turn translucent, add the ginger garlic paste, mix it well
                                                                                                • Once the raw smell of the ginger garlic paste reduces, add the Jeerem Powder or Garam masala, Turmeric powder, Kashmiri chilly powder, Dry Mango powder or Vinegar, Sugar and Salt, mix it well
                                                                                                • Let it cook for about 5 minutes or so and then add the fried ladyfinger and potatoes
                                                                                                • Mix it well till all the ladyfinger and potatoes are coated with the masala
                                                                                                • Throw in the chopped Coriander leaves, mix it well and let it cook for anoter 5 minutes or so
                                                                                                  Note:- Keep tossing and mixing
                                                                                                • Turn off the gas flame and enjoy this super flavoursome Ladyfinger Masala with Chapatis or as a side dish!

                                                                                                Follow these steps to make the Ginger Garlic Paste

                                                                                                • Add the following into a mixer grinder*100 gms Garlic (skinned and roughly chopped)*60 gms Ginger (thoroughly washed and roughly chopped. Some people like to remove the skin of the ginger. I don't. However, you can do it the way you are comfortable :)-Grind these two ingredients to a thick fine paste-Transfer this paste into an Air Tight container-As soon as the paste is ready, it will be hot, due to the pressure of the mixer rotation. Please wait until the paste has turned completely cool and only then cover it with a lid-Ginger Garlic paste should be stored in the refrigerator. It can be stored up to 15-20 days

                                                                                                Follow these steps to make the Jeerem Meerem Powder

                                                                                                • Add the following into to a mixer grinder*100gms Cumin seeds*100gms Pepper corns*50gms Cloves (if its too strong, you can add about 25-30gms)*50gms Cinnamon (if you don’t like the cinnamon flavor much, add only 30gms)-Grind all these ingredients to a fine powder-Transfer this spice mix into an Air Tight container -As soon as the powder is ready, it will be hot, due to the pressure of the mixer rotation. Please wait until the spice powder has turned completely cool and only then cover it with a lid-You can use Jeerem Meerem powder to make curries, chilly fries, cutlets, etc. Add the required quantity as per your taste(Please use only a DRY spoon while removing the Jeerem Meerem powder from the Air Tight container)-Jeerem Meerem powder should be stored in a dry place. It can be stored up to 1 year. 

                                                                                                If you like my recipe, don’t forget to “like” & “share” it with your friends and family. And once you’ve tried my recipe, request you to kindly share your valuable feedback with me. I'd Love to hear from You 🙂

                                                                                                  Recipe for Moist Carrot Cake

                                                                                                  Recipe for Moist Carrot Cake

                                                                                                  I was introduced to Carrot Cake by my sister in law Sophie, about2 years ago. Her Carrot cake is, Hands down, the best I’ve eaten so far. If it wasn’t for her, I don’t think I would ever have daredto purchase or make a Carrot…

                                                                                                  Simple No-fuss Recipe for Yellow Pumpkin

                                                                                                  Simple No-fuss Recipe for Yellow Pumpkin

                                                                                                  Simple No-fuss Recipe for Yellow Pumpkin Vegetable

                                                                                                  This recipe for Pumpkin is super easy and quick to prepare. It may look very boring but it is a very delicious vegetable if accompanied with a nice Spicy curry!
                                                                                                  This is the way we make it at home and enjoy it as a side dish with Meat or Fish curry.
                                                                                                  Yello Pumpkin is a Super hit among kids as well, as it has a slightly sweet taste to it.
                                                                                                  Here's the recipe! Hope you like it😊
                                                                                                  Course Main Course
                                                                                                  Cuisine Goan
                                                                                                  Keyword Pumpkin, Red Pumpkin, vegetable, Yellow Pumpkin
                                                                                                  Prep Time 20 minutes
                                                                                                  Cook Time 20 minutes
                                                                                                  Total Time 40 minutes

                                                                                                  Ingredients

                                                                                                  • 500 gms Yellow Pumpkin(skin off and cut into cubes)
                                                                                                  • 2 Tbspn Fresh grated coconut
                                                                                                  • 1 Medium sized onion(chopped fine)
                                                                                                  • 2 green chillies(slit)
                                                                                                  • 1 Tspn Oil
                                                                                                  • Salt as per taste
                                                                                                  • 1/2 cup water

                                                                                                  Instructions

                                                                                                  • In a vessel, add the Coconut, Water, Onions, Chillies, Oil and Salt. Cover the vessel an place it on medium flame
                                                                                                  • As the water starts evaporating, add the pumpkin and give it a gentle mix and put the lid back on
                                                                                                  • After about 5 minutes or so, you will notice the pumpkin releasing some moisture. At that time, reduce tge flame, take off the lid and let the pumpkin cook for another 10 minutes on low flame
                                                                                                    Note: Stir very gently
                                                                                                  • Check if the pumpkin has turned soft. Once there is absolutely no water left, your Pumpkin Veg is ready.
                                                                                                  • Note: The reason why we cook the coconut, water, onion and oil first, is because Yellow pumpkin cooks very quickly, unlike oter veggies. So if you add all the ingredients together, the pumpkin will cook first and the other ingredients will remain raw. Upon further cooking, tge pumpkin will get completely mashed.

                                                                                                  If you like my recipe, don’t forget to “like” & “share” it with your friends and family. And once you’ve tried my recipe, request you to kindly share your valuable feedback with me. I'd Love to hear from You 🙂

                                                                                                    Recipe for Spicy Chicken Liver & Heart

                                                                                                    Recipe for Spicy Chicken Liver & Heart

                                                                                                    Recipe for Spicy Chicken Liver & Heart

                                                                                                    Course Appetizer
                                                                                                    Cuisine Goan
                                                                                                    Keyword chicken, Chicken Heart, Chicken Liver, Kaleji, Liver
                                                                                                    Prep Time 10 minutes
                                                                                                    Cook Time 15 minutes
                                                                                                    2 hours
                                                                                                    Total Time 2 hours 25 minutes
                                                                                                    Servings 4 People

                                                                                                    Ingredients

                                                                                                    • 500 gms Chicken Liver and Heart(You can use only Heart or Only Liver if you wish)
                                                                                                    • 1.5 Tsp Ginger Garlic Paste(recipe given below)
                                                                                                    • 1 Tsp Jeerem Meerem Powder(recipe given below)
                                                                                                    • 1 Tbsp Oil
                                                                                                    • 6-8 Curry Leaves
                                                                                                    • 4 Spicy Green Chillies(slit)
                                                                                                    • 2 Dried Red Chillies(roughly hand broken)
                                                                                                    • 2 Tsp Vinegar
                                                                                                    • 1/2 Tsp Turmeric Powder
                                                                                                    • 1/2 Tsp Kashmiri Chilly Powder
                                                                                                    • 4-6 Medium sized Garlic Cloves(crushed)
                                                                                                    • 1/4 Cup Water
                                                                                                    • 2 Tsp Tomato Ketchup
                                                                                                    • 6-8 Sprigs Coriander Leaves(chopped fine)
                                                                                                    • 1 Small Capsicum(optional)
                                                                                                    • 1/2 Tspn Salt

                                                                                                    Instructions

                                                                                                    • Gently wash the Chicken Heart and Liver under running water
                                                                                                      Note:- ensure the water pressure is light or else the Liver might get damaged since it is very delicate
                                                                                                    • Now if the Heart and liver are not separated, cut them and separate them and take off the fat (the white substance) on the sides of the heart and liver
                                                                                                    • Transfer the Liver in a skillet(we will cook the liver in the same ) add all the above mentioned ingredients, except Coriander leaves, Ketchup & Capsicum(if using)
                                                                                                    • Mix it well and let it marinade in the refrigerator for about 1-2 hours or more if you have the time
                                                                                                    • After 1-2 hours, place the skillet on medium high flame
                                                                                                    • As the Gravy starts to boil, add the Ketchup and gently mix it in the gravy
                                                                                                      Note:- while stirring or tossing the Liver, you must do so from the bottom and dont let your Spoon come in contact with with liver or else, the liver will get smashed
                                                                                                    • As the gravy further thickens, add the Chopped coriander and Capsicum (if using) and toss it. Check for salt, vinegar or ketchu
                                                                                                      Note:-Please Do Not forget to add chopped Coriander leaves. The taste gets elevated only once you add chopped Coriander
                                                                                                    • Let the water get evaporated completely and turn off the flame
                                                                                                      Note:- The total time to cook Chicken liver is 10-12 minutes maximum, on high heat. If you over cook it, it will become hard and its not so much fun to eat Hard cooked liver, bit its totally upto you, how you like it!
                                                                                                    • And we're ready to serve!

                                                                                                    Follow these steps to make the Jeerem Meerem Powder

                                                                                                    • Add the following into to a mixer grinder*100gms Cumin seeds*100gms Pepper corns*50gms Cloves (if its too strong, you can add about 25-30gms)*50gms Cinnamon (if you don’t like the cinnamon flavor much, add only 30gms)-Grind all these ingredients to a fine powder-Transfer this spice mix into an Air Tight container -As soon as the powder is ready, it will be hot, due to the pressure of the mixer rotation. Please wait until the spice powder has turned completely cool and only then cover it with a lid-You can use Jeerem Meerem powder to make curries, chilly fries, cutlets, etc. Add the required quantity as per your taste(Please use only a DRY spoon while removing the Jeerem Meerem powder from the Air Tight container)-Jeerem Meerem powder should be stored in a dry place. It can be stored up to 1 year. 

                                                                                                    Follow these steps to make the Ginger Garlic Paste

                                                                                                    • Add the following into a mixer grinder*100 gms Garlic (skinned and roughly chopped)*60 gms Ginger (thoroughly washed and roughly chopped. Some people like to remove the skin of the ginger. I don't. However, you can do it the way you are comfortable :)-Grind these two ingredients to a thick fine paste-Transfer this paste into an Air Tight container-As soon as the paste is ready, it will be hot, due to the pressure of the mixer rotation. Please wait until the paste has turned completely cool and only then cover it with a lid-Ginger Garlic paste should be stored in the refrigerator. It can be stored up to 15-20 days

                                                                                                    If you like my recipe, don’t forget to “like” & “share” it with your friends and family. And once you’ve tried my recipe, request you to kindly share your valuable feedback with me. I'd Love to hear from You 🙂

                                                                                                      Recipe for Short Cut Racheado Chicken Wings

                                                                                                      Recipe for Short Cut Racheado Chicken Wings

                                                                                                      Recipe for Short cut Recheado Chicken Wings

                                                                                                      Course Appetizer
                                                                                                      Cuisine Goan
                                                                                                      Keyword chicken wings, Racheado, Racheado wings, Wings
                                                                                                      Prep Time 15 minutes
                                                                                                      Cook Time 15 minutes
                                                                                                      Total Time 30 minutes
                                                                                                      Servings 12 pcs

                                                                                                      Ingredients

                                                                                                      • 6 Chicken wings cut into two
                                                                                                      • 1 Tsp Kashmiri Chilly powder
                                                                                                      • 1/2 Tsp Jeerem Meerem Powder(recipe given below)
                                                                                                      • 1/2 Tsp Sugar
                                                                                                      • 1/2 Tsp Ketchup
                                                                                                      • 1.5 Tsp Vinegar
                                                                                                      • 1 Tsp Ginger Garlic Paste(recipe given below)
                                                                                                      • Salt as per taste
                                                                                                      • 1 Tbsp Oil

                                                                                                      Instructions

                                                                                                      • Cut the side part of the Chicken wings.Wash the Chicken Wings thoroughly and place them in a bowl.
                                                                                                        Note:- Chicken wings often have tiny feathers stuck on to them. So please ensure to pluck them off and wash the wings thoroughly
                                                                                                      • Add all the above mentioned ingredients to the Chicken wings
                                                                                                      • Hand Mix it well, till all the wings are coated well with the spices
                                                                                                      • In a pan, heat 1 tbspn oil on medium flame
                                                                                                      • Once the oil turns hot, transfer the wings into the pan and allow it to fry on each side for 6-7 minutes. You can cover the pan if you like
                                                                                                      • Remove them on a paper napkin to drain off any excess oil
                                                                                                      • Garnish with freshly choppedcoriander & Serve them hot and enjoyyyy 😋

                                                                                                      Follow these steps to make the Jeerem Meerem Powder

                                                                                                      • Add the following into to a mixer grinder*100gms Cumin seeds*100gms Pepper corns*50gms Cloves (if its too strong, you can add about 25-30gms)*50gms Cinnamon (if you don’t like the cinnamon flavor much, add only 30gms)-Grind all these ingredients to a fine powder-Transfer this spice mix into an Air Tight container -As soon as the powder is ready, it will be hot, due to the pressure of the mixer rotation. Please wait until the spice powder has turned completely cool and only then cover it with a lid-You can use Jeerem Meerem powder to make curries, chilly fries, cutlets, etc. Add the required quantity as per your taste(Please use only a DRY spoon while removing the Jeerem Meerem powder from the Air Tight container)-Jeerem Meerem powder should be stored in a dry place. It can be stored up to 1 year. 

                                                                                                      Follow these steps to make the Ginger Garlic Paste

                                                                                                      • Add the following into a mixer grinder*100 gms Garlic (skinned and roughly chopped)*60 gms Ginger (thoroughly washed and roughly chopped. Some people like to remove the skin of the ginger. I don't. However, you can do it the way you are comfortable :)-Grind these two ingredients to a thick fine paste-Transfer this paste into an Air Tight container-As soon as the paste is ready, it will be hot, due to the pressure of the mixer rotation. Please wait until the paste has turned completely cool and only then cover it with a lid-Ginger Garlic paste should be stored in the refrigerator. It can be stored up to 15-20 days

                                                                                                      If you like my recipe, don’t forget to “like” & “share” it with your friends and family. And once you’ve tried my recipe, request you to kindly share your valuable feedback with me. I'd Love to hear from You 🙂

                                                                                                        Recipe for Goan Prawn Potato Chops

                                                                                                        Recipe for Goan Prawn Potato Chops

                                                                                                        Recipe for Goan Prawn Potato Chops

                                                                                                        Course Appetizer, Side Dish
                                                                                                        Cuisine Goan
                                                                                                        Keyword Potato chops, Prawn chops, Prawn potato Chops
                                                                                                        Prep Time 1 hour
                                                                                                        Cook Time 1 hour
                                                                                                        Total Time 2 hours

                                                                                                        Ingredients

                                                                                                        Ingredients for the outer covering

                                                                                                        • 4 LargePotatoes
                                                                                                        • 2 Beaten Eggs (for coating)
                                                                                                        • 1 Cup Bread Crumbs
                                                                                                        • 1 Tsp Salt (for boiling the potatoes)
                                                                                                        • Oil (for greasing palms while shaping the chops)
                                                                                                        • 750 ml Oil (for deep frying)

                                                                                                        Ingredients for the stuffing

                                                                                                        • 1/2 Kg Small Prawns(if the prawns are big, you will have to cut them into either half or quarter pieces, depending upon how big the prawns are)
                                                                                                        • 2 Large Onions  chopped fine
                                                                                                        • 1/2 Medium sized Tomato chopped fine
                                                                                                        • 1/2 Capsicum chopped fine
                                                                                                        • 4 Green chillies chopped (You can alter the number of chillies as per preference)
                                                                                                        • 6-8 Curry leaves
                                                                                                        • 1/2 Tsp Ginger Garlic paste(recipe mentioned below)
                                                                                                        • 1/2 Tsp Turmeric powder 
                                                                                                        • 1/2 Tsp Pepper powder
                                                                                                        • 1/2 Tsp Vinegar (You can add more if you like)
                                                                                                        • 1/2 Maggie cube (3gms)
                                                                                                        • 1/4 Tsp Sugar or 1/2tsp ketchup
                                                                                                        • 1/4 Cup Fresh coriander (chopped fine)
                                                                                                        • 1/2 Tsp Sea Salt/Fat Salt For seasoning the prawns. If you dont have fat salt, use 1/4 tspn table/fine salt
                                                                                                        • Salt As per taste, only if required

                                                                                                        Instructions

                                                                                                        Follow these steps to make the outer covering

                                                                                                        • Peel and Wash the potatoes thoroughly 
                                                                                                        • Cut them into 4 pieces each and place them in to a cooker.
                                                                                                        • Add 2 cups water and 1 tspn salt into the cooker. Mix it well with the potatoes
                                                                                                        • Close the cooker and place it on medium flame 
                                                                                                        • Give it two whistles and turn off the flame
                                                                                                        • Wait until all the steam has been released from the cooker and only then open the cooker
                                                                                                        • Check if the potatoes have turned soft. If they are still hard, give it another whistle till the potatoes turn soft
                                                                                                        • If they have turned soft, drain out all the water from the cooker and transfer the potatoes on a flat plate
                                                                                                        • You have to mash the potatoes when they are hot. For mashing, take a potato masher or a fork and mash the potatoes well, till completely smooth. Ensure there are no lumps
                                                                                                        • Once the potatoes are mashed, keep it aside 

                                                                                                        Follow these steps to make the stuffing

                                                                                                        • Wash the Prawns with 1 cup water, with shell on just once and drain off all the water
                                                                                                        • Take off the Head, Tail & Shell of the Prawns
                                                                                                        • With the help of a sharp knife, Slit the back of each Prawn in the centre and remove the black string like object.
                                                                                                          Some Gyaan: The black string in the prawn is it's digestive tract. The darker the string the higher the level of dirt. Hence its always advicable to take off the string for hygiene and digestive purpose. The process of taking off the black string is called 'deveining'
                                                                                                        • Place all the prawns into a bowl and apply 1tspn salt. Mix it well and keep it aside
                                                                                                          Note:- If the Prawns are big, cut them into half or else stuffing them into the potatoes might get challenging
                                                                                                        • In a skillet, add the Onions, Tomatoes, Chillies, Curry Leaves, Capsicum and Oil.
                                                                                                        • Mix it well, cover the skillet and place it on medium flame
                                                                                                        • Once the Onions turn translucent, add the ginger garlic paste and stir well and cover the skillet
                                                                                                        • Once the raw smell of the Ginger Garlic paste reduces, add the Turmeric Powder, Pepper powder, Sugar, Maggi cube, Coriander and Vinegar and give it a quick stir
                                                                                                        • Let it further cook for about 7-10 mins till all the water dries off and then add the Prawns
                                                                                                        • Increase the flame to high and keep tossing and stirring and mixing the Prawns with the Onions. Check for salt and turn off the flame once all the water has dried off
                                                                                                        • Your Prawn Chilly Fry stuffing is ready. Keep it aside

                                                                                                        Follow these steps to make the Potato chops

                                                                                                        • Make balls (approx 40-45 gms each) of the mashed potatoes
                                                                                                        • Lightly Grease both your palms with oil
                                                                                                        • Take one ball of mashed potatoes and lightly spread and flatten it on your palm
                                                                                                        • Add 1.5 spoon of the stuffing on the flattened mashed potato
                                                                                                        • Very gently, bring all the sides of the potatoes together in the centre and close the ball to form a round shape(like that of a ball)
                                                                                                        • Lightly flatten the stuffed ball to make it like a disc
                                                                                                        • Take each chop, lightly coat the entire outer layer with beaten egg and apply bread crumbs to the entire ball and place it on a tray
                                                                                                          What I do to avoid a mess:-
                                                                                                          I Hold the chop in my left hand and egg brush the chop with the help of my right hand, using a silicon brush
                                                                                                          I Immediately drop the egg washed chop from my left hand into the bowl of bread crumbs and coat the chop with bread crumbs using my right hand
                                                                                                          It will be Vice versa if you're a left hander
                                                                                                          It may sound confusing and complex, but just give it a try. You will save yourself alot of time and mess
                                                                                                        • Place it on a large tray 
                                                                                                        • Follow steps 1-8 to make all the chops

                                                                                                        Follow these steps to fry the chops

                                                                                                        • In a Kadai, Add 750 ml Oil and place the Kadai on Medium high flame 
                                                                                                          Note:- You can also shallow fry the potato chops. 2-3 minutes on each side on medium high flame without covering it with a lid
                                                                                                        • Once the oil is nice and hot, Add two Potato chops at a time(if your kadai is small or add 4 at a time if your kadai is big) and deep fry
                                                                                                          Note:-If you add too many chops at a time while frying, there is a high possibility that the oil may not remain as hot as required and this will cause the chops to break
                                                                                                        • Deep Fry the chops till it gets a nice brown colour. But don't over fry them or else it will taste bitter and burnt.
                                                                                                        • Once ready, place them on a kitchen paper towel to drain out any excess oil
                                                                                                        • Serve Hot with some ketchup or just enjoy it as it is!! 😋😋

                                                                                                        Notes

                                                                                                        • Please Do not get confused looking at certain pictures in the description section of this recipe. I have used some pictures from my other recipes. These pictures are posted only so you understand the process better.
                                                                                                        • You can store potato chops in the deep freezer for up to 2 months
                                                                                                        • For that, you will need an air tight container or a casserole and parchment paper
                                                                                                        • Place the parchment paper at the bottom of the casserole/airtight container and place the chops on top of the parchment paper. Place another layer on top of the cops and place the other set of chops on top of the parchment paper.
                                                                                                        • The parchment paper will help the chops not to stick together when frozen. So it is very important to store it along with parchment paper
                                                                                                        • When you want to fry the chops that are frozen, remove how many ever you wish to fry, keep them to thaw at room temperature. Once completely thawed, only then fry them
                                                                                                          Enjoy!!😋 😋
                                                                                                        • Cover the casserole/airtight container and store in the freezer

                                                                                                        Follow these steps to make the Ginger Garlic paste

                                                                                                        • Add the following into a mixer grinder*100 gms Garlic (skinned and roughly chopped)*60 gms Ginger (thoroughly washed and roughly chopped. Some people like to remove the skin of the ginger. I don't. However, you can do it the way you are comfortable :)-Grind these two ingredients to a thick fine paste-Transfer this paste into an Air Tight container-As soon as the paste is ready, it will be hot, due to the pressure of the mixer rotation. Please wait until the paste has turned completely cool and only then cover it with a lid-Ginger Garlic paste should be stored in the refrigerator. It can be stored up to 15-20 days

                                                                                                        If you like my recipe, don’t forget to “like” & “share” it with your friends and family. And once you’ve tried my recipe, request you to kindly share your valuable feedback/suggestions with me. I'd Love to hear from You 

                                                                                                          Recipe for Lemon Rice

                                                                                                          Recipe for Lemon Rice

                                                                                                          Recipe for Lemon Rice

                                                                                                          So when I was a kid, I used to live in a place where all families would share food or send across to eachother's home, a bowl full of food, specially if something special was prepared! Oh how i miss those days☹️
                                                                                                          One day, 'Lemon Rice' was one such special dish that was made and sent to our home, by our sweet neighbour, Sheryl!
                                                                                                          It was something completely New and Different from the usual Pulaos or Biryanis that would qualify as 'Special'. If you know me well, you're obviously going to know that I would definitely want to learn how to make that New and Exciting dish😛 So I pestered Sheryl to teach me how to make the super yummy Lemon Rice that she had sent across and without a fuss, she shared with me the recipe(Thank God for people who share recipes😉🙏)
                                                                                                          I'd like to share with you all, the recipe for Lemon Rice that I learnt from my sweet neighbour, Sheryl!
                                                                                                          Course Main Course
                                                                                                          Cuisine Indian
                                                                                                          Keyword Lemon rice, Lime Rice, Tadka Rice
                                                                                                          Prep Time 20 minutes
                                                                                                          Cook Time 40 minutes
                                                                                                          Total Time 1 hour
                                                                                                          Servings 4 People

                                                                                                          Ingredients

                                                                                                          • 2 Cups Basmati Rice
                                                                                                          • 4 Large Onions (sliced)
                                                                                                          • 2 Large Tomatoes (sliced)
                                                                                                          • 2 Tsp Cumin Seeds
                                                                                                          • 1/2 Tsp Mustard Seeds (optional)
                                                                                                          • Juice of 3 Medium sized Lemons
                                                                                                          • 1 Tsp Turmeric Powder
                                                                                                          • 1 Veg Maggie cube (5gms)
                                                                                                          • Salt as per taste
                                                                                                          • 2 Tbsp Oil
                                                                                                          • 10-12 Curry leaves

                                                                                                          Instructions

                                                                                                          • Wash the rice till the water runs clear
                                                                                                          • Boil the ice with salt and water and strain off all the water and keep it aside in a wide Plate so that it cools faster and the rice grains dont further cook with the steam
                                                                                                            Note: Do not wait until the rice becomes completely soft because we have to further cook tge rice
                                                                                                            I have used left over rice here in this recipe(you can too) but Lemon rice tastes best with Basmati Rice
                                                                                                            Tip:- If you want the rice to be grainy and not sticky, add 1 tspn oil and lemon peels to the rice while boiling
                                                                                                          • Now in a skillet, Add 2 tbspn oil and olace it on medium high flame
                                                                                                          • Once the oil becomes hot, add the Cumin seeds and Mustard seeds(if using) and all it to sputter
                                                                                                            Note- if the oil is not hot, the Mustard and Cumin seeds wont sputter and it will remian bitter
                                                                                                            Tip:- Before adding all the mustard seeds, always add 1 or 2 Mustard seeds to the oil to check if it has become hot
                                                                                                          • Now add the Curry Leaves
                                                                                                          • Immediately, add the Onions and Tomatoes, give it a qiuck stir and cover the skillet
                                                                                                          • As soon as the Onions turn Translucent and the Tomatoes start turning soft, add the Maggie Cube(if using), Lemon Juice and Tuemeric powder and mix well. Keep the skillet open
                                                                                                          • Mix it for about 5 minutes and then add the Boiled Rice
                                                                                                          • Toss and Stir the Rice until all the rice grains are covered with the Sauté.Check for Salt and add it at this stage
                                                                                                          • Turn the flame off and your Lemon Rice is ready to be devoured😋😋. At home, we love to eat Lemon Rice with Fried Chicken. It is a Lip smacking Combo! Try it out, Thank me later😉

                                                                                                          If you like my recipe, don’t forget to “like” & “share” it with your friends and family. And once you’ve tried my recipe, request you to kindly share your valuable feedback/Now in a skillet, Add 2 tbspn oil and olace it on medium high flame with me. I'd Love to hear from You 🙂

                                                                                                            Recipe for Chicken Fry

                                                                                                            Recipe for Chicken Fry

                                                                                                            Recipe for Goan Pork Roast

                                                                                                            Recipe for Goan Pork Roast

                                                                                                            Recipe for Goan Prawn Chilly Fry

                                                                                                            Recipe for Goan Prawn Chilly Fry

                                                                                                            Recipe for Goan Prawn Chilly Fry

                                                                                                            Course Main Course, Side Dish
                                                                                                            Cuisine Goan
                                                                                                            Keyword Prawn chilly fry, prawns
                                                                                                            Prep Time 30 minutes
                                                                                                            Cook Time 20 minutes
                                                                                                            Total Time 50 minutes
                                                                                                            Servings 6 People

                                                                                                            Ingredients

                                                                                                            • 1 Kg Prawns
                                                                                                            • 4 Large Onions Sliced
                                                                                                            • 1 Medium sized Tomato Sliced
                                                                                                            • 1 Small Capsicum Sliced
                                                                                                            • 4 Green chillies Slit (You can alter the number of chillies as per preference)
                                                                                                            • 6-8 Curry leaves
                                                                                                            • 1 tspn Ginger Garlic (recipe mentioned below)
                                                                                                            • 1 tspn Turmeric powder 
                                                                                                            • 1 tspn Pepper powder
                                                                                                            • 1.5 tspn Vinegar You can add more if you like
                                                                                                            • 1 1 maggie cube
                                                                                                            • 1/2 tspn Sugar
                                                                                                            • 1/2 cup Fresh coriander (chopped fine)
                                                                                                            • 1 tspn Sea Salt/Fat Salt For seasoning the prawns. If you dont have fat salt, use 1/2 tspn table/fine salt
                                                                                                            • Salt As per taste, only if required

                                                                                                            Instructions

                                                                                                            • Wash the Prawns with 1 cup water, with shell on just once and drain off all water
                                                                                                            • Take off the Head, Tail & Shell of the Prawns
                                                                                                            • With the help of a sharp knife, Slit the back of each Prawn in the centre and remove the black string like object.
                                                                                                              Some Gyaan: The black string in the prawn is it's digestive tract. The darker the string the higher the level of dirt. Hence its always advicable to take off the string for hygiene and digestive purpose. The process of taking off the black string is called 'deveining'
                                                                                                            • Place all the prawns into a bowl and apply 1tspn salt. Mix it well and keep it aside
                                                                                                            • In a skillet, add the Onions, Tomatoes, Chillies, Curry Leaves, Capsicum and Oil.
                                                                                                            • Mix it well, cover the skillet and place it on medium flame
                                                                                                            • Once the Onions turn translucent, add the ginger garlic paste and stir well and cover the skillet
                                                                                                            • Once the raw smell of the Ginger Garlic paste reduces, add the Turmeric Powder, Pepper powder, Sugar, Maggi cube, Coriander and Vinegar and give it a quick stir
                                                                                                            • Let it further cook for about 7-10 mins and then add the Prawns
                                                                                                            • Increase the flame to high and keep tossing and stirring and mixing the Prawns with the Onions for exactly 1 minute only. Check for salt and turn off the flame
                                                                                                              Note: If you cook Prawns foe more than a minute, it will turn hard and chewy.
                                                                                                            • Your Prawn Chily Fry is ready to serve! Yummm! Enjoy it with some Hot bread or chapatis or as a side dish to any of your sea food curries😋😋

                                                                                                            Follow these steps to make the Ginger Garlic paste

                                                                                                            • Add the following into a mixer grinder*100 gms Garlic (skinned and roughly chopped)*60 gms Ginger (thoroughly washed and roughly chopped. Some people like to remove the skin of the ginger. I don't. However, you can do it the way you are comfortable :)-Grind these two ingredients to a thick fine paste-Transfer this paste into an Air Tight container-As soon as the paste is ready, it will be hot, due to the pressure of the mixer rotation. Please wait until the paste has turned completely cool and only then cover it with a lid-Ginger Garlic paste should be stored in the refrigerator. It can be stored up to 15-20 days

                                                                                                            If you like my recipe, don’t forget to “like” & “share” it with your friends and family. And once you’ve tried my recipe, request you to kindly share your valuable feedback/suggestions with me. I'd Love to hear from You 🙂

                                                                                                              Recipe for Goan Akka Masoor/Whole Red Lentil gravy

                                                                                                              Recipe for Goan Akka Masoor/Whole Red Lentil gravy

                                                                                                              Recipe for Goan Akka Masoor/Whole Red Lentil gravy

                                                                                                              Course Main Course
                                                                                                              Servings 4 people

                                                                                                              Ingredients

                                                                                                              • 1 Cup Akka Masoor
                                                                                                              • 1 Large Onion chopped fine
                                                                                                              • 1 Small Tomato chopped fine
                                                                                                              • 3-4 Green chillies Slit
                                                                                                              • ½ Tspn Turmeric powder
                                                                                                              • ½ Tspn Kashmiri chilly powder
                                                                                                              • 1 Tspn Jeerem Meerem powder (Recipe mentioned below)
                                                                                                              • 1 Tspn Garlic Ginger paste (recipe mentioned below)
                                                                                                              • 1 Maggi cube (optional)
                                                                                                              • 1 Tspn Tomato ketchup
                                                                                                              • 1.5 Tspn Vinegar or lemon juice
                                                                                                              • Salt As per taste
                                                                                                              • 8-12 Curry Leaves
                                                                                                              • 1 Tspn Mustard Seeds
                                                                                                              • 6-8 Sprigs Coriander leaves (chopped fine)
                                                                                                              • 1 tbsp Pure Cow's Ghee or oil For the tadka
                                                                                                              • 1 Tspn Pre Cow's Ghee or oil For the masoor

                                                                                                              Instructions

                                                                                                              • Wash the Akka Masoor till the water runs clear and soak it in 4 cups of room temperature water for 2-3 hours
                                                                                                              • In a cooker, add 1tbspn ghee or oil and heat it on medium flame
                                                                                                              • Once the oil turns hot add the onions tomatoes and chillies and allow it to cook till the onions turn translucent
                                                                                                              • Once the onions turn translucent, add the ginger garlic paste and mix well
                                                                                                              • Once the raw smell of the ginger garlic paste reduces add the soaked akka masoor and all the water
                                                                                                              • Now add the jeerem meerem powder, turmeric powder, kashmiri chilly powder, ketchup, salt maggi cube and vinegar and stir it well and close the cooker lid
                                                                                                              • After two whistles release, tn off the flame andopen the cooker and check if the akka masoor is cooked.
                                                                                                                Safety tip: wait for about 10-15 minutes and then release all the steam from the cooker by lifting the whistle with te help of a spoon. Open the cooker lid only once all the steam has been released from the cooker
                                                                                                              • If the masoor is cooked, keep the cooker open(without lid the next)and boil the masoor on medium flame for the next 10-12 minutes till it turns thick. Add the chopped coriander at this stage and check for salt or vinegar
                                                                                                              • Turn the flame up and Allow the masoor to boil
                                                                                                                
                                                                                                              • Once the masoor turns thick, turn the flame off.

                                                                                                              For the Tadka

                                                                                                              • In a tadka pan add 1tspn ghee or oil and place it on medium flame
                                                                                                              • Once the ghee turns hot add the mustard seeds
                                                                                                                
                                                                                                              • As soon as the mustard seeds start to sputter turn the flame off and throw in the curry leaves
                                                                                                              • Now add this tadka to the masoor and cover the masoor with a lid so that all the flavour from the tadka remains inside the masoor pot and elevates the flavour of the masoor.
                                                                                                                Safety tip: while adding the tadka to the masoor, you will have to be very careful because the masoor will sizzle and splash as hot oil from the tadka and water from the masoor will come in contact with each other. I suggest you wear a pair of gloves if its your first time or while adding the tadka to the masoor just hold the cooker lid in your left hand and slip the tadka pan below the lid and add it to the masoor. This way you will be protected from the masoor or hot oil splashing on to your hands
                                                                                                              • After about 15-20 minutes, mix the masoor well and enjoy it with some hot bread rice or chapatis😋😋

                                                                                                              Follow these steps to make the ginger garlic paste

                                                                                                              • 1) Add the following into a mixer grinder*100 gms Garlic (skinned and roughly chopped)*60 gms Ginger (thoroughly washed and roughly chopped. Some people like to remove the skin of the ginger. I don't. However, you can do it the way you are comfortable :)-Grind these two ingredients to a thick fine paste-Transfer this paste into an Air Tight container-As soon as the paste is ready, it will be hot, due to the pressure of the mixer rotation. Please wait until the paste has turned completely cool and only then cover it with a lid-Ginger Garlic paste should be stored in the refrigerator. It can be stored up to 15-20 days

                                                                                                              Follow these steps to make the Jeerem Meerem Powder

                                                                                                              •  1) – Add the following into to a mixer grinder*100gms Cumin seeds*100gms Pepper corns*50gms Cloves (if its too strong, you can add about 25-30gms)*50gms Cinnamon (if you don’t like the cinnamon flavor much, add only 30gms)-Grind all these ingredients to a fine powder-Transfer this spice mix into an Air Tight container -As soon as the powder is ready, it will be hot, due to the pressure of the mixer rotation. Please wait until the spice powder has turned completely cool and only then cover it with a lid-You can use Jeerem Meerem powder to make curries, chilly fries, cutlets, etc. Add the required quantity as per your taste(Please use only a DRY spoon while removing the Jeerem Meerem powder from the Air Tight container)-Jeerem Meerem powder should be stored in a dry place. It can be stored up to 1 year. 

                                                                                                              If you like my recipe, don’t forget to “like” & “share” it with your friends and family. And once you’ve tried my recipe, request you to kindly share your valuable feedback/suggestions with me. I'd Love to hear from You 🙂

                                                                                                                Simple Vermicelli Kheer Recipe

                                                                                                                Simple Vermicelli Kheer Recipe

                                                                                                                Simple Vermicelli Kheer Recipe

                                                                                                                Course Dessert
                                                                                                                Cuisine Indian
                                                                                                                Keyword Kheer, pudding, Sweet, vermicelli
                                                                                                                Prep Time 20 minutes
                                                                                                                Cook Time 1 hour
                                                                                                                Total Time 1 hour 20 minutes
                                                                                                                Servings 10 people

                                                                                                                Ingredients

                                                                                                                • 2 ltrs Full Fat Milk
                                                                                                                • 1 tspn Ghee
                                                                                                                • 300 gms Sugar
                                                                                                                • 100 gms Assorted Dry Fuits(Almonds, Pistas, Raisins, Cashews) (roughly chopped)
                                                                                                                • 1 tspn Green Cardamom powder
                                                                                                                • 80 gms Fine Vermicelli – hand broken into smaller bits (i used wheat vermicelli)
                                                                                                                • A pinch of salt

                                                                                                                Instructions

                                                                                                                • In a Large Vessel, add the Milk and Ghee and place it on high flame and allow the milk to boil for 20minutes
                                                                                                                  Note: keep stirring the milk with a wooden spoon and scrape the sides off(the milk that gets stuck on the sides of the vessel), at intervals.
                                                                                                                • Now add in the Vermicelli, Sugar, and salt continue stirring
                                                                                                                  
                                                                                                                • After about 10 minutes, add in the roughly chopped dry fruits
                                                                                                                • Now Reduce the flame to medium and Allow the Kheer to further boil for another 20-25 minutes until the vermicelli is fully cooked
                                                                                                                  Add in the Green Cardamom powder at this 
                                                                                                                • Once the Vermicelli is fully cooked, it completely depends upon you, whether u like your Kheer runny or thick. I my kheer a bit thick so I boil it until the milk turns a little thick. Approx a total of 1hour ..But if you like your Kheer a bit runny, you can turn off the flame as soon as the vermicelli is fully cooked
                                                                                                                  Note: You can enjoy your kheer either Cold or Hot. If you like it Cold, you will have to cool the Kheer at room temperature first and then refigerate it.
                                                                                                                  Either way, cold or Hot, I'm sure you're going to Love it! 😋😋
                                                                                                                  Important Notes:- Please ensure that you're stirring the milk at all times Do not leave the milk unattended or else it will get stuck/burnt at the bottom of the vessel and so will the other ingredients.
                                                                                                                  If you're not going to use dry fruits reduce the Sugar content to 250 gms
                                                                                                                  If you like your kheer extremely runny, add all the ingredients(vermicelli, dry fruits, sugar, cardamom powder and ghee) to the milk in the beginning and turn off the flame once the Vermicelli is ready

                                                                                                                If you like my recipe, don’t forget to “like” & “share” it with your friends and family. And once you’ve tried my recipe, request you to kindly share your valuable feedback/suggestions with me. I'd Love to hear from You 🙂

                                                                                                                  No-Cook Recipe for Eggless Marzipan Easter Eggs with Eggless Decorative Icing

                                                                                                                  No-Cook Recipe for Eggless Marzipan Easter Eggs with Eggless Decorative Icing

                                                                                                                  No-Cook Recipe for Eggless Marzipan Easter Eggs with Eggless Decorative Icing

                                                                                                                  So This is the first time I’ve tried my hand at Egg-Free Marzipan Easter Eggs and Egg-free Decorative Icing! The best part is that this is so simple and there’s absolutely no difference in taste from the usual Marzipan with Eggs! 
                                                                                                                  So everyone’s wondering why did I try making Egg-free Easter Eggs! So just recently, a relative of mine, Kelly Gracias asked me if I had a recipe for Marzipan without egg because she wishes to go Vegetarian! So I put on my thinking hat, turned to YouTube and browsed through several recipes but nothing quite convinced me! So I gathered all what I saw and started my trials! And finally got what I wanted! The perfect taste and texture. 
                                                                                                                  So thanks to Kelly’s request, I got to learn and try something different! Yayyy! 
                                                                                                                  This recipe is for all those who, like Kelly wish to go Vegetarian or for those who do not like or are allergic to eggs!
                                                                                                                  Course Festive Sweets
                                                                                                                  Cuisine Goan
                                                                                                                  Keyword Eggless, eggless marzipan, Marzipan
                                                                                                                  Prep Time 20 minutes
                                                                                                                  Servings 150 Gms

                                                                                                                  Ingredients

                                                                                                                  For the Marzipan

                                                                                                                  • 50gm Cashew Nuts
                                                                                                                  • 80 Gms Granulated white Sugar
                                                                                                                  • 1.5 Tspn Liquid glucose
                                                                                                                  • 2 Drops Vanilla essence
                                                                                                                  • 1 Tspn Rose water
                                                                                                                  • Food Colour (of your choice)

                                                                                                                  Ingredients for the Decorative Icing

                                                                                                                  • 2 Tbspn Icing sugar
                                                                                                                  • 2 Drops Fresh Lemon juice
                                                                                                                  • 1/4 Tspn Liquid glucose (or corn syrup)
                                                                                                                  • Food Colour (of your choice)
                                                                                                                  • 4-5 Drops Water (for mixing)

                                                                                                                  Instructions

                                                                                                                  Follow these steps to make the Marzipan

                                                                                                                  • First Make the Cashew powder in a dry small mixer grinder
                                                                                                                    Note:- Use the start and stop method i.e. start the mixer and rotate for 3 seconds on the lowest speed and turn it off. Continue this process until the cashews turn into a fine powder. Remember if the mixer is on continuously, the cashews will turn into a paste and leave oil. What we require is a powder not paste. So the only trick to avoid the cashews turning into a paste is to use the start and stop method
                                                                                                                  • Transfer the cashew powder into a sift and sift the powder into a bowl. You can discard the grains that remain in the sift
                                                                                                                  • The cashew powder will look like this
                                                                                                                  • Now in the same mixer jar, add the granulated white sugar and make a fine powder 
                                                                                                                    Note:- the start and stop method is not required here
                                                                                                                  • Transfer the sugar powder into the same bowl as that of the cashew powder 
                                                                                                                  • Gently mix the sugar powder and Cashew Powder 
                                                                                                                  • Now add in the wet ingredients i.e.  1.5tspn liquid glucose, food colour of your choice and vanilla essence
                                                                                                                    Note:- here I haven’t added any colour
                                                                                                                  • Gently mix it all and add 1/4 tspn rose water and start kneading 
                                                                                                                    Note:- if you add all the rose water at once, there is a possiblity that the marzipan dough will not form. It will be sticky and not firm. So please add the rose water little by little. At first it may feel like the dough is all crumbly and not coming together, and you may think you require lots more rose water, but NO,  as you knead it slowly, it will come together. 
                                                                                                                  • Gently knead all the ingredients to form a dough
                                                                                                                    Note:- Do not knead it too hard or with too much pressure as we do not want any oils to be released from the Cashews which then may not give a very pleasant taste to your marzipan .. 
                                                                                                                  • Mould the dough using Aluminium, Acrylic, Silicon or Plastic moulds which are easily available in the market. 
                                                                                                                  • After moulding, place them on a Kitchen Paper Napkin for a day or two to harden and dry up from the outside 
                                                                                                                    Note:- do not place it on normal tissue paper as tissue tends to stick to the marzipan. Also do not place the marzipan on parchment paper, they will not get dried

                                                                                                                  Follow these steps to make the icing and decorate the eggs

                                                                                                                  • In a small bowl, add the icing sugar, 2 drops of lemon juice, colour of your choice and the liquid glucose
                                                                                                                    Note:- the lemon juice serves as a preservative
                                                                                                                  • Mix it all together and then add 1 drop of water and mix if more water is required, add it drop by drop and Everytime you add a drop of water, mix and check the consistency of the icing
                                                                                                                    Note:- The consistency should not be free flowing and runny. When you lift it with a finger it should hold on to your finger first and then fall from your finger
                                                                                                                  • Take a small quarter sized plastic food packing bag and put your decorating icing into one corner of the plastic
                                                                                                                    Note:- if it is a big quantity you can use piping bags as well. But since these are small quantities, piping bags become extremely challenging to use. 
                                                                                                                  • With the help of a spoon or your fingers, gently push the icing to the extreme corner of the plastic
                                                                                                                  • Bring all the top ends of the plastic together and tightly tie it either with a rubber band or a clip lock.
                                                                                                                  • Cut the extra plastic on the corner so it becomes easier to decorate. Poke a safety pin or a toothpick in the centre corner and you can start piping and decorating your Easter eggs
                                                                                                                    Note:- Always use a new pin. Please sterilise the safety pin and keep aside. For sterilising the pin, In a bowl of hot boiling water, place the safety pin for at least 10 minutes. Take it out, wipe it dry with a clean cloth or tissue and then use the pin 
                                                                                                                    I prefer using a safety pin to a toothpick because the piping whole of a pin is finer than that of a toothpick and the decoration on the Easter eggs look neater. But that completely depends on your preference 
                                                                                                                  • Start by first decorating the joints of the egg to cover the line
                                                                                                                  • After piping the joints, keep the egg to dry for about 30 minutes, the icing will turn hard. Then you can decorate the egg as per your preference
                                                                                                                  • Once the egg is decorated, keep it out for the icing to dry and harden and then you can pack them as you like! 
                                                                                                                  • The Shelf Life is around 15-20 days during Winter, at room temperature and found 7-10 days during Summer at room temperature. 
                                                                                                                    Note:- please do not place the marzipan into the refrigerator. Cashew marzipans, when placed in the refrigerator, tend to get mildewed. 

                                                                                                                  If you like my recipe, don’t forget to “like” & “share” it with your friends and family. And once you’ve tried my recipe, request you to kindly share your valuable feedback/suggestions with me. I’d Love to hear from You 🙂

                                                                                                                    Recipe for Ambot Tik Masala

                                                                                                                    Recipe for Ambot Tik Masala

                                                                                                                    Recipe for Ambot Tik Masala

                                                                                                                    Hot and Fiery Ambot Tik! 
                                                                                                                    Ambot is the Konkani word for Sour and Tik means Spicy. In our family, we enjoy our Ambot Tik Hot, Spicy and Tangy to an extent where our tongues are out and eyes are teary For us, the fun lies in that. I've always made Ambot tik using either Shark(Mori), Kite fish, Cat Fish, Prawns or Squids.
                                                                                                                    This Masala Paste recipe can be used for 1 kg Fish, Prawns or Squids.
                                                                                                                    I've shared a recipe link for Ambot Tik, below
                                                                                                                    Cuisine Goan
                                                                                                                    Keyword Ambot Tik Masala, Fish Curry Masala, Goan Curry

                                                                                                                    Ingredients

                                                                                                                    • 24 KashmiriChillies(roughly hand broken)
                                                                                                                    • 1 Tbspn Cumin seeds
                                                                                                                    • 1 Tspn Pepper Corns
                                                                                                                    • 1 Tspn CorianderSeeds(Optional. The Traditional Ambot tik recipe doesn't call for Corianderseeds)
                                                                                                                    • 1.5 Tspn Sugar
                                                                                                                    • 2.5 Tbspn Vinegar
                                                                                                                    • 15-20 Medium clovesof Garlic(roughly cut)
                                                                                                                    • 1/2 Tomato Roughly cut
                                                                                                                    • 1/2 Onion Roughly cut
                                                                                                                    • 2 Tbspn Water 

                                                                                                                    Instructions

                                                                                                                    • Transfer all the ingredients into a small(dry) mixer jar
                                                                                                                    • Using water little by little, Grind all the ingredients into a smoothfine paste
                                                                                                                      Note: If you add all the water at once, the spices won’t break downcompletely and the Masala will remain coarse.
                                                                                                                    • Once the Masala is ready, you can use it immediately
                                                                                                                      If you wish to store it, transfer the Masala into a dry Airtightcontainer and wait until it completely cools and comes to room temperature andonly then put the lid on
                                                                                                                      Place the container into the Deep Freezer and you can store it forMaximum 1 month. You can store it longer since this Masala doesn’t containCoconut

                                                                                                                    If you like my recipe, don’t forget to “like” &“share” it with your friends and family. And once you’ve tried my recipe, request you to kindly share your valuable feedback with me. I'd Love to hear from You 🙂