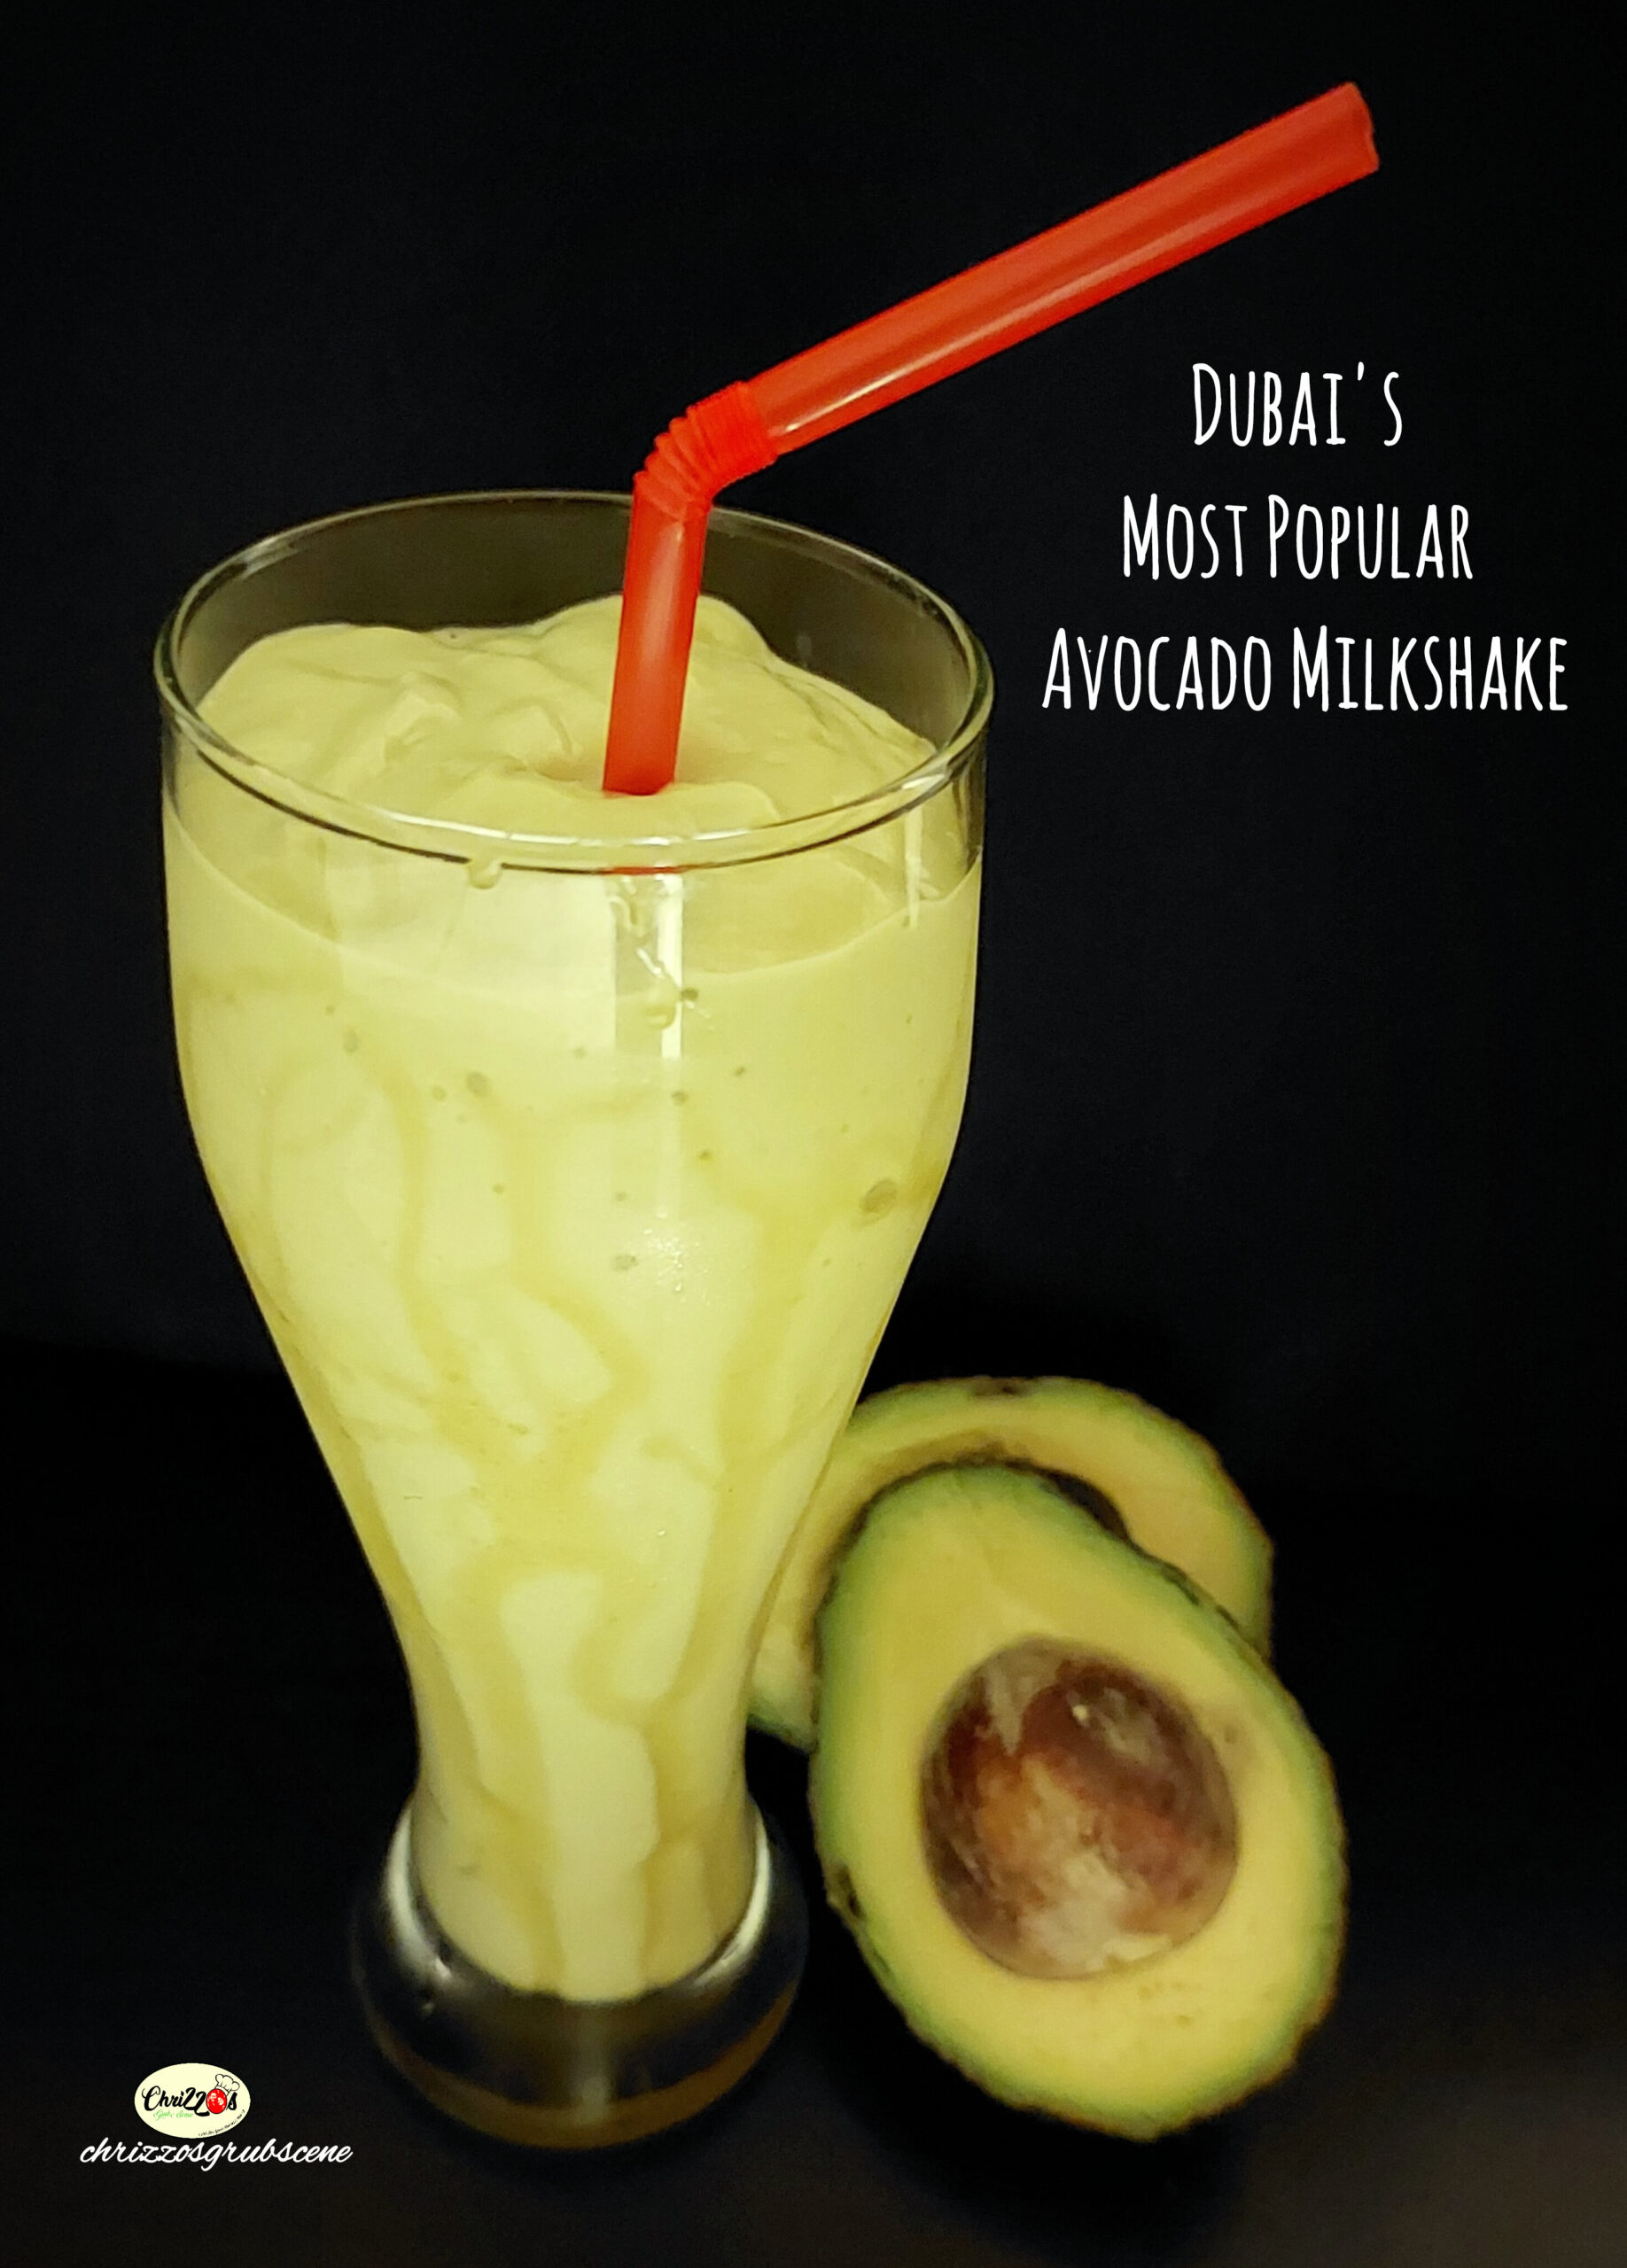
Recent Posts

Recipe for The Tender Tiranga Pudding

Recipe for The Tender Tiranga Pudding

  This recipe is inspired by the Indian National Flag – The Tiranga, on the occasion of the Indian Independence Day which is celebrated on15th August.This Day also happens to be the Feast of the Assumption of Mother Mary into Heaven. This feast is celebrated…

Recipe for Cheesy Corn Aloo Tikki

Recipe for Cheesy Corn Aloo Tikki

I was first heard of Corn Cheese Aloo Tikki when my accountsProfessor in Management college Professor Natika asked me if I could make thesefor a college event. I was so lost and said I don’t know how to make these butI can always ask my…

Recipe for CAB Cutlets(Corn Aloo Beetroot)

Recipe for CAB Cutlets(Corn Aloo Beetroot)


Recipe for CAB Cutlets(Corn Aloo Beetroot)

So, very recently, some of our friends here in Dubai decided to catch up at my place since my Mum n Dad had come from India to be with us for a bit. Usually at my place, you’ll find a Non veg spread and the ONLY veg dish will be a salad hahahaha
However, this time, since it was the month of Lent and one of our friends was observing a Full Vegetarian Lent, I decided to make a Vegetraian fare so that he doesn’t tempted if we all eat Non-veg in front of him. I am not very confident to prepare Vegetarian dishes but I love to try them out every once in a while.
I tried my hand at some Corn Aloo Beetroot (with cheese)Cutlets as a starter and the Luck Gods were with me that night!!! They turned DELISH! My friends asked for the recipe as soon as they bit into them and I was soooooo happy!
Here’s my recipe.
Course Appetizer, Snack
Cuisine Indian
Keyword Beetroot Cutlets, Beetroot Potato Corn cutlets, Corn cutlets, Cutlets, Tikkis, Veg Cutlets

Ingredients

For the Cutlet mixture

  • 2 Corn Cobs(approx. 350 gms) (Boiled till soft and kernels separated)
  • 2 Large Potatoes Potato(Peeled, Boiled and Mashed)
  • 2 Medium Sized Beetroot(Boiled, Peeled and Pureèd in a mixer)
  • 1 Tspn Cumin seeds
  • 1.5 Tspn Ginger Garlic Paste
  • ½ Amchur Powder(or Lemon juice)
  • 2 Tspn Garam Masala Powder(I’ve used Everest here)
  • 7-8 sprigs Fresh Coriander with stem – chopped fine
  • 2 Green Chillies – chopped fine
  • 1 Tbspn Corn Flour(This keeps the cutlet firm and tightwhile frying)
  • 1 Onion – Chopped fine
  • 2 Slices of Bread – Make a powder in the mixer(This binds the cutlet together and saves the cutlets from breaking. This is a substitute of Egg. You can also use this in your nonvegetarian cutlets incase you are allergic to or do not like the smell of eggs)

Additional Ingredients

  • Oil for frying
  • Cheddar block Cheese for stuffing - optional (cut into 1 inch cubes)

Instructions

  • In a bowl, add all the ingredients mentioned under the cutlet mix section
  • Mix all this well
  • Now take small portions of the mixture and form them into balls and gently flatten each ball to form discs
    Incase you're using cheese, gently make dents into each disc and place the cheese cube in the centre and cover
    Note: Ensure the cheese is cold. When room temperature cheese is used in any stuffing, when it touches the hot pan, it tends to melt faster and the cheese begins to ooze out. Hence, it’s always advisable to use cold cheese so that by the time the cutlets is fried on both sides the cold cheese will take time to start melting
    Note: while shaping the discs, grease your palms with oil each time so that the cutlet mix doesn't get stuck on your palms
    P.S. This picture is for reference of the technique since I forgot to take a pic of this step
  • In a frying Pan, heat Oil on medium heat and transfer the cutlets into the pan
    Flatten the cutlets into discs and keep them on a tray or plate. Tuck the plate/tray into the fridge for about 30 minutes
    Note: same logic as above. Better to fry when cold since we have stuffed cheese. However, If you’re not using cheese and wish to make it like tikkis/cutlets, you can do that too. In that case, you can skip this step
  • Fry the cutlets on each side till the cutlets get a slight golden crispy crust. Ensure the heat isn’t too hot or else the cutlets will turn dark
    Once done Transfer the fried cutlets on a plate with Kitchen napkins to drain off the excess oil
    Note: I fried it for exactly 4 minutes on each side. Do not forget that there is cheese stuffed inside the cutlets. So do not keep it into the pan for too long or else the cheese will begin to ooze out of the cutlets.
  • Enjoy these delicate super delicious Cheesy CAB cutlets with your family, especially if there are kids around, they’ll be excited with the vibrant Red and Yellow colours from the Beetroot and Corn.

If you like my recipe, don’t forget to “like” & “share” it with your friends and family. And once you’ve tried my recipe, request you to kindly share your valuable feedback with me. I'd Love to hear from You 🙂

    Recipe for “KAISA DIYA” (Quesadilla)

    Recipe for “KAISA DIYA” (Quesadilla)

      After months of waiting, My sweet friend Linda and I finally decided to go out for Coffee.We did a recipe shoot for The Family Kitchen Season 2 on COLORS TV here in the UAE and after we finished, we decided to celebrate that joy.We…

    Recipe for Goan Egg Drop Curry

    Recipe for Goan Egg Drop Curry

      Egg Curry is one of the easiest curries to make especially when I'm running late or my creative cells and thinking power go for a mighty toss and I just cannot understand what to cook. My fridge always has stock of eggs at any…

    Recipe for Hurry Burry Mushrooms

    Recipe for Hurry Burry Mushrooms

    Recipe for Hurry Burry Mushrooms

    This recipe was tried as a fluke since I had some leftovers!I paired it with Pan Grilled Garlic Pepper Chicken and Stir Fry! Oooooh Yummmm!
    And now this is my Go-to dish whenever I have sudden guestsat my door. It is so quick and hassle free and serves as a great starter.
    Try it out at for your upcoming home party! The Mushroomfans will love it! My Mum n Dad did 😊
    Course Appetizer, Starter
    Keyword Garlicky Mushroom, Mushroom, Mushroom garlic, Mushrooms in a Hurry

    Ingredients

    • 250 gms Button Mushrooms(washed and cut into half orquarters)
    • 2 Tspn Butter (Ensure the Butter is cold and hard)
    • 1 Tspn Olive Oil
    • 4 cloves of Garlic chopped fine
    • ½ Tspn Some crushed pepper
    • 1 Tspn Dried Oregano
    • ½ Tspn Salt or as per taste
    • 1/2 Tspn Chilly flakes
    • 1/2 Tspn Sesame seeds (for garnish)
    • 3-4 sprigs fresh coriander with stem chopped fine

    Instructions

    • Heat a Pan and Add the Butter and Oil
      Note: Whenever we use Butter,  we heat the Pan first and then add the Butter or else the Butter burns and turns brown
      Also, when using butter, there has to be Oil to control the smoke point of butter which is very high. So if you use only butter, most of the time you will notice when it gets heated, it turns brown very quickly. So always remember to use a little oil when using butter for any dish, it won’t turn brown
    • Add the chopped the Garlic and turn the heat to high
    • Immediately add the Mushrooms into the Pan and let it cook on high heat for 2 minutes or so
      Some Tips to remember while frying Mushrooms
      (1)  Always cook Mushrooms on High Heat. If cooked on low to medium heat, it will begin to sweat and a lot of moisture will be released
      (2)  Wait for around 2 minutes or so until the Mushrooms get a crispy coat and only then start tossing it or else if it is tossed from the beginning, the pan will begin to lose its heat and the Mushrooms will release its juices
      (3)  Add the Salt only after the Mushrooms are tossed and fried well. Salt has a property of making Food release it’s juices naturally while getting cooked. So, if you add the salt first, the Mushrooms will turn soggy
    • Then start tossing the Mushrooms(or you can also use a spoon/spatula to stir the mushrooms)
      Mushrooms cook quickly so add the Salt, Oregano, Chilly flakes and Crushed Pepper and continue tossing for another 3-4 minutes until the Mushrooms turn dark grey/brown
    • Then add the chopped coriander and toss it for a minute.
      Turn off the Heat, sprinkle some sesame seeds and enjoy these Hurry Burry Mushrooms for Breakfast with Eggs or for Dinner with some stir fry Veggies and a Protein of your choice or as I mentioned above, serve it to your guests as a starter!

    If you like my recipe, don’t forget to “like” & “share” it with your friends and family. And once you’ve tried my recipe, request you to kindly share your valuable feedback with me. I'd Love to hear from You 🙂

      Recipe for Seafood Pink Pasta

      Recipe for Seafood Pink Pasta

        Dinner is readyLeftovers really excited me because the end productturns out insane so many ideas running in the head all at the same timeI had eaten a Pink Sauce Pasta many years ago atthis restaurant in Vasai, Bombay called Farmhouse(I hope I got the…

      Recipe for Red Pasta Sauce(Marinara Sauce)

      Recipe for Red Pasta Sauce(Marinara Sauce)

        So at home, there’s always a Pasta team. Some like Red Sauce Pasta, some like White and some like a mix of both. There are some days where the teams change too! So, in my opinion, I guess the preference of sauce depends on…

      Recipe for White Sauce(Bèchamel Sauce)

      Recipe for White Sauce(Bèchamel Sauce)

      Recipe for White Sauce(Bèchamel Sauce)

      So at home, there’s always a Pasta team. Some like Red Pasta, some like White and some like a mix of both. There are some days where the teams change too! So, in my opinion, I guess the preference of saucedepends on the kind of Mood or the kind of Day it probably is. But whenever there is Pasta made at home, there is always 3 types  - Red, White and Pink( A mix of Red and White)
      White sauce Pasta is my Mum’s new found favorite dish. She enjoys making it all parties!
      So, here’s my recipe for the White Sauce
      P.S. The Actual name for what we call Red Sauce is "Marinara Sauce" and White sauce is "Bèchamel sauce".
      Bèchamel is also known as the Mother Sauce as many other sauces and dips are made using this as the base.
      Cuisine Italian
      Keyword Bèchamel, Pasta, Pasta Sauce, White Pasta, White Sauce, White Sauce Pasta
      Prep Time 30 minutes

      Ingredients

      • 500 ml milk
      • 2 tbspn All purpose Flour
      • 1 Tsbpn Butter
      • 1 Tbpn Oil
      • 1 Onion – chopped fine
      • 6-8 cloves of Garlic – chopped fine
      • 1 Tspn Crushed Black Pepper or ½ Tspn Pepper Powder
      • 1 Tspn Dried Oergano
      • 2 slices of cheese or you can use 2 Tbspn Cheese spread or grated Cheddar Cheese
      • ½ Tspn Salt
      • 1/2 Tspn dried Basil(optional)
      • 1/2 Tspn dried Parsley(optional)

      Instructions

      • In a skillet, heat the Oil and Butter
        Note: Whenever you heat Butter, always ensure there you add some oil because the smoking point of Butter is very high so to maintain it’s heat it requires oil or else the butter will turn black.
        Also, always ensure the butter is cold hard and not at room temperature. Room temperature of softened butter gets burnt faster
      • Once the Oil and Butter turn Hot, add the chopped Garlic saute for a minute
      • Then add the All Purpose Flour little by little and with the help of a whisk, continuously, but gently, keep whisking
        Note: When the butter mixes with the flour, it creates a smooth paste and this avoids lumps
      • When you mix the flour with the butter, it will look like this
      • Then add in the Milk little by little and gently whisk the milk so that no lumps are formed
        Note: If you add all the milk together, there could be lumps that may form. To avoid this happening, add the milk little by little. Also, using a whisk is important when using all purpose flour in any dish as APF has a tendency to clump up easily when mixed with a liquid. The whisk serves as a tool to smoothen the lumps
        Note: you can also make a slury (mixture) of cold or room temperature milk and All purpose flour and mix it into the boiling milk. This can avoid lumps too
      • Now add the dried spices and whisk it well
      • Once the sauce begins to boil, add the cheese. Here I have used cheddar cheese. You can use Parmesan, Cream cheese, Slice Cheese or even Cheese spread. Choice is yours
      • Once the sauce turns smooth and begins to thicken, lower the heat and allow this to boil for about 7-10 minutes and turn off the heat. While the sauce is boiling, keep stirring it. Your white sauce is ready!!!
        Note: The more you boil white sauce the more it will thicken and when  it turns completely cool, it will clump up and we don’t want a clumpy texture when we mix the pasta into the sauce. The sauce should be smooth and thick but runny.
        Note: If we leave the sauce to boil on high heat, there could be a high possibility of it curdling as there is garlic in it which is acidic. Also, continuously stirring the sauce and lowering the heat will avoid any spilage, since the base ingredient is milk
      • This is how the sauce will thicken once it turns cold.
        Note: If the sauce thickens too much, you can always add milk and boil it on low heat. If the Sauce remains too runny, make a slury of 1 Tspn All Purpose Flour and 1/2 Cup Room temperature or cold Milk(ensure no lumps). Boil the Sauce and as it comes to a boil, pour this slury into the sauce little by little

      If you like my recipe, don’t forget to “like” & “share” it with your friends and family. And once you’ve tried my recipe, request you to kindly share your valuable feedback with me. I'd Love to hear from You 🙂

        Notes

        Recipe for Pink Pasta

        Recipe for Sweet Corn Salad

        Recipe for Sweet Corn Salad

        Roasted Sweet Corn Cob or in Mumbai as we call it “Butta” with some salt and Red chilly powder and a squeeze of Lemon is a Monsoon favorite for most Mumbaikars. Another favourite is Hot boiled Sweet Corn with Butter and Lemon….ooohhhh sooo delish!I’m a…